Your garbage disposal just stopped working, and now you’re staring into the sink wondering what went wrong. Maybe it’s humming but not spinning, maybe it won’t turn on at all, or maybe something’s jammed in there that shouldn’t be. The good news: learning how to fix a garbage disposal is one of those rare plumbing tasks that most homeowners can handle without calling in backup. A few basic tools, a little know-how, and about 15 minutes are usually all it takes.
That said, not every disposal problem is a quick DIY job. Some issues point to electrical faults, worn-out motors, or deeper drain problems that need a professional’s hands. At Bizzy B Plumbing, we handle garbage disposal repairs and replacements across Knoxville and the surrounding East Tennessee area every week, so we know exactly where the line falls between “fix it yourself” and “call a plumber.”
This guide walks you through the most common garbage disposal problems, what’s causing them, and how to fix each one step by step. We’ll also cover when it makes more sense to replace the unit entirely, and when it’s time to skip the DIY route and get professional help before a small issue turns into a bigger one.
Before you start: safety checks and tools
Before you touch anything inside your disposal, take two minutes to do this right. Garbage disposals run on electricity and contain sharp grinding components, so skipping the safety steps isn’t worth it. Whether you’re learning how to fix a garbage disposal for the first time or you’ve done it before, these checks apply every single time, no exceptions.
Cut the power first
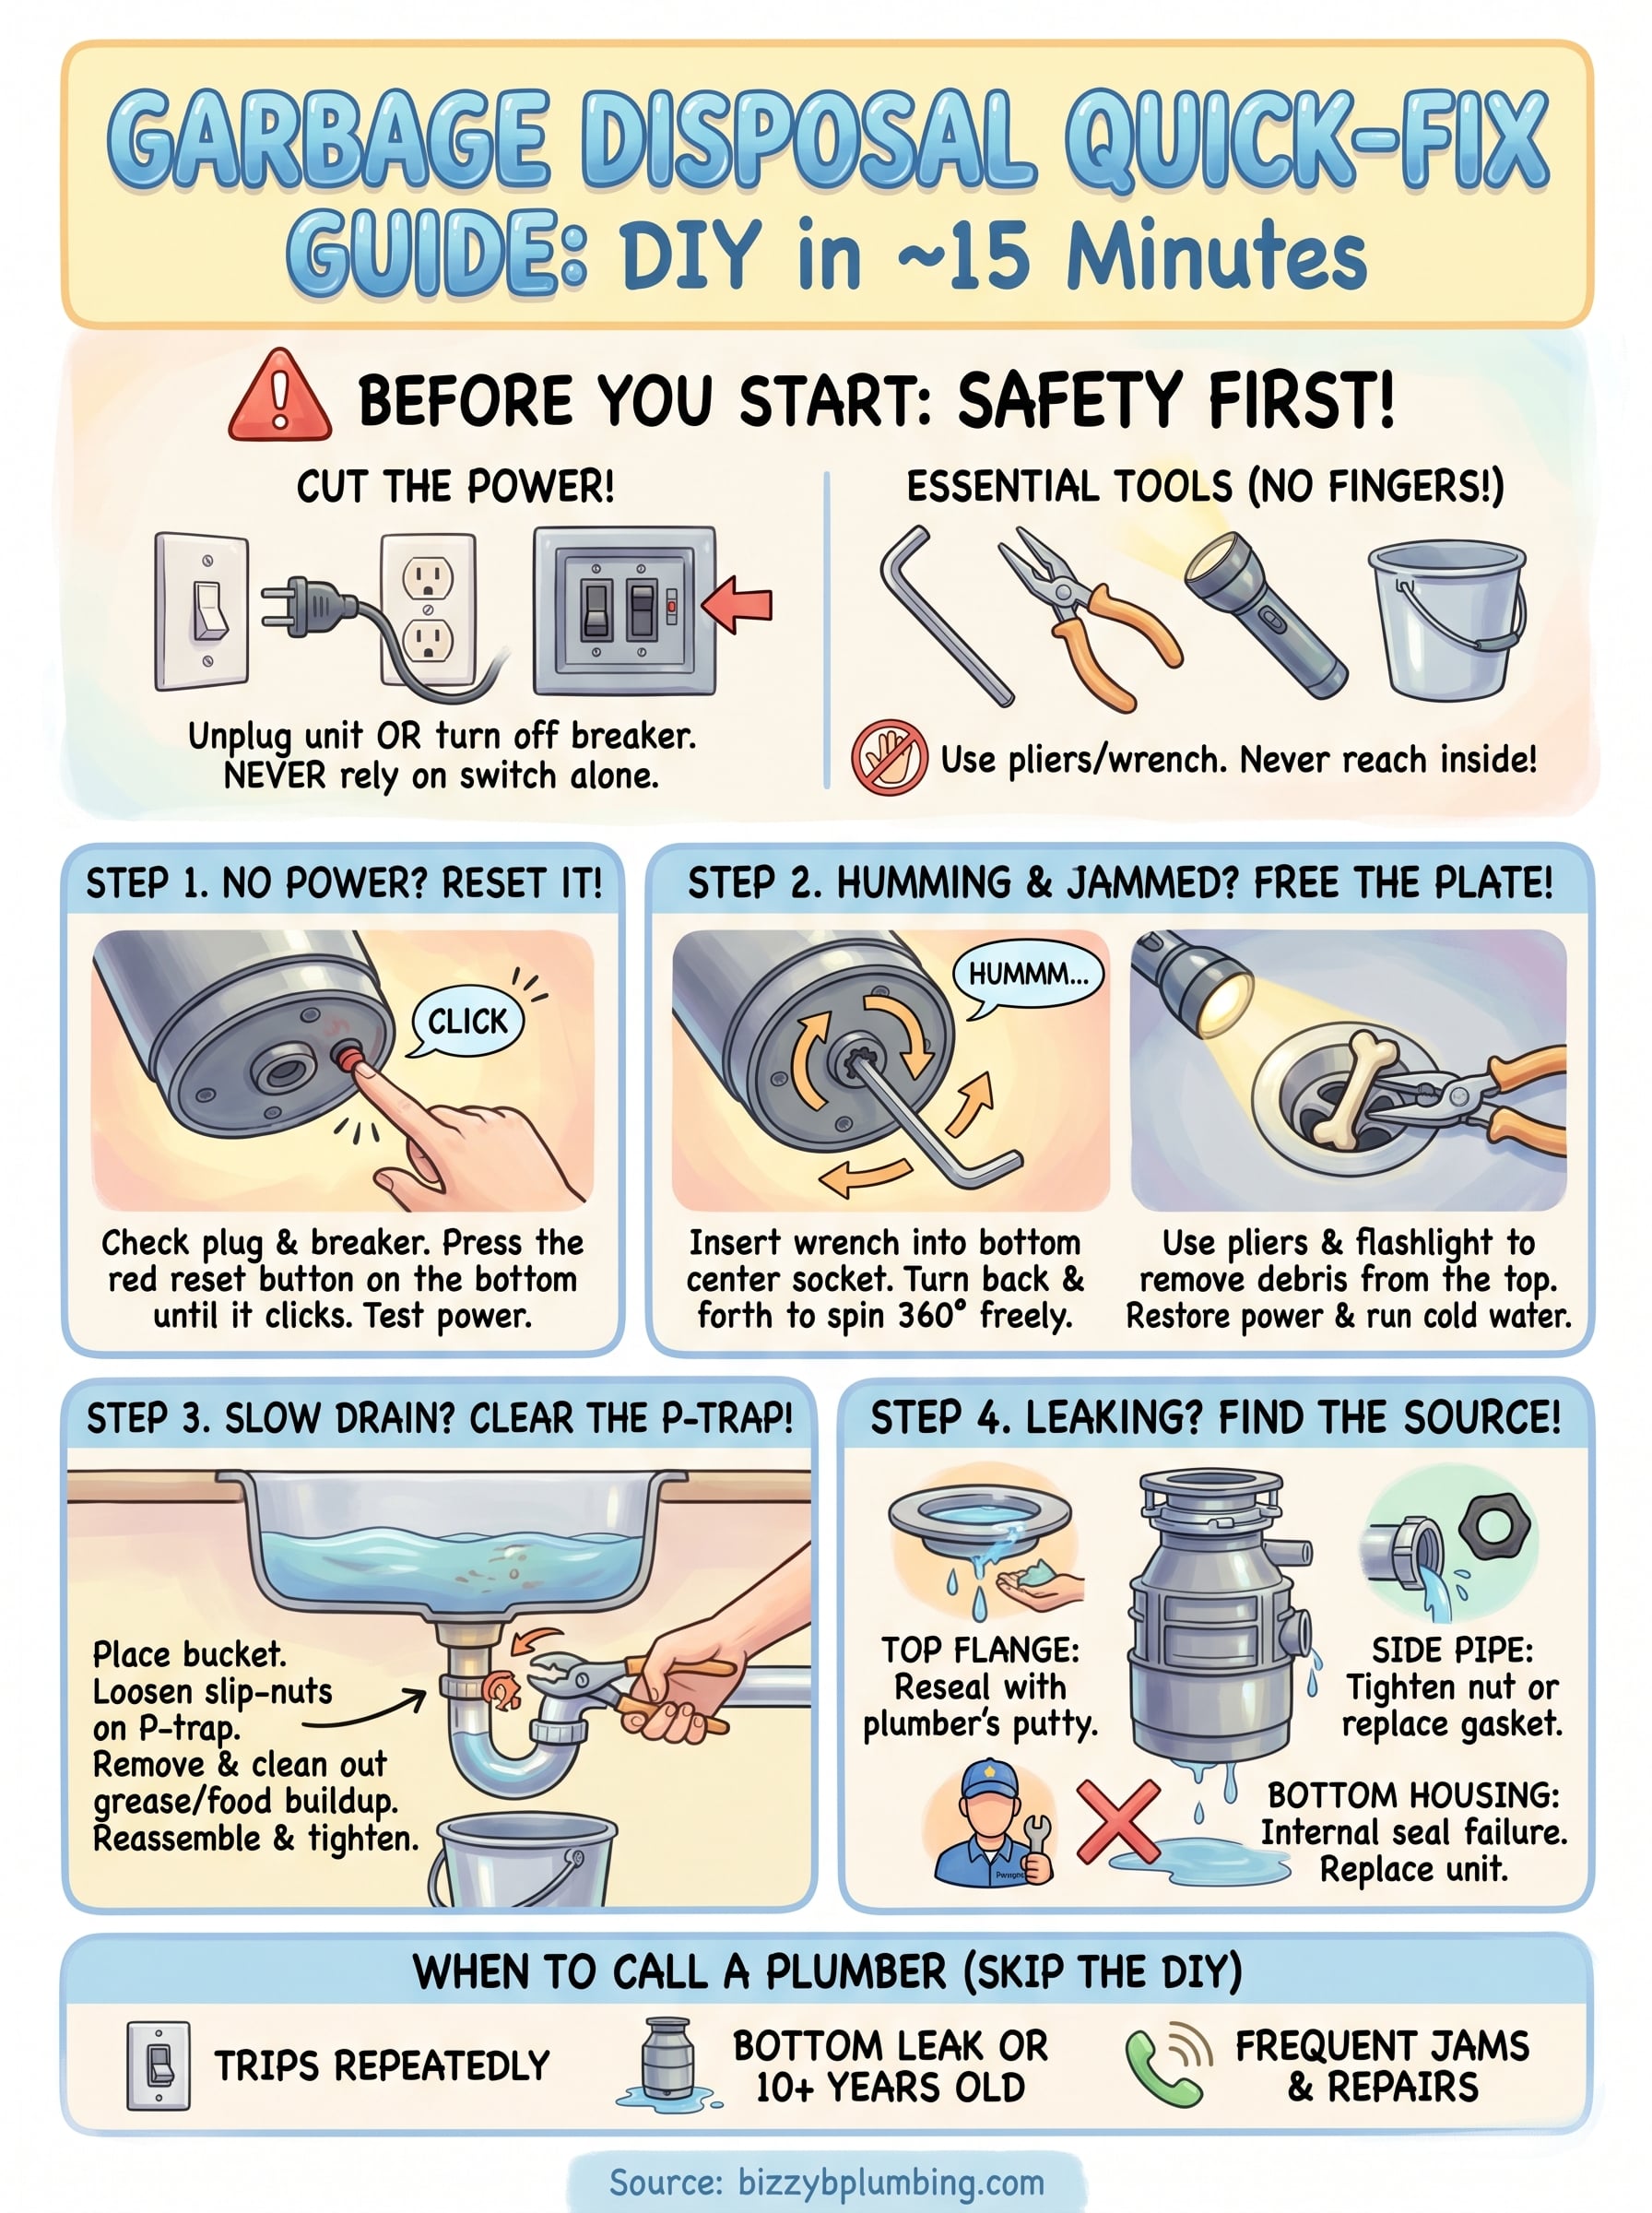
The single most important step is making sure no power reaches the disposal before your hands go anywhere near it. Start by flipping the wall switch to the off position. Then go one step further: locate the disposal’s power cord under the sink and unplug it from the outlet. If your unit is hardwired, go to your electrical panel and flip the circuit breaker that controls the kitchen or disposal circuit.
Never rely on the wall switch alone to confirm the unit is off. Always unplug or cut the breaker before reaching into or under the disposal.
With the power cut, press the reset button on the bottom of the unit once and listen for any hum or movement. If nothing happens, you’ve successfully cut the power. If the unit still reacts in any way, go back to the breaker panel and locate the correct circuit before continuing.
Tools you’ll need
You don’t need a full toolbox to handle most disposal repairs. The right tools make each step faster and safer, and most of what you need is probably already in your home. Gather everything before you start so you’re not hunting for tools mid-repair with water on the floor.
Here’s what to have ready:
| Tool | What it’s for |
|---|---|
| Disposal wrench or 1/4″ Allen wrench | Manually turning the grinding plate to free jams |
| Flashlight or headlamp | Seeing inside the drain chamber |
| Needle-nose pliers | Removing small objects from inside the chamber |
| Bucket and towels | Catching water when you disconnect drain lines |
| Plumber’s putty | Resealing the sink flange if you find a leak |
| Slip-joint pliers | Tightening or loosening drain connections |
Most disposals ship with a small Allen wrench included in the box. Check the bottom of the unit near the reset button for a socket port where this wrench fits. If you can’t find yours, a standard 1/4-inch Allen wrench from any basic toolkit works just as well.
After your power is confirmed off and your tools are within reach, you’re ready to work through each repair step without stopping halfway through.
Step 1. Confirm power and reset the unit
When your disposal goes completely silent or stops responding to the switch, the fix is often simpler than you think. Many homeowners who search for how to fix a garbage disposal discover the problem was never mechanical at all – it was a tripped circuit or an overloaded motor that just needed a reset. Start here before you disassemble anything.
Check if power is actually reaching the unit
Your disposal plugs into an outlet under the sink, usually behind the cabinet wall or along the back panel. Reach under and confirm the plug is fully seated in the outlet – a loose connection can mimic a dead motor completely. If the plug looks fine, check your kitchen circuit at the electrical panel. A tripped breaker sits visibly between the “on” and “off” positions, not all the way in either direction. Flip it fully off, then back on to reset it.
If you reset the breaker and it trips again immediately, stop and call an electrician – this is not a disposal problem.
Press the reset button
Once you’ve confirmed the power supply is solid, look at the bottom of the disposal unit itself for a small red or black button. This is the thermal overload reset button. The motor trips this button automatically when it overheats or gets overloaded, usually from jamming. If the button is popped out, press it firmly until you feel a click, then restore power at the wall switch and test the unit.
If the disposal hums for a second and shuts off again right after the reset, the motor is overloaded for a separate reason, and you’ll need to move on to Step 2 to free the jam. If the unit still does nothing after a confirmed reset, check the outlet itself by plugging in another small appliance to rule out a dead outlet before going further.
Step 2. Free a jam and stop the humming
A humming disposal that won’t spin tells you one thing clearly: the motor is receiving power but the grinding plate is stuck. Something is wedged between the plate and the housing wall, and the motor can’t turn it. Left running, a jammed disposal will overheat and trip the reset button again within seconds. Cut the power at the wall switch immediately before moving to the steps below.
Never reach into the disposal chamber with your fingers, even with the power off. Always use pliers or the wrench.
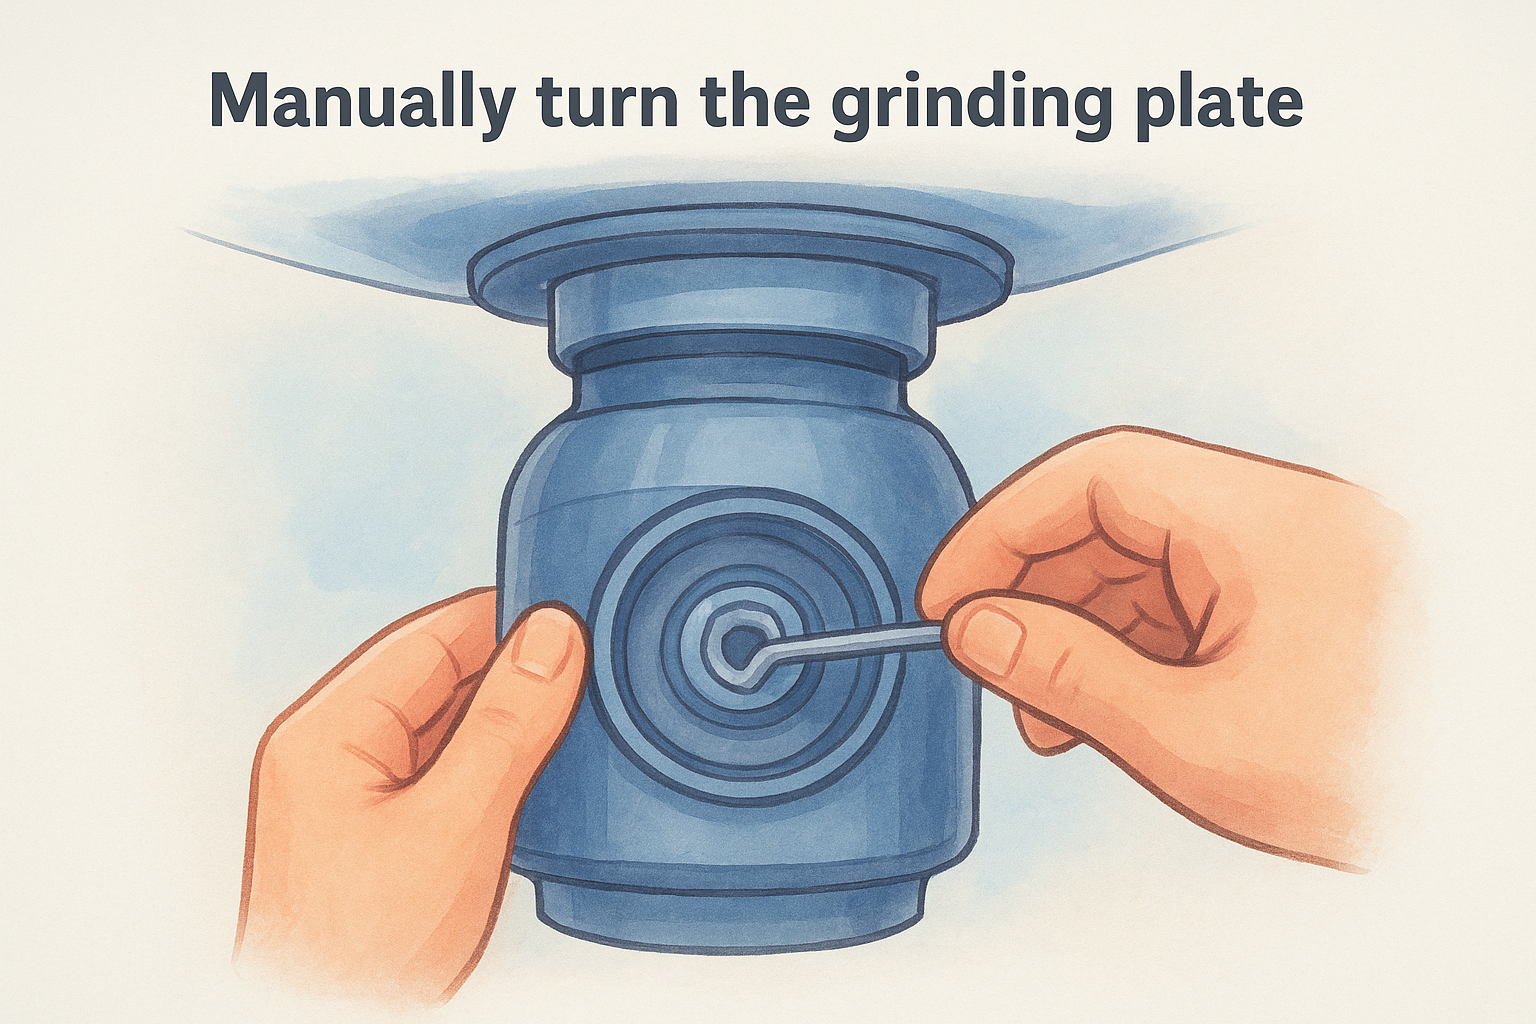
Manually turn the grinding plate
Flip the unit off and look at the center socket on the very bottom of the disposal. That port accepts a 1/4-inch Allen wrench, and this is how you fix a garbage disposal jam without taking anything apart. Insert the wrench and work it back and forth in both directions. You’ll feel resistance at first, then the plate will begin to loosen as the jammed material breaks free. Keep working the wrench until the plate rotates a full 360 degrees without catching on anything.
If you don’t have an Allen wrench, some disposals include a wooden broom handle method as an alternative: insert the handle down through the drain opening and use it to push against the impeller blades manually. Check your disposal’s model documentation for which approach the manufacturer recommends before you try this option.
Clear the chamber before restarting
With the plate moving freely, shine a flashlight down into the drain opening and look for the object that caused the jam. Bone fragments, bottle caps, and fruit pits are the most common culprits. Use needle-nose pliers to grip and pull out any visible debris completely before restoring power. Once the chamber is clear, press the reset button on the bottom, restore power, and run cold water while you test the unit.
Step 3. Fix slow drains and clear clogs
A disposal that runs fine but drains slowly points to a clog in the drain line, not a motor problem. This is one of the most common issues homeowners run into when figuring out how to fix a garbage disposal, and it’s usually straightforward to clear without removing the unit.
Never pour chemical drain cleaners into a garbage disposal – they can corrode the internal components and damage the drain seals over time.
Identify where the clog is sitting
Before you start clearing anything, narrow down where the blockage actually is. Run water into the sink with the disposal off. If the water backs up immediately and fills the basin, the clog is likely sitting in the trap or the discharge pipe directly below the unit. If the water drains slowly but eventually clears, the blockage is further down the line.
Check the discharge pipe connection on the side of the disposal unit where it meets the P-trap. Grease buildup and packed food particles in this short section of pipe are the most frequent cause of slow drains tied to disposal units, and clearing this area resolves the problem in most cases.
Clear the drain line step by step
With the power off and a bucket positioned under the P-trap, work through these steps in order to clear the blockage completely:
- Loosen the slip-joint nuts on both ends of the P-trap using slip-joint pliers, then pull the trap free.
- Empty the trap into the bucket and inspect it for packed debris like grease or food waste.
- Use a sink auger to push through any blockage in the pipe section beyond the trap.
- Reassemble the trap and hand-tighten the slip-joint nuts first before snugging them with pliers.
- Run cold water for 30 seconds to confirm the drain is fully clear before restoring power.
Step 4. Find and fix common disposal leaks
Disposal leaks are sneaky. Water tends to pool under the sink cabinet and soak into the base before you notice anything, which makes it harder to pinpoint exactly where the leak originates. Before you do anything else, dry the entire area under the sink completely, then run the disposal with water for 30 seconds and watch closely. Identifying the exact source saves you from replacing parts that aren’t actually failing.
Leaks at the sink flange are the most common disposal leak location and often look like they’re coming from the disposal body when the actual seal failure is at the very top.
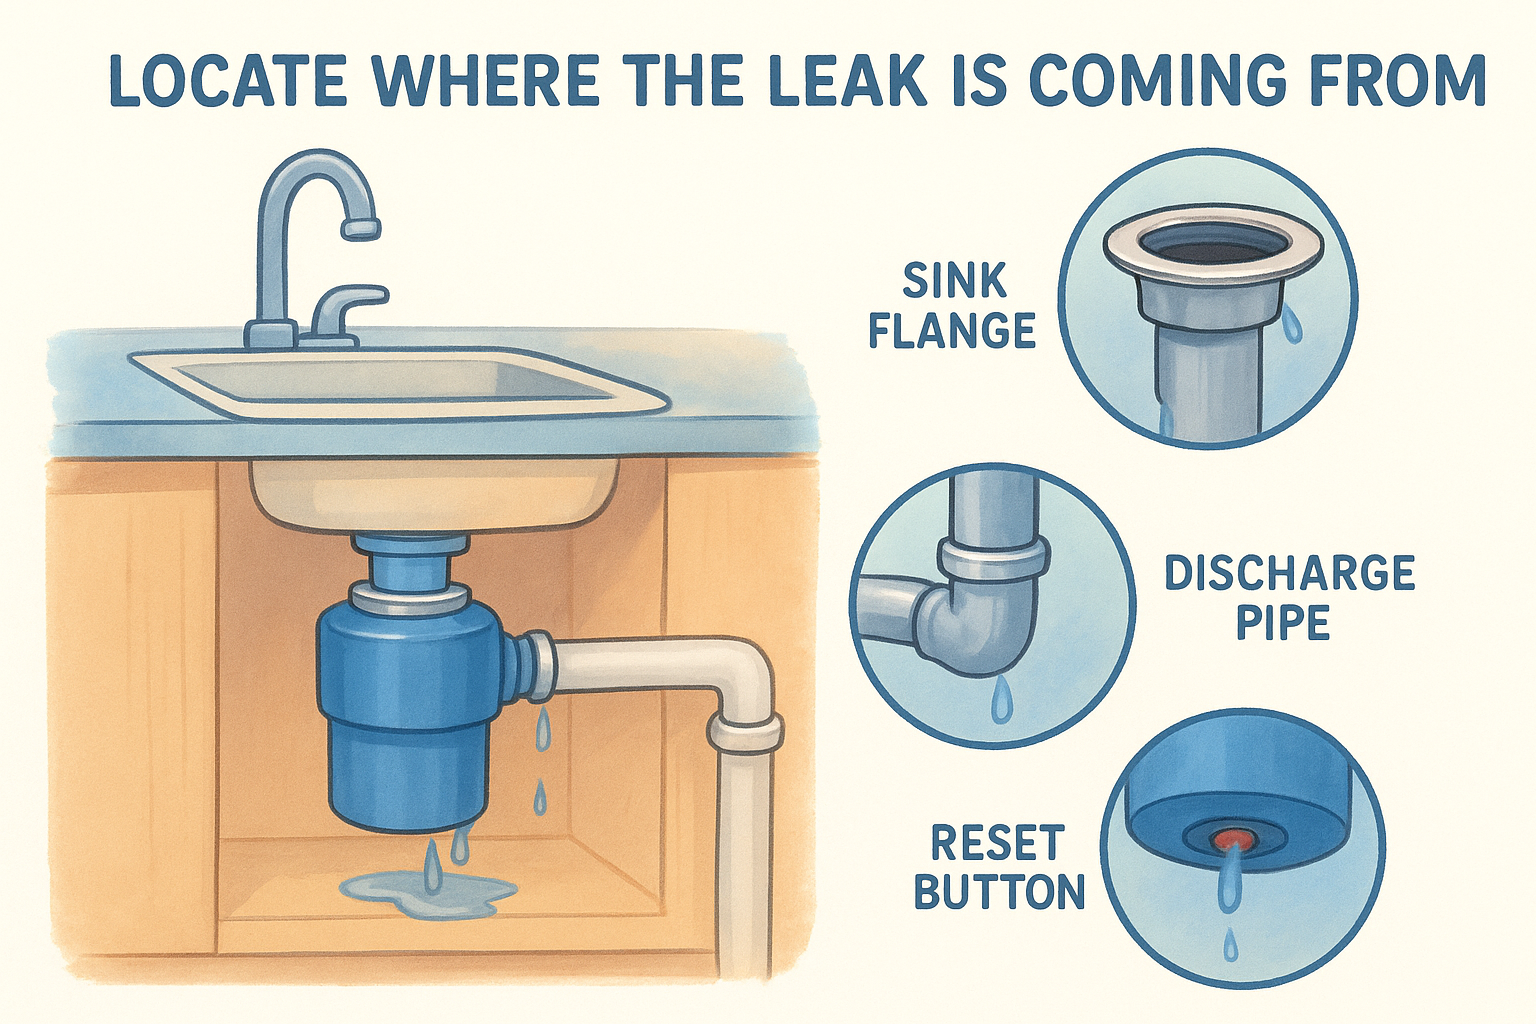
Locate where the leak is coming from
Three spots account for the majority of garbage disposal leaks: the sink flange at the top where the unit connects to the drain opening, the discharge pipe on the side where water exits toward the P-trap, and the reset button area at the bottom of the unit. Each location points to a different cause and requires a different fix, so getting the location right is the first step in how to fix a garbage disposal leak correctly.
| Leak Location | Likely Cause | Fix |
|---|---|---|
| Sink flange (top) | Failed putty seal | Remove unit, reapply plumber’s putty, reseat flange |
| Discharge pipe (side) | Loose connection or worn gasket | Tighten slip-joint nut or replace the rubber gasket |
| Reset button area (bottom) | Internal seal failure | Replace the disposal unit |
Repair the leak at its source
For a flange leak, loosen the mounting assembly, drop the disposal down from the sink, scrape away the old putty, and press a fresh rope of plumber’s putty around the flange before reseating it. For a discharge pipe leak, remove the pipe, inspect the rubber gasket inside the connection, replace it if it looks cracked or compressed flat, and retighten the connection firmly.
A leak at the reset button area means the internal seals inside the motor housing have failed. No external repair will hold reliably at that point, and replacing the entire unit is the only practical fix.
When to call a plumber
Most of what this guide covers on how to fix a garbage disposal falls well within DIY territory. But some situations call for a professional, and recognizing them early saves you from turning a minor repair into a costly replacement. Call a plumber if your breaker trips repeatedly after resetting, if you notice a leak coming from the bottom of the unit near the motor housing, or if the disposal hums and jams again within days of you clearing it. These patterns point to worn-out internal components or electrical issues that no amount of manual turning or resetting will fix permanently.
Replacing a disposal unit entirely is also worth the call when the unit is more than 10 years old and repairs keep coming up. A plumber can swap in a new unit in under an hour and make sure it’s wired and sealed correctly from the start. If you’re in the Knoxville area and need fast, honest help, contact Bizzy B Plumbing for same-day service.