You flip the switch, and nothing happens, or worse, you hear a low hum but your garbage disposal not working the way it should. Either way, you’re stuck with a sink full of food scraps and no clear next step. It’s one of the most common kitchen plumbing issues homeowners in Knoxville and East Tennessee deal with, and it usually hits at the worst possible moment.
The good news? Many garbage disposal problems have simple causes, a jam, a tripped reset button, or a blown circuit, and you can often fix them yourself in a few minutes. This guide walks you through practical troubleshooting steps based on what you’re experiencing, whether that’s silence, humming, leaking, or something else entirely. And if you hit a wall, Bizzy B Plumbing offers same-day service across Knoxville, Alcoa, Maryville, and surrounding areas to get things running again fast.
Let’s start with the basics and figure out what’s going on with your disposal.
Safety first: shut off power and gather tools
Before you touch anything on a garbage disposal not working the way it should, you need to shut the power down completely. A disposal has sharp grinding components and a spinning motor inside a metal housing, and that combination can cause a serious injury in a fraction of a second if the unit activates while your hand is near the drain opening. Taking two minutes on safety now protects you and lets you work through each step with focus rather than risk.
Cut the power before you touch anything
The safest approach is to turn off the wall switch first, then unplug the disposal from the outlet mounted inside the cabinet under your sink. Most units plug into a standard outlet you can reach by hand. If yours is hardwired directly into the wall, go to your electrical panel and flip the dedicated circuit breaker for the disposal or the kitchen circuit. Do not rely on the wall switch alone since switches can fail or get bumped back on without you noticing.
Never put your hand into the disposal drain opening until you have confirmed the power is disconnected at the outlet or the breaker, not just at the switch.
Once the power is off, run the faucet for a few seconds to clear standing water near the drain opening. This gives you a cleaner view of what you are working with and removes any loose food debris sitting close to the surface.
Tools you’ll need before you start
You do not need a full toolbox for most disposal fixes. Gathering the right items before you begin saves you from stopping mid-task and hunting through drawers and cabinets. Here is what to pull together:
- Allen wrench (hex key): Most disposals use a 1/4-inch hex key for the manual crank port at the bottom of the unit. Some disposals ship with one taped to the side.
- Flashlight or headlamp: The cabinet under the sink is dark, and you need a clear view of the reset button, mounting ring, and drain connections.
- Pliers or kitchen tongs: Use these to reach into the drain opening and pull out visible debris. Even with power off, avoid reaching in with your bare hand.
- Bucket or old towels: Water and food residue tend to spill when you work under the sink, so protect the cabinet floor before you start.
- Disposal wrench or offset tool: Some brands include a plastic wrench with the unit. If yours came with one, keep it nearby since it makes manual rotation much easier.
With power confirmed off and your tools within reach, you are set to work through each troubleshooting step without interruption. Now let’s find out exactly what is causing the problem.
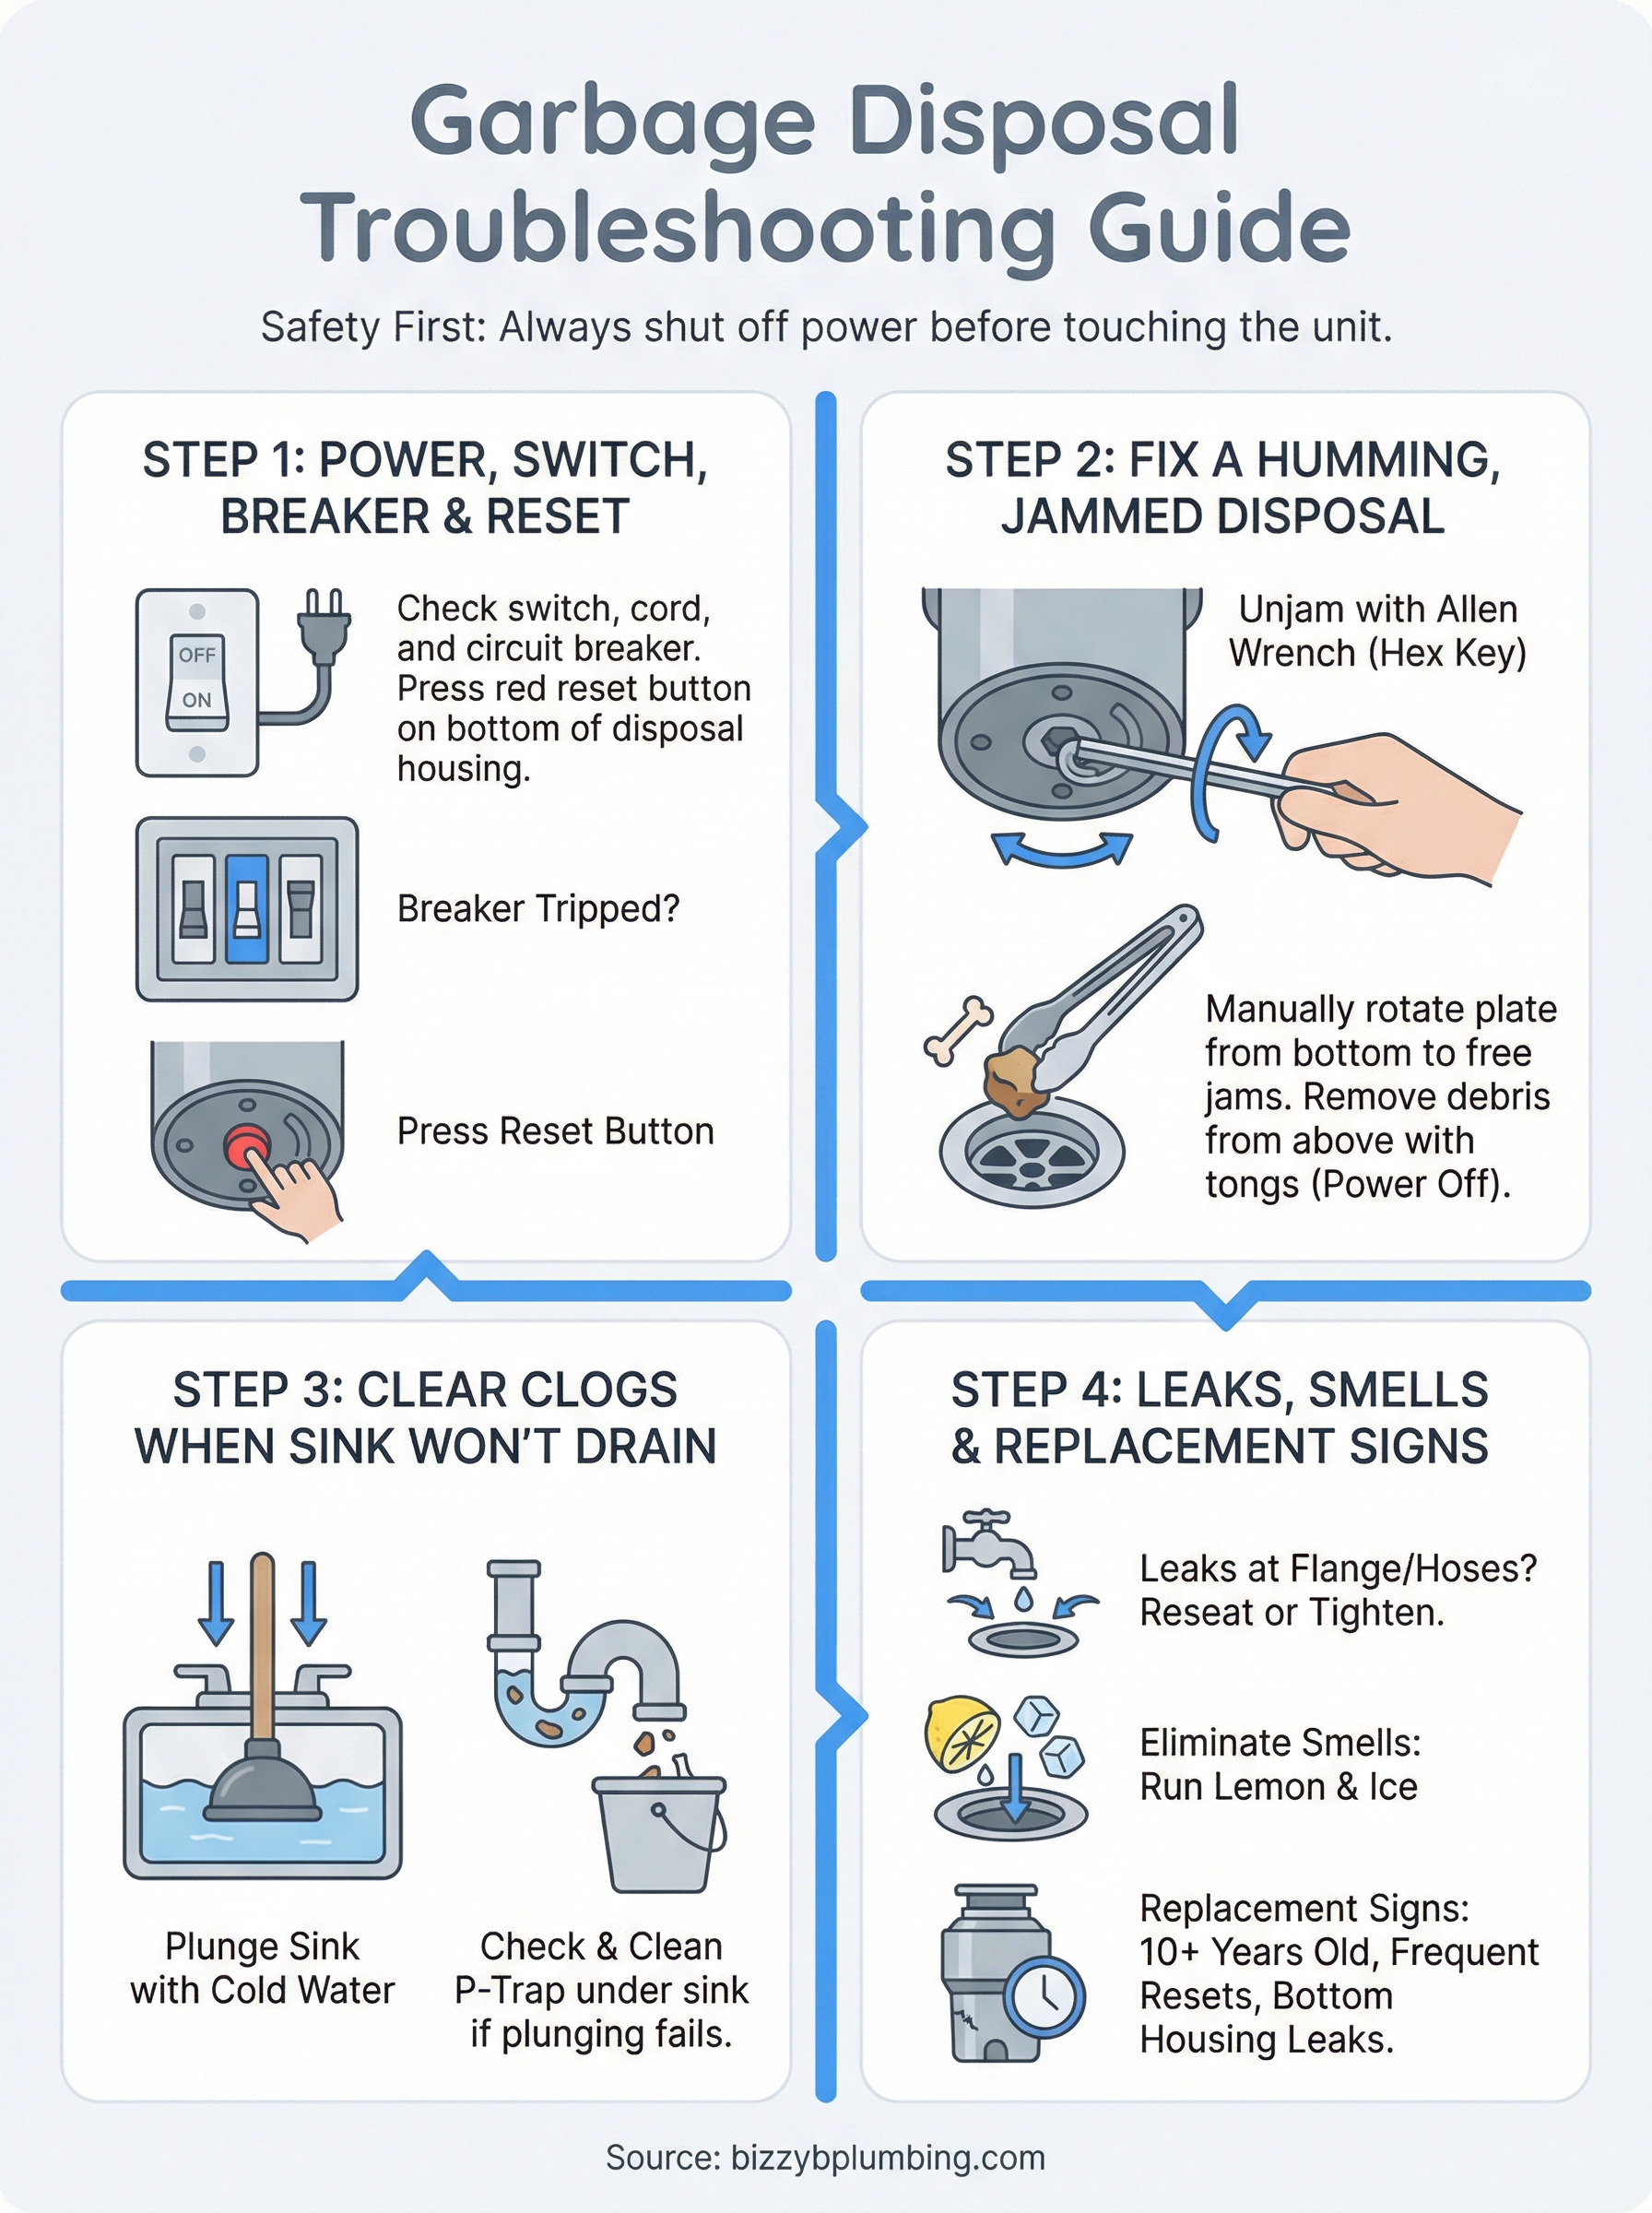
Step 1. Check power, switch, breaker, and reset
When your garbage disposal not working at all, the first thing to check is whether it’s actually receiving power. This sounds obvious, but a surprising number of disposal problems trace back to a tripped circuit breaker, a loose plug, or a wall switch that got bumped by someone else in the house.
Test the wall switch and outlet
Start by pressing the wall switch firmly off and then back on. If nothing happens, open the cabinet under the sink and confirm the disposal’s power cord is fully seated in the outlet. A cord that’s halfway out won’t make a reliable connection. If the outlet itself seems dead, plug in a lamp or phone charger to confirm power is actually reaching it. No power at the outlet means you need to check your breaker panel.
- Go to your electrical panel
- Look for a tripped breaker labeled “disposal,” “kitchen,” or “kitchen circuit”
- A tripped breaker sits in a middle position rather than fully on or off
- Flip it fully off, then firmly back on to reset it
Find and press the reset button
Every disposal has a thermal overload reset button on the bottom of the unit itself. When the motor overheats from a jam or extended use, this button pops out automatically to cut power and protect the motor. Reach under the sink and feel the bottom center of the disposal housing for a small button, usually red or black. If it sticks out more than a quarter inch, press it firmly until you feel it click back into place.
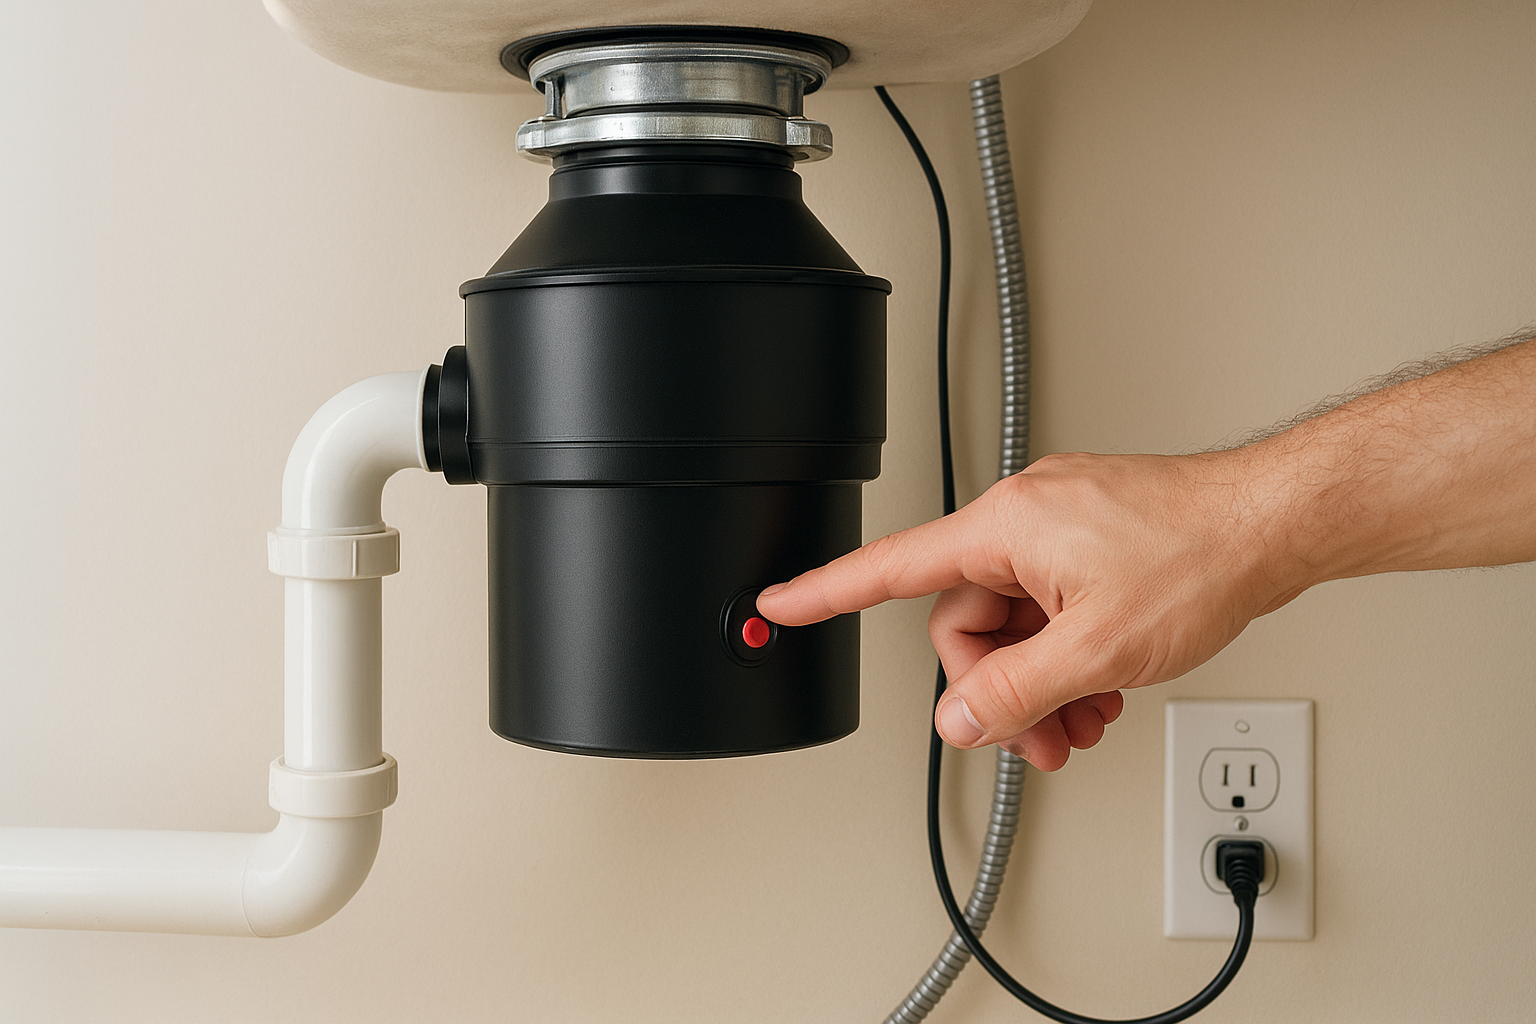
After pressing the reset button, wait ten seconds before restoring power and testing the switch, giving the motor time to cool down fully.
Once the reset button is seated, restore power and flip the wall switch. If the disposal runs normally, you are done. If it still fails to spin, move on to Step 2.
Step 2. Fix a humming disposal that will not spin
A humming sound with no spinning usually means your garbage disposal not working because the grinding plate is jammed on a piece of hard debris. The motor is receiving power and trying to run, but something wedged between the grinding plate and the shredder ring is stopping it cold. If you leave it humming too long, the thermal overload will trip and cut power to protect the motor, so address a jam quickly rather than flipping the switch repeatedly.
Unjam the disposal with an Allen wrench
The most reliable way to clear a jam is to manually rotate the grinding plate from the bottom of the unit using a hex key. This frees whatever debris has locked the plate in place without putting your hands anywhere near the cutting components.
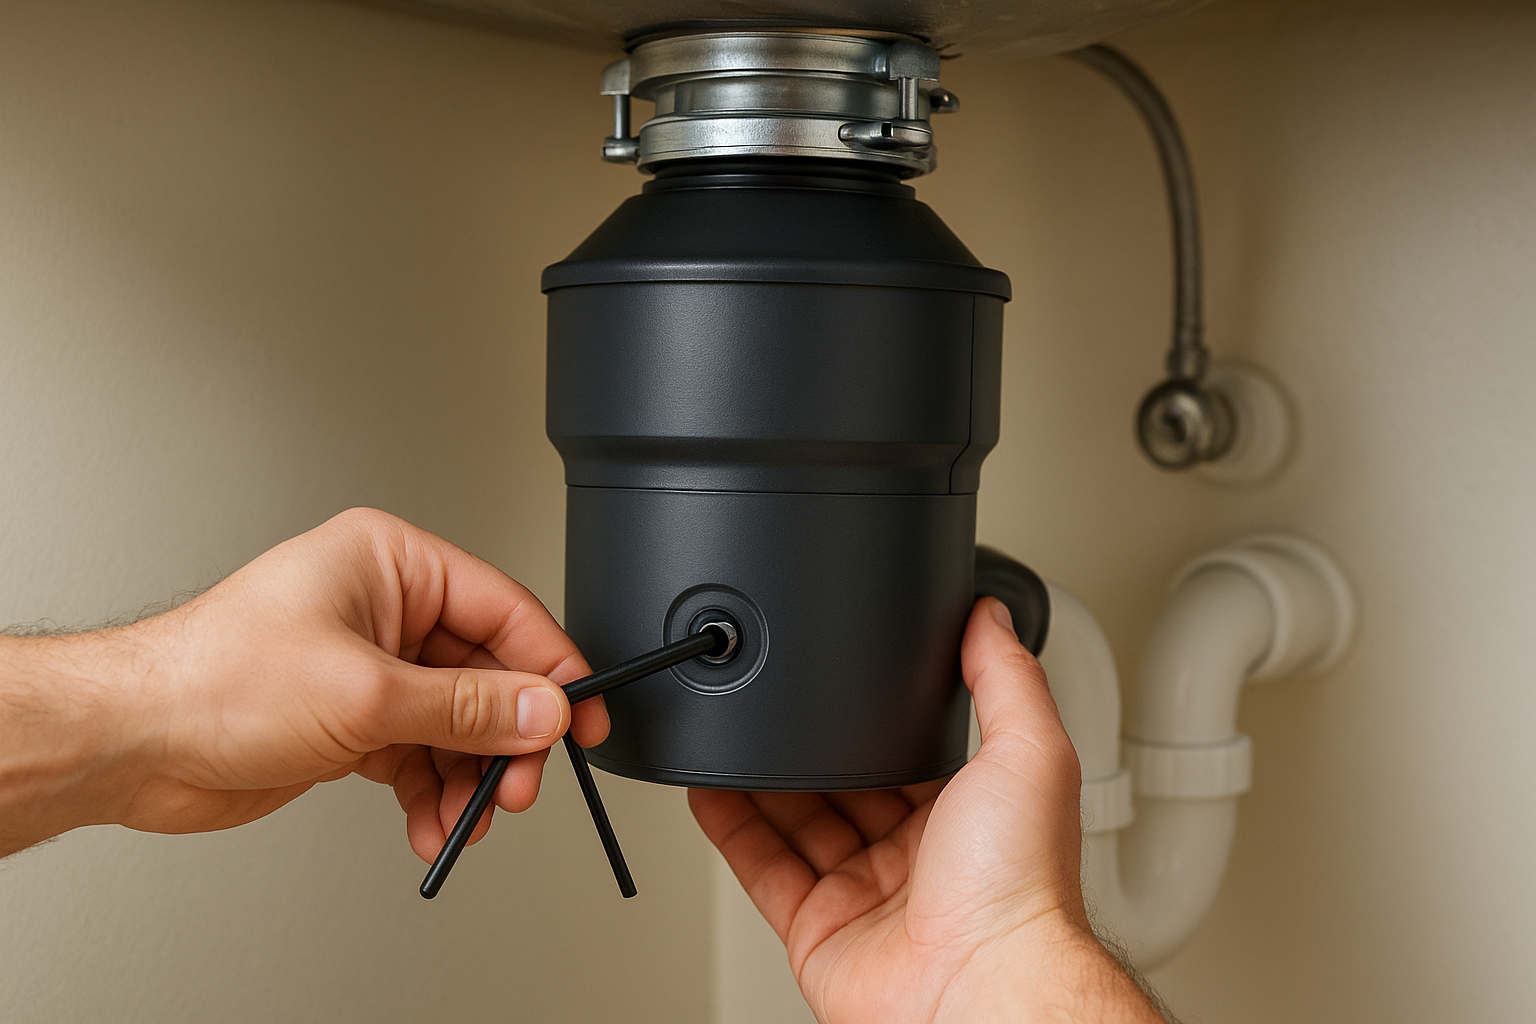
Follow these steps in order:
- Confirm power is off at the outlet or breaker before you do anything else.
- Locate the hex socket on the center underside of the disposal housing. It is a small six-sided port, usually 1/4-inch.
- Insert your Allen wrench into the socket and work it back and forth in both directions until the grinding plate turns freely in a full circle.
- Use kitchen tongs to reach into the drain opening from above and pull out any visible food chunks, bones, or foreign objects that caused the jam.
- Remove the Allen wrench, restore power, and press the reset button on the bottom if it popped out during the jam.
If the plate won’t budge even after several minutes of working the hex key, the jam may involve a damaged component rather than just trapped debris, and replacing the unit is likely the better call.
Test the disposal after clearing
Once the plate rotates freely, run cold water into the sink and flip the wall switch. Cold water helps move loosened debris through the drain line and keeps the motor from overheating during the first run after a jam. If the unit spins normally and drains well, you fixed it. If the humming returns or the drain backs up, move on to the next step to check for a clog in the drain line itself.
Step 3. Clear clogs when the sink will not drain
When the disposal runs but water pools around the drain, the problem is a clog in the drain line, not the motor itself. Running the disposal while the line is backed up can push debris deeper and make the blockage worse, so stop running it until the water clears. This is a separate issue from a garbage disposal not working due to a jam, and it requires a different approach.
Break up the blockage from inside the drain
Start with the simplest fix before you pull any pipes. Turn off the disposal, then run cold water at full pressure for 30 to 60 seconds to see if the force alone moves the clog. If that does not help, use a sink plunger (not a toilet plunger) to create suction and dislodge the blockage. Fill the sink with two inches of water first so the plunger cup seals fully against the drain opening, then plunge firmly 10 to 15 times.
Avoid pouring chemical drain cleaners into a disposal drain since the harsh compounds can damage the rubber gaskets and plastic components inside the unit.
You can also try running ice cubes and coarse salt through the disposal while the water flows. The abrasive combination helps knock loose grease buildup along the walls of the drain line without harming the unit.
Check the P-trap if the clog won’t clear
If plunging does not move the blockage, the clog is likely sitting in the P-trap, the curved pipe section directly beneath the sink. Place a bucket under the P-trap, unscrew the slip nuts by hand or with pliers, and pull the trap free. Clear out any packed debris inside, rinse the trap, and reassemble the connection. Run water to confirm the drain flows freely before you consider the job finished.
Step 4. Handle leaks, bad smells, and replacement signs
Not every garbage disposal not working situation involves the motor or a clog. Leaks, persistent odors, and worn-out components are just as common and each one points to a different fix. Recognizing which problem you are dealing with saves you from chasing the wrong solution.
Locate and stop a leak
Leaks can come from several spots, and pinpointing the exact source before you tighten anything saves a lot of frustration. Dry the area under the sink completely, then run water through the disposal and watch closely for where the drip originates.
- Leak at the sink flange (top): The plumber’s putty sealing the flange to the sink basin has dried out. Disconnect the disposal, reseat the flange, and pack fresh putty around it.
- Leak at the dishwasher inlet hose: The hose clamp has loosened. Tighten it with a screwdriver.
- Leak at the drain outlet (side): The gasket or the slip nut connection has failed. Replace the gasket and hand-tighten the slip nut, then snug it with pliers.
A leak at the bottom center of the housing almost always means the internal seal has failed, and no amount of tightening will fix it.
Eliminate bad smells
Bad odors come from food buildup on the grinding plate and inside the drain line, not from the motor itself. Cut a lemon into quarters, drop the pieces in with the disposal running and cold water flowing, and let the citric acid cut through grease and residue. Running ice cubes mixed with kosher salt once a week keeps the grinding plate clean between deeper cleanings.
Know when to replace rather than repair
Some signs tell you the unit has reached the end of its useful life. If your disposal shows three or more of the following, replacement is the smarter investment compared to repeated repairs:
- The unit is more than 10 years old
- You have reset the button more than twice in a single month
- The motor hums but jams even after manual cranking
- Water leaks from the bottom housing consistently
- Grinding performance has noticeably declined despite cleaning
When you want it fixed today
Most garbage disposal not working problems come down to a handful of root causes, a tripped reset button, a jammed grinding plate, a blocked drain line, or a worn-out unit past its prime. This guide gave you step-by-step fixes for each one so you can work through the problem without guessing. Start with power and the reset button, move to the jam, check the drain, and then assess whether the unit deserves another repair or a full replacement.
Some situations call for a professional. If your disposal leaks from the bottom housing, the motor runs but jams repeatedly after manual cranking, or you simply do not want to spend your afternoon under the sink, that is a completely reasonable place to stop. Bizzy B Plumbing serves Knoxville, Alcoa, Maryville, and surrounding East Tennessee communities with same-day service and upfront pricing, so you know exactly what the fix costs before any work begins.