You open the cabinet under your kitchen sink and find a puddle. After a little investigating, you realize your garbage disposal leaking from bottom is the culprit. It’s not a drip from a loose connection or a worn-out sink flange, it’s coming from the unit itself. That’s usually a sign of internal seal failure, and it changes your repair options significantly.
The good news is that figuring out what’s going on isn’t complicated once you know what to look for. Some bottom leaks can be addressed with a straightforward fix, while others mean the disposal has reached the end of its lifespan. Knowing the difference saves you time, money, and the headache of a repair that won’t hold.
At Bizzy B Plumbing, we help homeowners across Knoxville and East Tennessee deal with exactly this kind of problem every week. In this guide, we’ll walk you through the most common causes of a bottom-leaking disposal, how to diagnose yours, and when it makes more sense to repair versus replace the unit.
Safety first and what a bottom leak usually means
A garbage disposal leaking from bottom isn’t just a water mess issue. The unit is electrically powered, and water pooling near electrical components creates a real shock hazard. Before you touch the disposal, move items out of the cabinet, or reach in to feel where the water is coming from, you need to take two specific safety steps first.
Why you need to cut the power before anything else
Your garbage disposal runs on a 120V household circuit, which means contact with water near live wiring can injure or kill you. Don’t rely on the wall switch to make the unit safe. The switch only interrupts power to the motor, but the wiring inside the unit can still be energized. Do one of the following before you go any further:
- Unplug the disposal from the outlet under the sink if it has a standard plug connection
- Flip the dedicated circuit breaker for the disposal in your electrical panel if the unit is hardwired
Cutting power at the breaker is the safest option in either case, since it removes all electrical risk before you start checking connections or moving the unit.
Once the power is off, use a dry towel to soak up the standing water before you start looking for the source.
What a bottom leak actually tells you
When water exits from the bottom of the disposal housing, the leak almost always points to an internal problem rather than a loose fitting or worn gasket at a connection point. Disposals have internal seals that protect the motor and separate the grinding chamber from the electrical components. Those seals are made from rubber or silicone, and they degrade over time from constant heat cycles, vibration, and exposure to acidic food waste.
The leak typically drips from the reset button located on the bottom of the unit, or from small cracks in the housing itself. Both are signs that the internal seals have broken down. Unlike a leaky sink flange or a loose drain line connection, you cannot tighten or re-seal an internal failure from the outside. That’s why a bottom leak usually signals that your disposal is nearing the end of its useful life, which for most units runs between 8 and 15 years depending on usage and the quality of the original unit.
Step 1. Cut power and confirm the leak source
Your first move with a garbage disposal leaking from bottom is to cut the power completely and then pinpoint exactly where the water is exiting the unit. Skipping this step or doing it out of order puts you at risk and makes accurate diagnosis harder.
How to cut power safely
Two options exist depending on how your disposal is wired. Plug-in models have a standard cord running to an outlet under the sink. Reach under the cabinet and pull that plug before touching anything else. Hardwired models connect directly to your home’s wiring, which means you need to go to your electrical panel and flip the dedicated circuit breaker for the disposal.
If you’re not sure which circuit controls the disposal, flip what you think is the right breaker and then try the wall switch. If the unit doesn’t hum or respond at all, you’ve found it.
How to confirm the leak source
Once the power is off, dry the outside of the disposal and the cabinet floor completely with a towel. Old pooled water misleads you into thinking the leak originates in the wrong spot, so starting with a dry surface gives you an accurate baseline to work from.
Next, plug the sink drain, fill it with a few inches of water, then pull the plug and watch carefully with a flashlight. Track where water first appears on the unit. If it drips from the reset button on the underside of the housing or seeps through the body of the unit rather than from a connection point or fitting, you have a confirmed internal leak. That tells you almost everything you need before moving to the next step.
Step 2. Rule out leaks from the top and side
Before you call a garbage disposal leaking from bottom a confirmed internal failure, you need to eliminate two other common sources: the sink flange at the top and the drain connections on the side. Water travels downward, so a leak at the top of the unit can run along the outside of the housing and pool at the bottom, making it look like an internal failure when it’s actually a fixable connection problem.
Check the sink flange at the top
The sink flange is the metal ring seated inside your sink drain opening that connects the disposal to the sink basin. Over time, the plumber’s putty sealing that flange dries out and cracks, which lets water drip down the outside of the unit. To check for this, dry the disposal completely, fill the sink with a few inches of water, and shine a flashlight at the top of the disposal where it meets the underside of the sink.
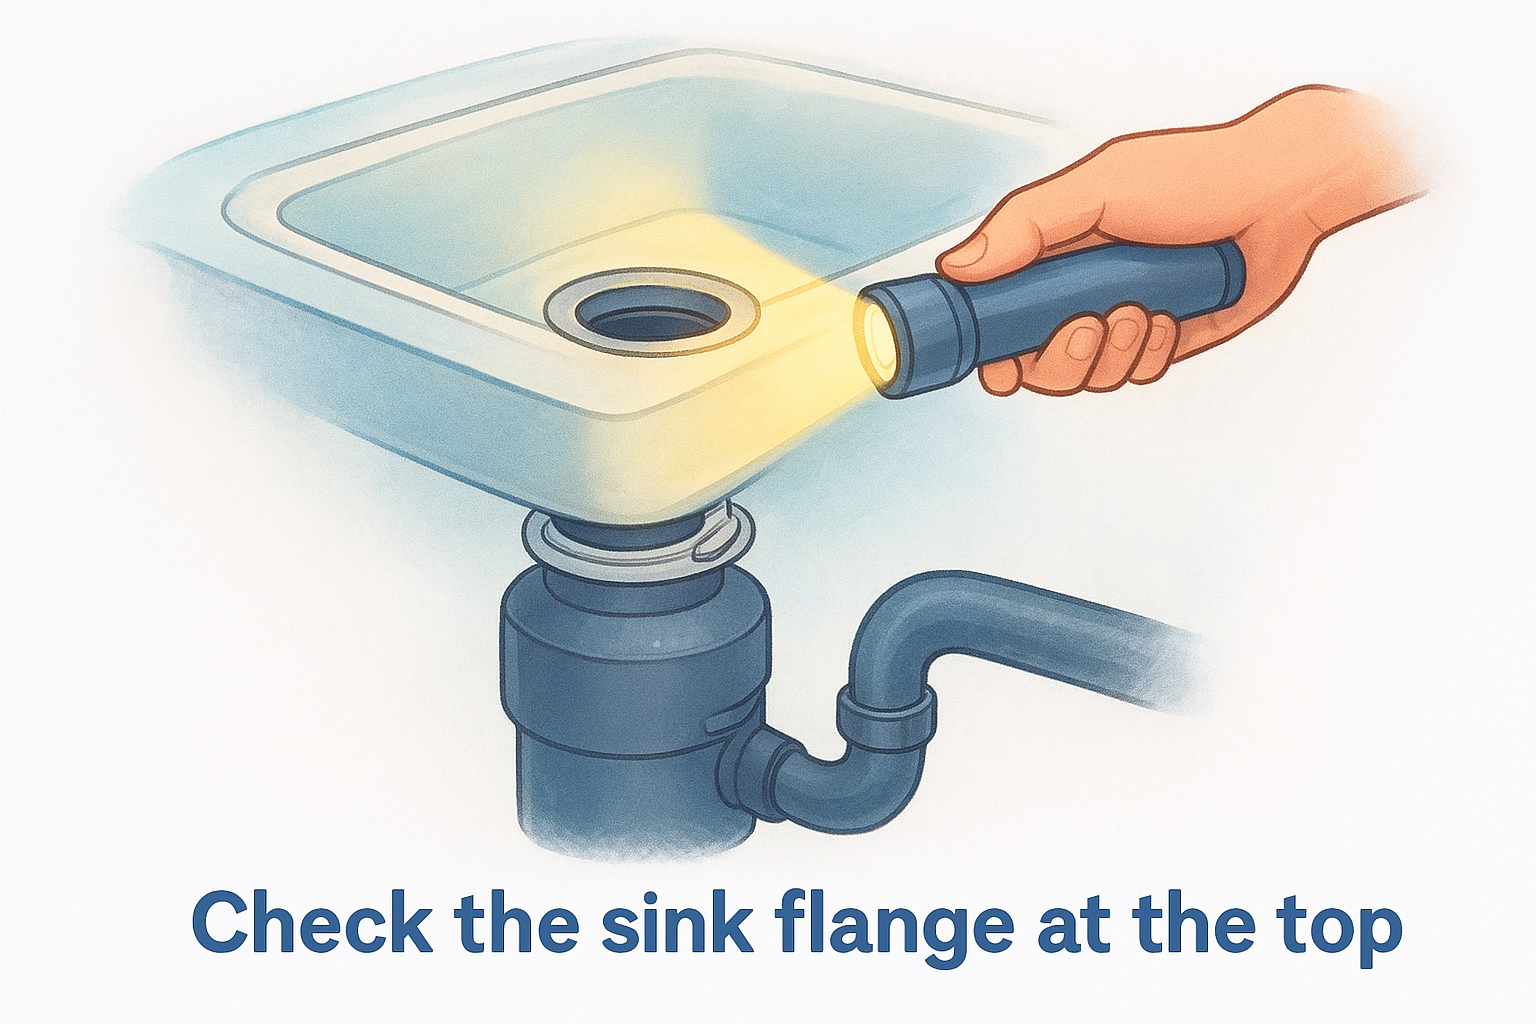
If water appears at the top first and then runs down the housing, re-sealing or tightening the mounting ring will fix the problem without replacing the unit.
Check the side drain connections
Your disposal has two side connection points to inspect: a smaller port for the dishwasher drain hose (if you have one) and a larger outlet connecting to the P-trap drain pipe. Press a dry paper towel against each fitting while water moves through the drain. Here is what each failure looks like:
- Dishwasher drain port: A loose clamp causes water to seep from the upper side of the unit near the ribbed fitting
- Drain pipe outlet: A worn rubber gasket or loose slip joint lets water drip from the larger side connection
- Paper towel result: Wet spots at either fitting confirm a side leak that a clamp tightening or gasket swap will resolve
Only when both the top and all side connections stay completely dry should you move forward to diagnosing a true bottom leak.
Step 3. Diagnose a true bottom leak and choose a fix
With the top and side connections ruled out, you now know the garbage disposal leaking from bottom is an internal problem. At this stage, your diagnosis comes down to identifying exactly where on the base the water exits, because that detail determines whether any repair attempt makes sense at all.
Identify whether the leak comes from the reset button or the housing
The reset button is the small rubber or plastic button on the very bottom of the unit that you press after a jam trips the motor’s thermal overload protector. If the leak drips specifically from around that button, the internal seal behind it has failed, and water from the grinding chamber is finding its way through. If the leak spreads across the base or seeps through a visible crack in the housing itself, the unit’s body has physically broken down.
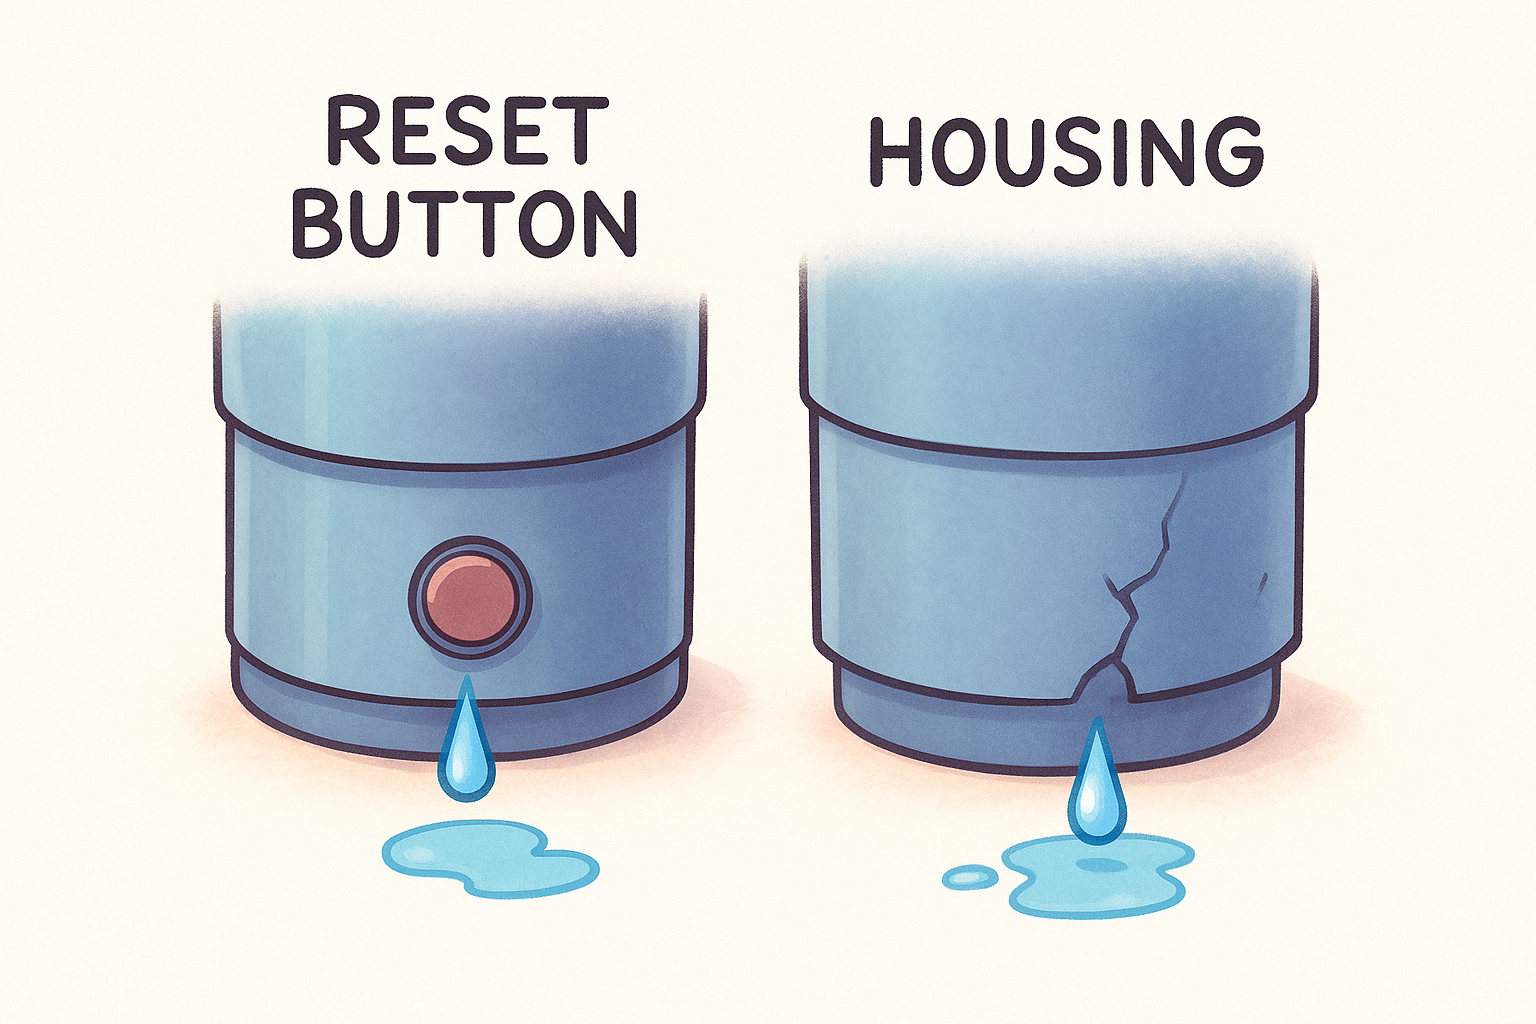
A leak at the reset button confirms internal seal failure, and a crack in the housing confirms the unit is done. Neither can be fixed by tightening something or replacing an external gasket.
When to repair vs. replace
Internal seal replacements are rarely worth the cost or effort on a residential disposal. Disassembling the unit to reach the internal seals requires specialized tools, and replacement parts for older models are often unavailable or cost nearly as much as a new unit. Use this quick decision table to guide your next step:
| Leak location | Repair option | Recommended action |
|---|---|---|
| Reset button area | None practical | Replace the unit |
| Cracked housing | None | Replace the unit |
| Internal seal visible failure | Seal kit (if under 3 years old) | Replace the unit if older |
Replacing the disposal is almost always the faster, more cost-effective path forward.
Step 4. Replace the disposal and test for leaks
Once you’ve confirmed a true bottom leak, replacing the disposal is your most practical path forward. Most standard residential disposals use a universal three-bolt mounting system, which means swapping an old unit for a new one is straightforward and does not require a plumber if you’re comfortable working under the sink.
How to swap out the unit
Start by disconnecting the drain line from the side outlet and, if you have a dishwasher, unclip the drain hose from its port. Place a dry towel under the unit to catch residual water, grip the disposal body, and rotate it counterclockwise to release it from the mounting ring. The unit will drop free.
Lift the new disposal into position and align it with the existing mounting ring. Rotate it clockwise until it locks firmly. If the mounting ring itself looks corroded or cracked, replace it before installing the new unit. Reconnect the drain line and the dishwasher hose, and make sure each fitting is snug by hand before using a tool.
How to test for leaks after installation
Before you move on, run a proper leak test to confirm every connection point is holding. Follow these steps in order:
- Restore power at the breaker or plug the unit back in
- Run cold water at full pressure into the sink for 60 seconds
- Shine a flashlight at each connection: flange, drain outlet, and dishwasher port
- Run the disposal for 30 seconds while water flows and check again
If any dripping appears after the swap, turn the disposal off and re-tighten the connection at that specific point before running the test again.
Any unit still showing a garbage disposal leaking from bottom after a clean installation points to an improperly locked mounting ring, which is a quick fix before your final check.

What to do next
A garbage disposal leaking from bottom almost always points to a worn internal seal or a cracked housing, and neither of those problems gets better on its own. If you worked through this guide and confirmed the leak is internal, replacing the unit is the right move rather than throwing time at a repair that won’t hold.
Most swaps go smoothly when the mounting ring is in good shape and you follow the test steps at the end. If your installation looks correct but the leak keeps coming back, or if you hit a point where the job feels beyond your comfort level, calling a plumber saves you from turning a straightforward fix into a bigger problem.
Bizzy B Plumbing serves homeowners across Knoxville and East Tennessee with same-day service and upfront pricing. If you need a hand, contact our plumbing team and we’ll get your kitchen back in working order fast.