You flip the switch, and nothing. No hum, no grinding, no sign of life. When your garbage disposal won’t turn on, it’s easy to assume the worst, but the fix is often simpler than you’d expect. A tripped reset button, a blown circuit, or a seized flywheel accounts for the majority of dead disposals we see in Knoxville-area homes.
Before you call anyone or start shopping for a replacement, there are a few things worth checking yourself. Some take less than a minute. Others require a bit more hands-on work but are still well within DIY territory for most homeowners. And if the disposal truly is done for, you’ll want to know that too, before spending time on a lost cause.
This guide walks you through each step: resetting the unit, freeing a jammed flywheel, checking your electrical connections, and recognizing when the motor has burned out. At Bizzy B Plumbing, we help East Tennessee homeowners with garbage disposal repairs and replacements daily, so these are the exact diagnostics our techs run on service calls. We’ll share what we know so you can handle what you can at home, and make a confident call on what you can’t.
Safety checks before you start
Working on a garbage disposal that won’t turn on means putting your hands near sharp metal components and live electrical connections. Before you touch anything under the sink or inside the unit, take two minutes to protect yourself. Skipping these steps won’t save time; it will just increase your risk of a cut or an electric shock.
Cut the power before reaching inside
Never put your hand inside the disposal chamber while power is still connected. Even a disposal that appears completely dead can spin suddenly if a jam clears while power is live. Turn off the wall switch first, then go to your breaker panel and flip the circuit that controls the disposal. Most units are on a dedicated circuit labeled “disposal” or “kitchen disposal.” If you can’t find it, use a non-contact voltage tester near the outlet under the sink before you proceed.
Treat the disposal as live until you have physically confirmed the circuit is off at the breaker panel.
Before touching the unit, run through this quick checklist:
- Wall switch: flip to the off position
- Breaker: shut off the correct kitchen circuit
- Voltage tester: confirm no power at the outlet under the sink if you have one available
Use the right tools before you start
You’ll need a few basics on hand: a flashlight to see clearly inside the grinding chamber, a 1/4-inch hex Allen wrench to manually rotate the flywheel from the bottom of the unit, and tongs or needle-nose pliers to remove any debris. Do not use your fingers to fish objects out, even after the power is off. Blades inside the chamber are sharp, and a sudden slip can cause a deep cut. If the disposal came with a dedicated wrench when it was installed, find it now. Keep a dry towel nearby to soak up any standing water under the sink before you start working.
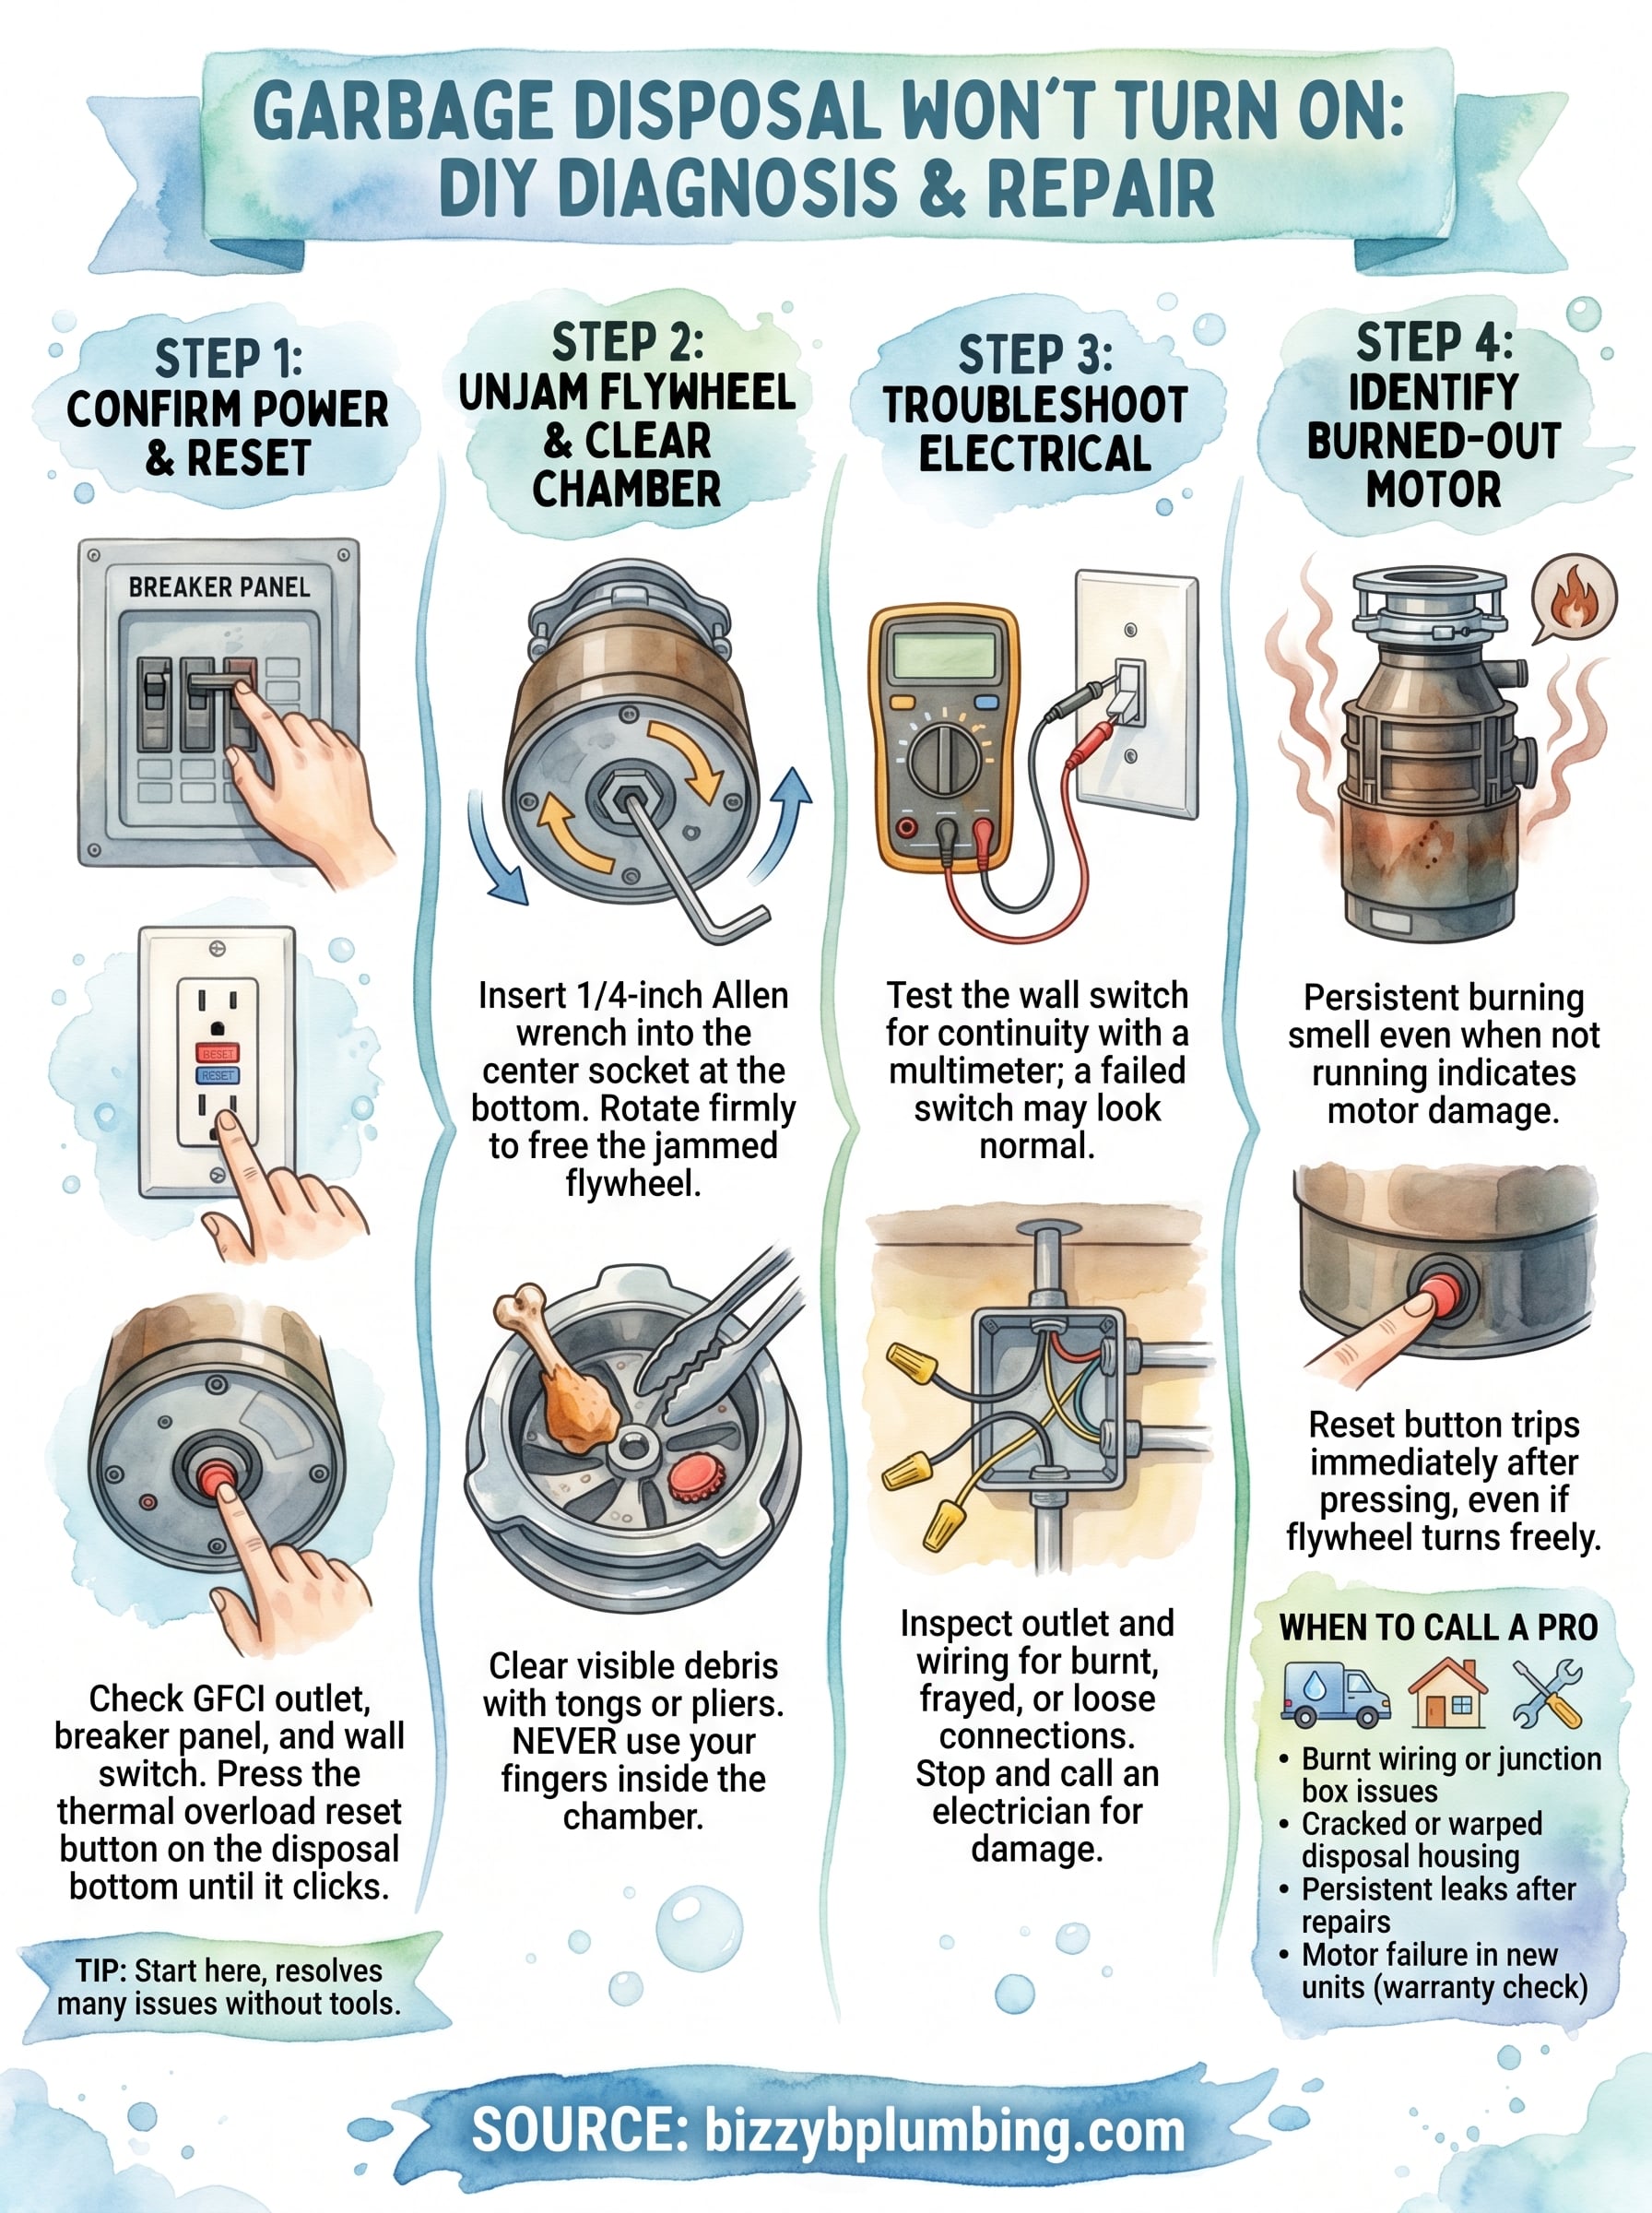
Step 1. Confirm power and press the reset button
When a garbage disposal won’t turn on, the most common culprit is a loss of power, not a mechanical failure. Start here before anything else, because this single step resolves a large number of dead disposals with no tools and no cost.
Check the outlet and circuit breaker
Your disposal plugs into an outlet under the sink, and that outlet may have tripped its internal breaker without you knowing. Look for a GFCI outlet under the sink or nearby on the wall, and press the small reset button if it has popped out. Then check your main electrical panel for a tripped breaker, which sits in the middle position between on and off. Flip it fully off first, then back on.
Check each power source in this order:
- GFCI outlet under the sink or on the nearby wall (press the “Reset” button)
- Breaker panel (flip the disposal circuit fully off, then back on)
- Wall switch (confirm it is in the on position)
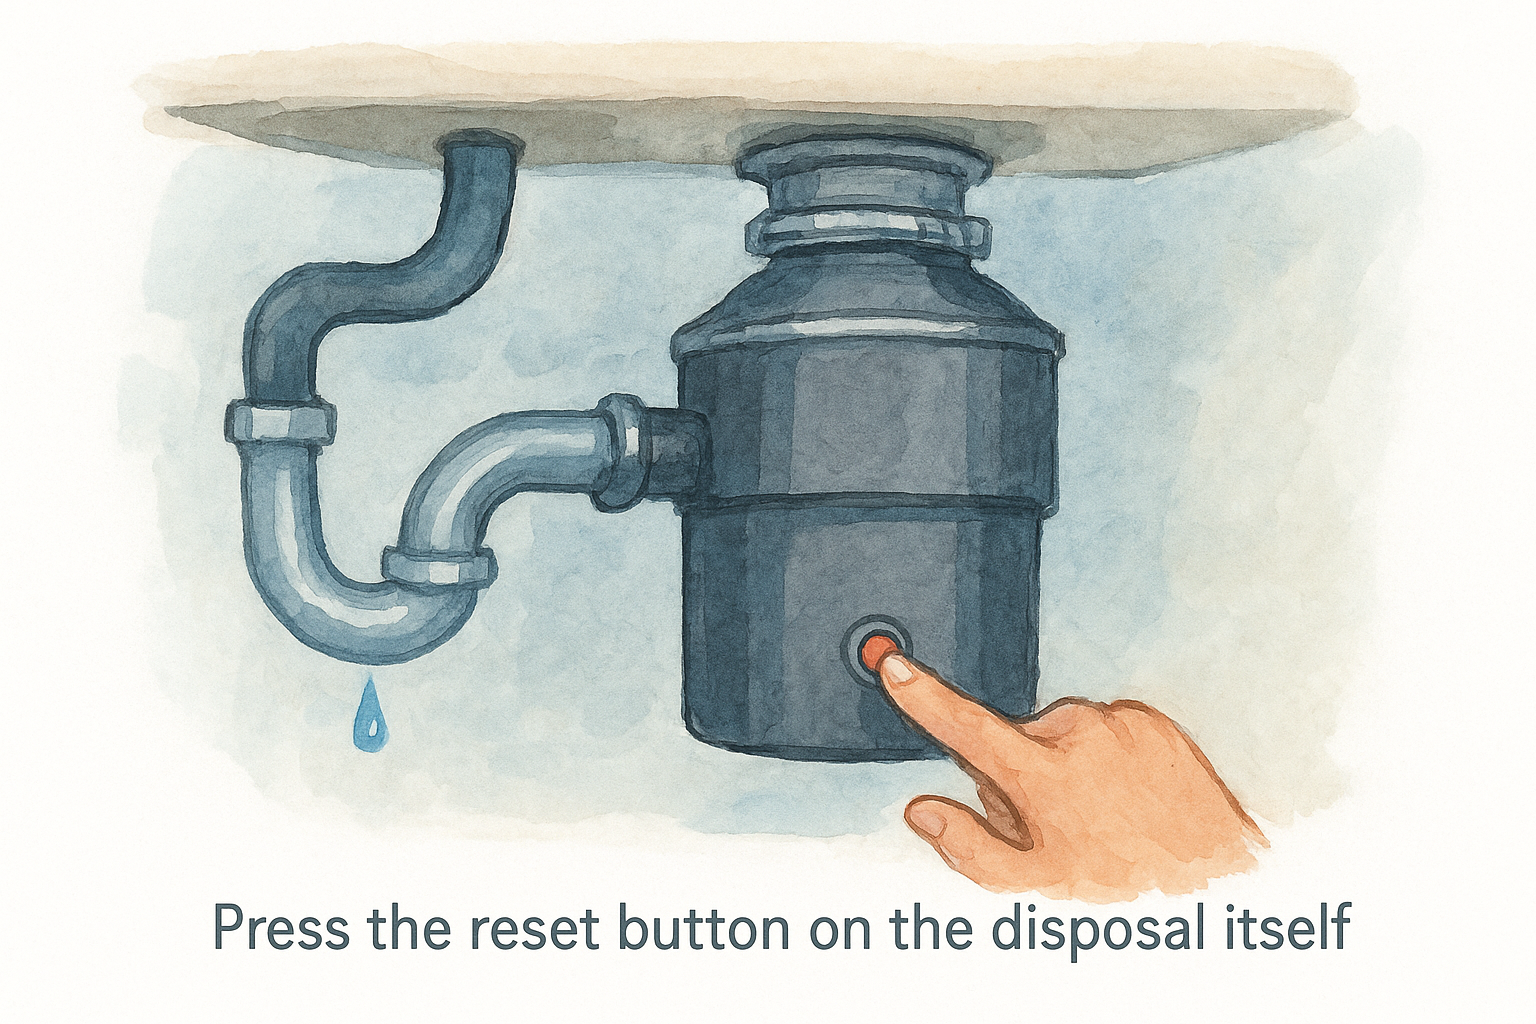
Press the reset button on the disposal itself
The unit has a thermal overload reset button on the bottom, usually a small red or black button that pops out when the motor overheats. Reach under the disposal and press it firmly until you feel it click. Restore power and test the switch once it clicks in.
If the reset button pops back out immediately after you push it, the motor is still jammed or overheated, and you need to move to Step 2 before trying again.
Step 2. Unjam the disposal and clear the grinding chamber
If the reset button keeps popping out, the motor is likely seized by a jammed flywheel. This is one of the most common reasons a garbage disposal won’t turn on, and you can fix it without any replacement parts in most cases.
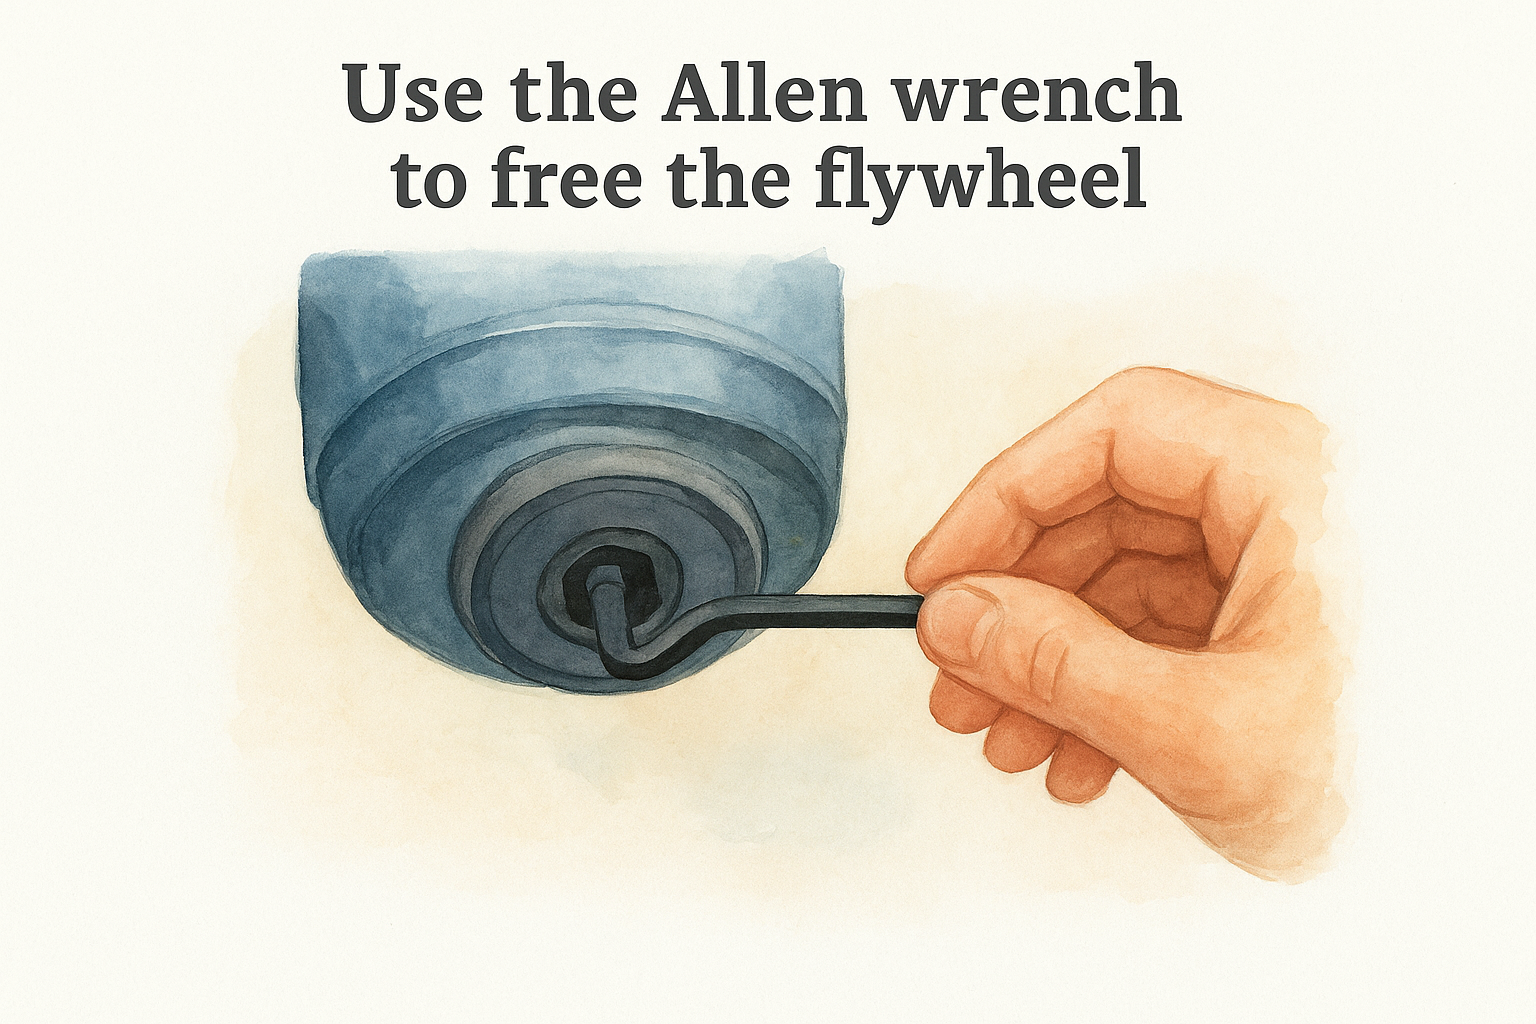
Use the Allen wrench to free the flywheel
Look at the center of the disposal’s underside and find the small hex socket. Insert a 1/4-inch Allen wrench and work it back and forth until the flywheel rotates freely in both directions. Start with small movements, then increase the range as resistance loosens.
Once the flywheel turns without resistance, press the reset button again before restoring power.
Follow these steps in order:
- Insert the Allen wrench into the hex socket on the bottom of the unit
- Rotate back and forth firmly until the flywheel breaks free
- Press the reset button until it clicks
- Restore power and test the wall switch
Clear debris from the grinding chamber
Shine a flashlight directly into the grinding chamber from above and look for bones, bottle caps, fruit pits, or broken glass. Use tongs or needle-nose pliers to remove anything you find. Never use your fingers inside the chamber, even with power off. Once the chamber is clear, run cold water and flip the switch to confirm normal operation.
Step 3. Troubleshoot switch, outlet, breaker, and wiring
If power is confirmed on and the flywheel turns freely, a faulty wall switch or loose wiring connection may be the reason your garbage disposal won’t turn on. These electrical issues are easy to diagnose and usually don’t require an electrician.
Test the wall switch
Your disposal’s wall switch takes constant mechanical wear over time, and the internal contacts can fail without any visible sign of damage. Use a multimeter set to continuity mode to test the switch terminals with the switch in the on position.
A failed wall switch looks identical to a working one, so testing is the only reliable way to confirm it.
If you get no continuity reading, the switch is faulty. Replace it with a standard single-pole switch from any hardware store; it’s a straightforward swap that takes about 15 minutes with a screwdriver.
Inspect the outlet and wiring under the sink
Open the cabinet and check the wiring connections at the outlet where the disposal plugs in. Look for wires that appear scorched, frayed, or disconnected. A loose wire nut or terminal screw can interrupt the circuit completely without tripping the breaker.
If you find burnt insulation, cracked wiring, or a melted outlet, stop immediately and contact a licensed electrician. Damaged wiring is a fire risk and goes beyond a standard DIY repair.
Step 4. Spot a burned-out motor and other failure signs
If you’ve reset the button, freed the flywheel, and confirmed the electrical path is intact but your garbage disposal won’t turn on, the motor itself may have failed. A burned-out motor produces specific warning signs that separate it from every other cause covered in the previous steps, and recognizing them saves you from wasting time on further troubleshooting.
Signs the motor has burned out
The clearest indicator is a persistent burning smell coming from the unit, even when it hasn’t run recently. That smell tells you the motor windings have overheated and degraded to the point where they can no longer generate enough torque to spin the flywheel.
If your disposal hums briefly then goes silent, the motor is receiving power but failing before the thermal overload trips. Freeing the flywheel with an Allen wrench will not fix this.
A second sign is the reset button tripping immediately after you press it, even with the flywheel turning freely. This pattern confirms the motor is drawing excessive current and cutting itself off to prevent a fire.
Other physical failure signs
Check these areas directly on the unit before concluding the motor is finished:
- Burning smell with no jam present: motor windings are damaged
- Discolored or warped housing: internal heat buildup has deformed the body
- Water leaking from the body rather than the connections: cracked housing from overheating
- Hum then silence with a free flywheel: motor cannot complete a full rotation
If two or more of these signs are present together, the unit has reached the end of its usable life and needs full replacement rather than repair.
Step 5. Know when to stop and call a local plumber
Not every garbage disposal won’t turn on problem has a DIY solution. Once you’ve worked through the reset button, freed the flywheel, tested the switch, and ruled out the motor, you have a clear picture of what’s actually wrong. At that point, some repairs cross into territory where calling a licensed plumber is the faster and safer choice.
Situations that go beyond DIY
Some failure points on a disposal require tools, parts, or skills that most homeowners don’t have on hand. Wiring damage inside the wall or at the junction box is a job for a licensed electrician, and attempting it without proper training creates a real fire risk. Full unit replacement is manageable for some homeowners, but incorrect mounting or drain connections can cause leaks inside the cabinet that damage the floor and subfloor over time.
If you’re unsure whether the unit needs repair or replacement, a plumber can give you a straight answer without pressuring you toward the more expensive option.
Call a plumber when you run into any of these situations:
- Burnt wiring at the outlet or junction box
- A cracked or warped disposal housing
- Persistent leaks after you’ve replaced the drain connections
- Motor failure in a unit under five years old (may still be covered under the manufacturer’s warranty)
Quick recap and what to do next
When your garbage disposal won’t turn on, work through the steps in order: press the reset button, free a jammed flywheel with an Allen wrench, test the wall switch for continuity, and look for motor failure signs like a burning smell or a reset button that keeps tripping. Most dead disposals fail at the first two steps, which means you can resolve them in under 15 minutes without any replacement parts.
If the unit shows signs of a burned-out motor, damaged wiring, or cracked housing, stop the DIY troubleshooting there. Those repairs carry real safety risks and often cost more in mistakes than in professional service. A qualified plumber can confirm whether repair or full replacement makes more sense for your situation.
For same-day garbage disposal service in Knoxville and surrounding East Tennessee communities, contact Bizzy B Plumbing and get a straight answer with upfront pricing and no pressure.


