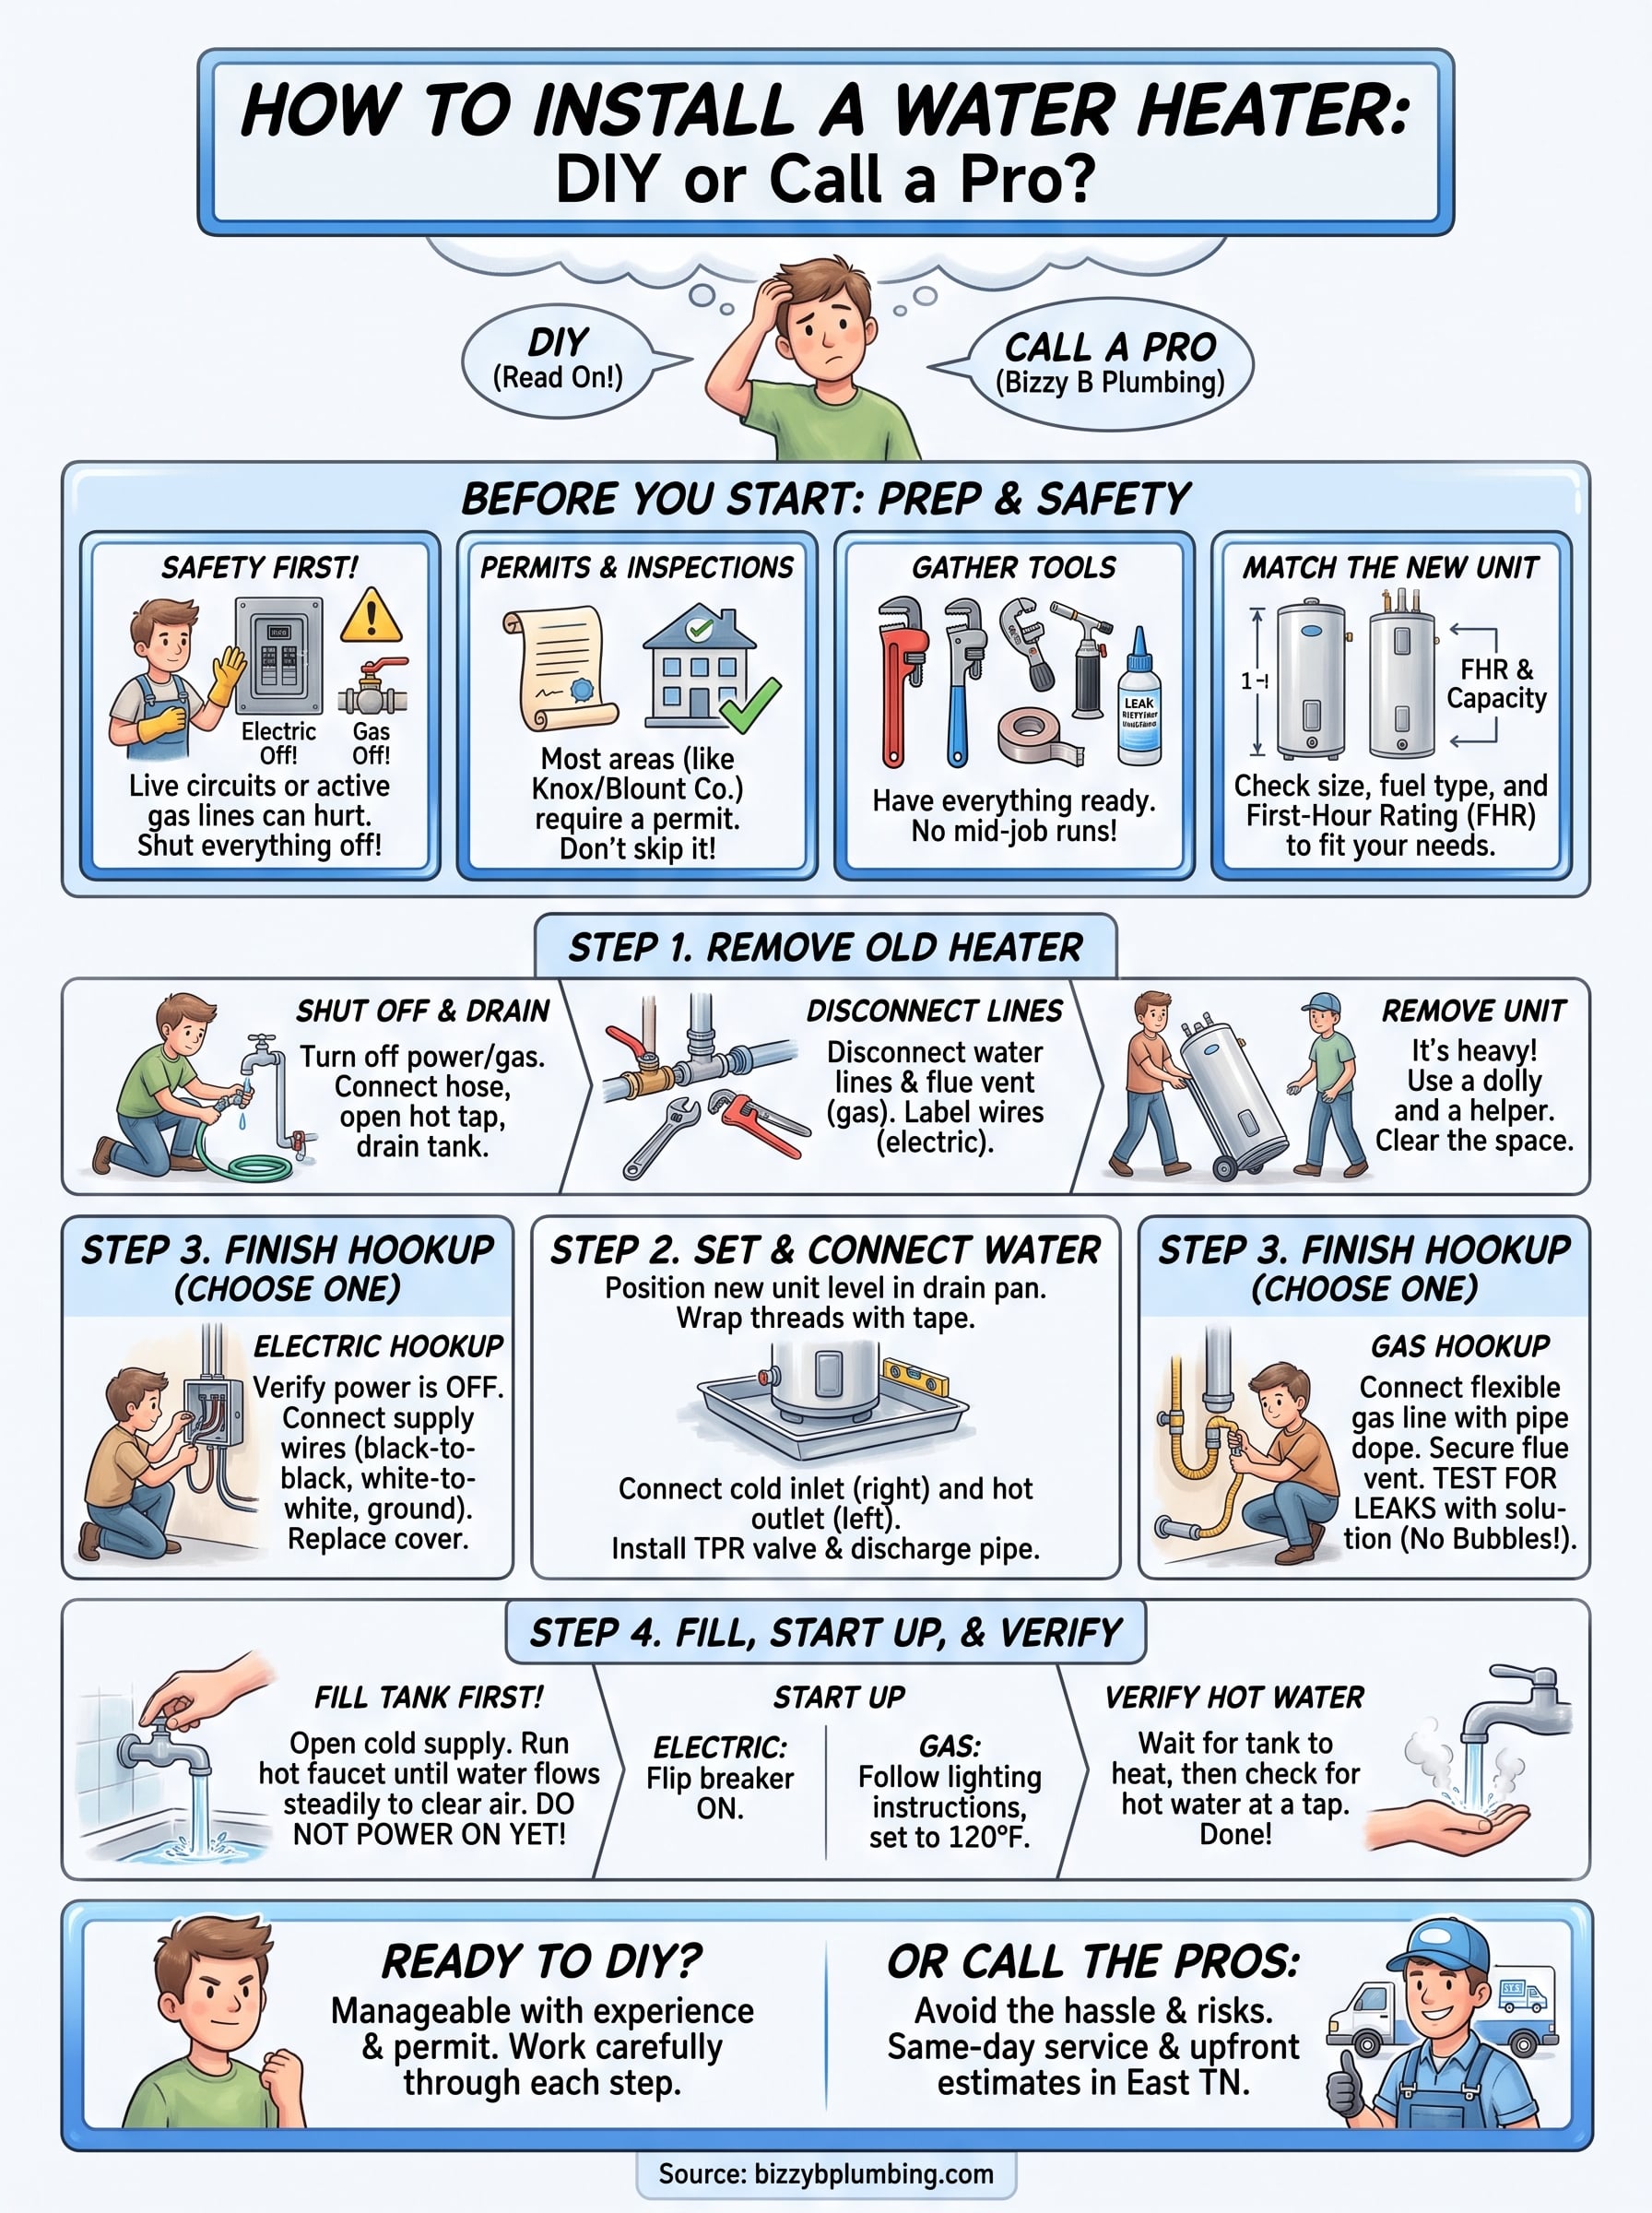
Your water heater quit, and now you’re standing in front of it wondering whether this is something you can tackle yourself. If you’ve searched how to install a water heater, you’re probably weighing two things at once: what the job actually involves and whether it’s worth doing on your own. Both are fair questions, and the honest answers depend on your setup, your comfort level, and what kind of unit you’re replacing.
This guide walks through the full process, gas and electric models, from draining and disconnecting the old tank to setting the new one in place, making the connections, and getting hot water back in your home again. We’ll cover the tools you need, the safety steps that matter most.
At Bizzy B Plumbing, water heater replacement is one of the most common calls we handle across Knoxville, Maryville, Alcoa, and the surrounding East Tennessee communities. We’ve seen every version of this job, straightforward swaps and complicated ones, so we know exactly where DIY installs tend to go sideways. This article gives you the real picture so you can decide for yourself: handle it at home, or pick up the phone and let us take care of it today, with an upfront estimate before any work begins.
Before you start: safety and prep
Before you touch anything on the old unit, you need a clear picture of what you’re dealing with. Water heater work involves live electrical circuits or active gas lines, and either one can hurt you seriously if you skip steps. The good news is that the prep work isn’t complicated. Get the safety basics in place, gather your tools, and the actual installation goes much smoother.
Some jurisdictions require that gas line connections be completed by a licensed plumber or gas fitter, even if you handle the rest of the job yourself. Check with your local codes office before you assume the full install is open to a homeowner.
Tools and materials to have on hand
Knowing how to install a water heater means nothing if you’re making emergency hardware runs mid-job. Gather every item below before you drain a drop of water out of the old tank.
Here’s what the typical replacement requires:
- Adjustable pipe wrenches (two, for counter-torquing connections without stressing the pipe)
- Pipe cutter
- Soldering torch and solder (for copper water lines that need new fittings)
- Thread seal tape and pipe joint compound
- Voltage tester (electric installs)
- Flexible water supply connectors
- Discharge pipe for the temperature and pressure relief (TPR) valve
- Drain pan (if one isn’t already in place)
- Garden hose for draining the old tank
- Gas leak detector solution (gas installs only)
- Pipe dope rated for gas (gas installs only)
Match the new unit to your home’s actual needs
Your new water heater needs to fit what your household requires, not just the space on the floor. Tank capacity is the most obvious factor: a 40-gallon tank handles most households of two to three people, and a 50-gallon unit works better for four or more. Beyond that, check the first-hour rating (FHR) printed on the Energy Guide label. That number tells you how much hot water the unit can deliver in the first hour of use, which is often more useful than tank size alone.
Physical fit matters too. Measure the height and diameter of the current tank and compare them to the new unit before it arrives. Confirm that the fuel type and voltage match your existing setup. If you’re switching from electric to gas, you’re adding gas line work and venting to the project, and that changes the scope significantly. Verify all of these specs upfront, and you’ll avoid the kind of mid-install surprises that turn a Saturday project into a two-day problem, not to mention the Missus will be extremely upset.
Step 1. Shut everything off and remove the old heater
Rushing this step is how people get hurt or end up with a flooded utility room. Shutting down utilities and draining the tank in the right order sets the foundation for everything that follows, and it’s where many DIY mistakes happen when someone skips steps while learning how to install a water heater. Take your time here, and the rest of the job goes much more smoothly.
Cut the power or gas to the unit
For an electric water heater, go to your breaker panel and flip the dedicated circuit breaker( or the quick disconnect at the water heater) for the unit to the off position. Then use a voltage tester at the element access panels to confirm the power is actually off before you touch any wiring. For a gas water heater, turn the gas valve at the unit to the “pilot” setting first, then close the dedicated gas supply valve on the line feeding the tank. The handle should sit perpendicular to the pipe when the valve is fully closed.
Once the gas supply is confirmed off, disconnect the flue vent pipe from the draft hood at the top of the tank. The sections usually pull apart or release with a few sheet metal screws. Set the vent pieces aside carefully, especially if you plan on reusing the same vent run with the new unit.
If you’re not certain the gas is completely off, brush gas leak detector solution onto the connections before going any further. Any bubbling means gas is still moving through the line, and you stop right there.
Drain the tank and disconnect the lines
Follow this sequence to drain the old tank without making a mess:
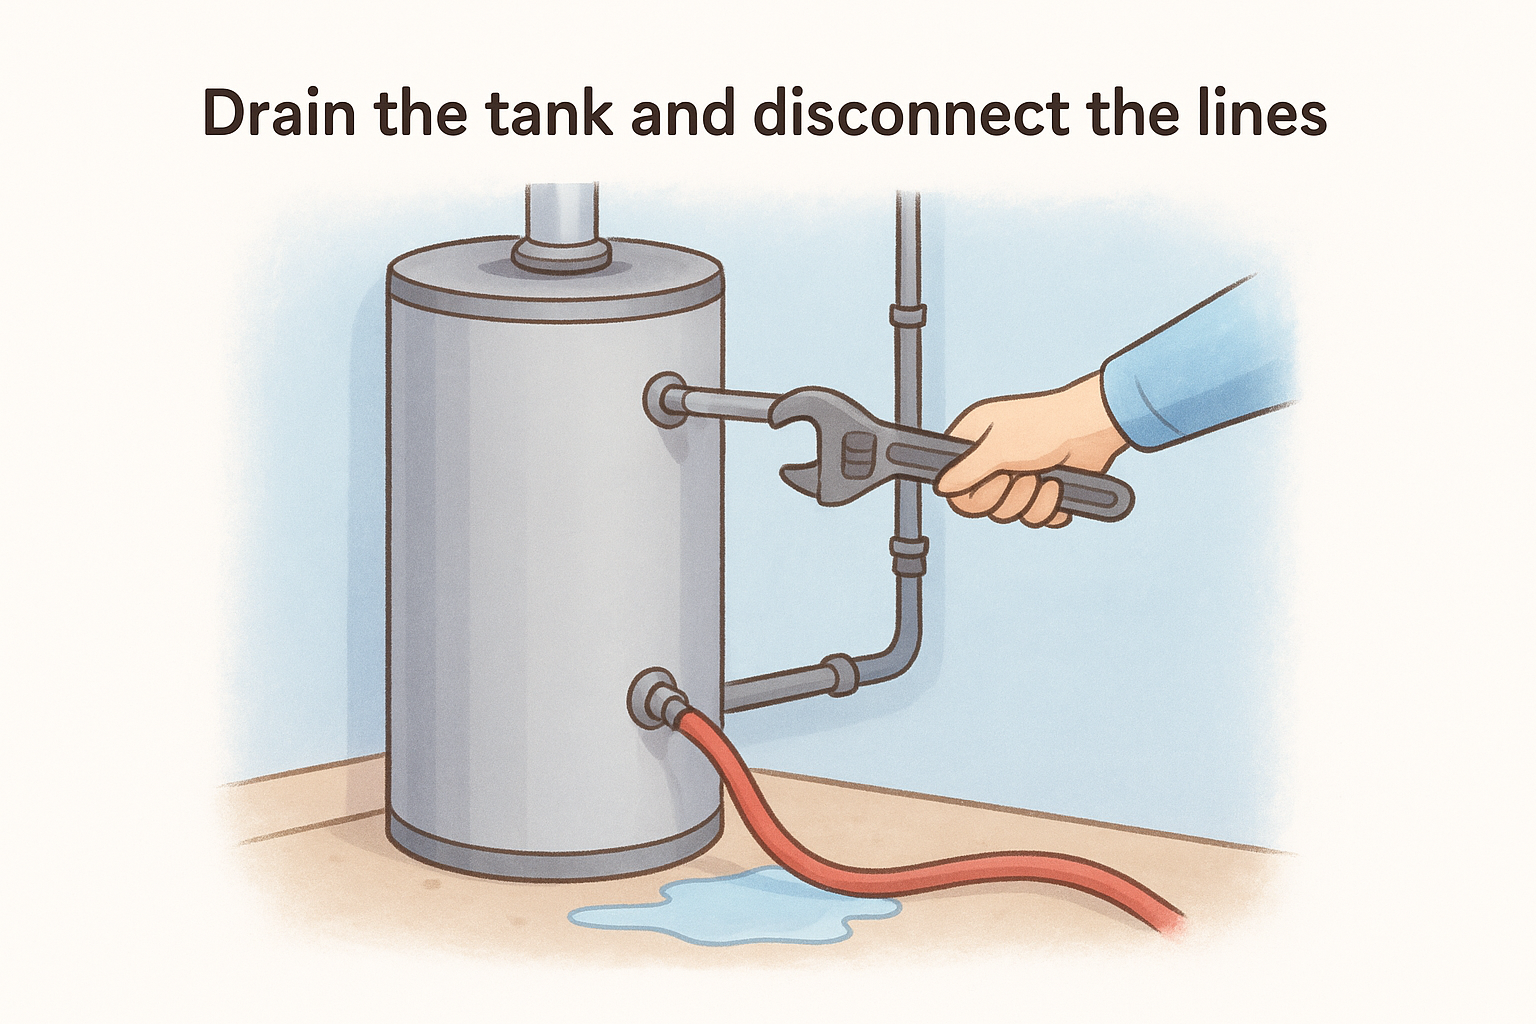
- Open a hot water tap anywhere in the house to break the vacuum inside the tank.
- Connect a garden hose to the drain valve at the bottom of the unit.
- Run the hose to a floor drain, utility sink, or outside.
- Open the drain valve fully and let the tank empty (plan for 20 to 45 minutes or more on a full tank).
- Close the cold water supply valve above the unit once draining is complete.
With the tank empty, use your two pipe wrenches to disconnect the water supply lines at the top of the tank, holding the fitting on the tank steady while you loosen each connector. Photograph the connections before you remove them so you know which line is hot and which is cold.
Pull the old unit out safely
An empty 40-gallon tank still weighs around 60 to 70 pounds, so bring a second person before you try to move it. Tilt the unit slightly, slide it onto an appliance dolly, and roll it clear of the work area.
Before the new heater goes in, take a minute to inspect the space. Check the drain pan for rust or corrosion and replace it if it’s deteriorated, and clear any sediment or standing water from the floor underneath so the new unit sits flat and stable.
Step 2. Set the new heater and connect the water lines
With the old tank out and the floor clear, you’re ready to bring the new unit in. This step covers physical placement and the water connections, which are the same regardless of whether you’re finishing with a gas or electric hookup. Getting these connections tight and leak-free before you move on to the fuel or electrical side keeps the rest of the job clean and avoids backtracking later.
Position and secure the new unit
Slide the new heater off the dolly and set it down in the drain pan. Check that the unit sits level. Use a small level on the top of the unit and shim the pan if needed.
The cold water inlet sits on the right side when you face the unit, and the hot outlet is on the left. Many tanks label the nipples directly, but confirm with the photos you took during teardown. Position the heater so the connections, access panels, and the TPR valve discharge port all face somewhere you can reach with ease.
Before connecting anything to the new unit, wrap all threaded nipples with at least three layers of thread seal tape, winding in the same direction as the thread so the tape doesn’t unravel when you tighten the fitting.
Connect the water supply lines
Flexible water supply connectors make this part of how to install a water heater much more forgiving than rigid copper, especially if the new tank sits even a few inches off from the old footprint. Hand-tighten each connector onto the nipple first, then snug it down with your pipe wrench. Use your second wrench to hold the tank nipple steady so you don’t torque the fittings on the tank body itself.
Work through this connection sequence in order:
- Attach the cold supply line to the inlet nipple first.
- Attach the hot outlet line to the top outlet nipple.
- Install the new TPR valve if the tank didn’t come with one pre-installed, using thread seal tape on the threads.
- Connect the discharge pipe to the TPR valve and run it to within six inches of the floor or directly to a nearby drain.
Leave the cold supply valve closed for now. You’ll open it in Step 4 when you’re ready to fill and test the tank.
Step 3. Finish the hookup for electric or gas
Water line connections are done, and now you split into one of two paths depending on your fuel type. This step is the most critical part of how to install a water heater correctly, because improper electrical wiring or a loose gas connection are both genuine hazards. Work slowly, double-check every connection, and don’t skip the leak test on the gas side before you move forward.
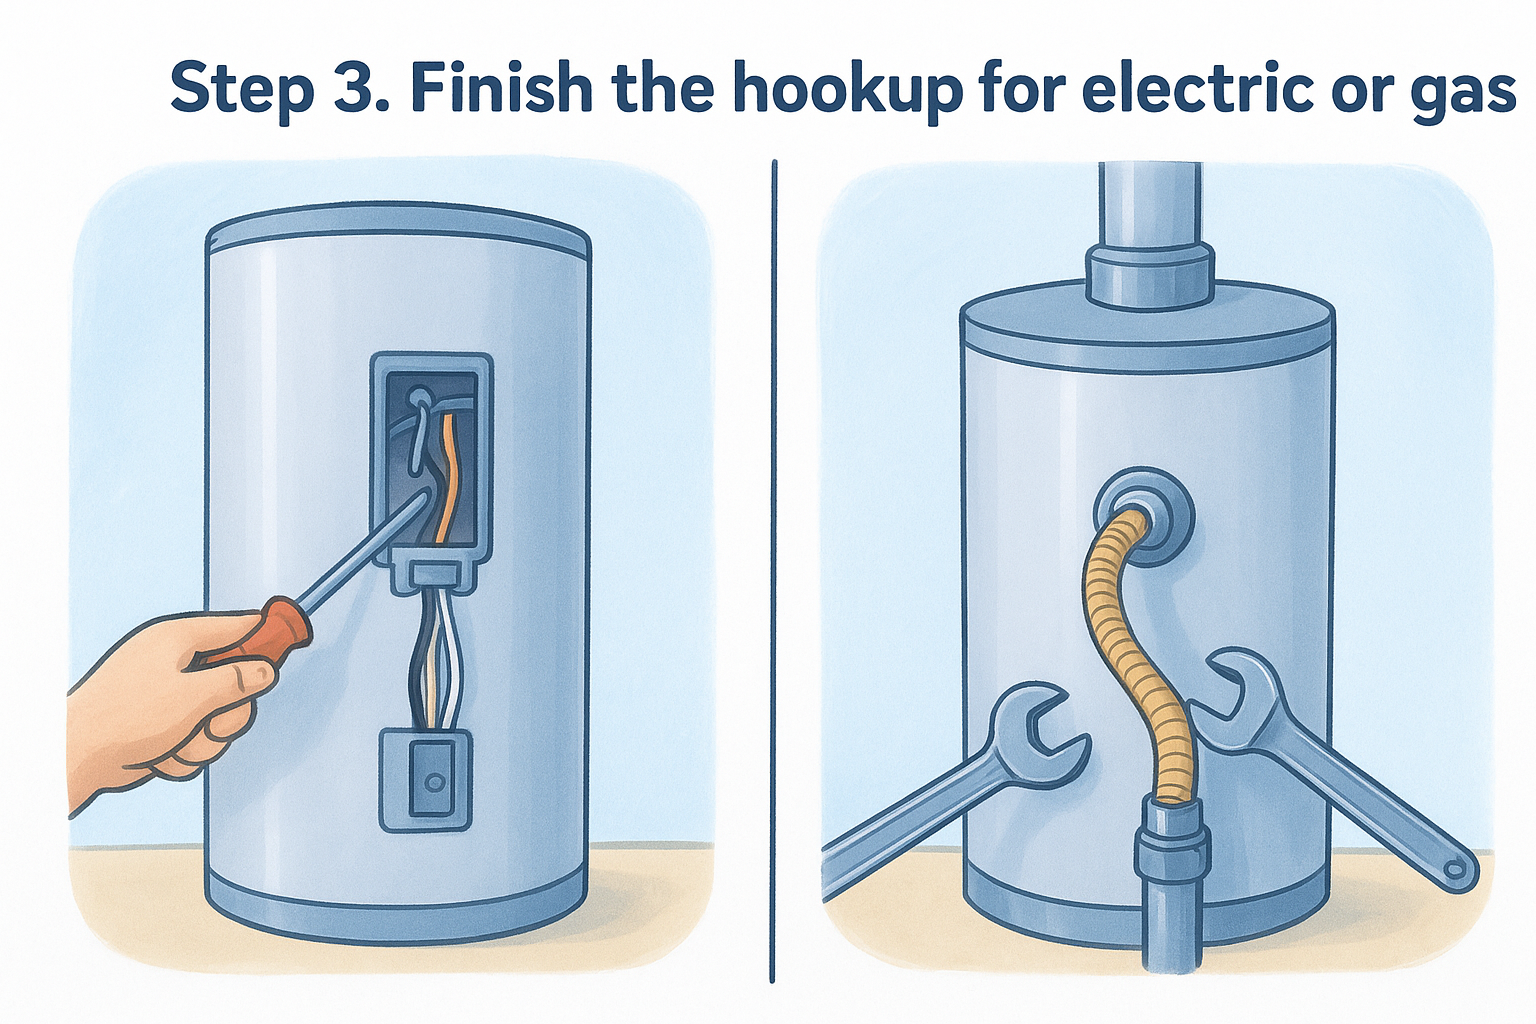
Electric water heater: wiring the connections
Electric water heaters run on a dedicated 240-volt double-pole circuit, and the connection point is behind a small access panel near the top of the tank. Remove the panel cover and you’ll find a junction box with the supply wires from your home waiting inside.
Follow this wiring sequence:
- Confirm the breaker is still in the off position and verify with your voltage tester before touching any wire.
- Connect the black supply wire from the wall to the black wire on the heater.
- Connect the white supply wire from the wall to the white wire on the heater.
- Connect the bare copper or green ground wire to the grounding screw inside the junction box.
- Fold the wires neatly into the junction box and replace the cover panel.
If your supply wires use black and red instead of black and white, that’s normal for a 240-volt circuit. Connect black to black and red to white on the heater side.
Gas water heater: connecting the line and venting
Gas connections require flexible (or ridged) corrugated stainless steel connector lines rated for gas use, not the flexible water supply connectors you used in Step 2. Apply pipe dope rated for gas to all threaded fittings before you tighten them, and use your two wrenches to hold the fitting steady while you turn the connector.
With the gas line connected, reattach the flue vent pipe to the draft hood at the top of the unit. The vent sections should slide together firmly with no gaps, and each joint needs at least three sheet metal screws to hold it secure. The vent should rise at least one inch for every foot of horizontal run before it connects to the flue, so hot exhaust gases move up and out rather than backing into the room.
Brush gas leak detector solution across every gas connection you made, including the valve, the union fitting, and the flexible connector at both ends. No bubbles means you’re clear to move to the next step.
Step 4. Fill, start up, and run the safety checks
You’re in the final stretch of how to install a water heater, and this step is where everything gets confirmed. Filling the tank in the correct order protects the heating elements from burning out and prevents damage the moment you turn the unit on. Work through each check below in sequence and don’t rush the last part.
Fill the tank before you apply power or light the pilot
Open the cold water supply valve slowly above the tank and let it begin to fill. While it fills, open a hot water faucet anywhere in the house to release trapped air from the lines. You’ll hear sputtering and spitting at the tap, and that’s expected. Keep that faucet open until water flows out in a steady, uninterrupted stream, which tells you the tank is completely full and the air is cleared.
Never power on an electric heater or light a gas pilot until the tank is full. Running the elements or burner dry will destroy them in minutes.
Wipe down the area around the base of the unit and all the water connections you made in Step 2. Look for any dripping or leaks and watch each joint for a full two minutes. Catching a slow drip here saves you from a bigger problem once the system is pressurized and heated.
Start up the unit and verify the heat
For an electric heater, flip the dedicated circuit breaker back on at the panel. The unit starts heating immediately with no sound from the tank. Give it 60 to 90 minutes before you expect full hot water at a tap, depending on the tank size.
With a gas heater, follow the startup instructions printed on the label attached directly to the tank. The steps typically involve setting the valve to pilot, pressing and holding the igniter, and moving the valve to the on position once the pilot holds a flame. Set the thermostat dial to 120 degrees Fahrenheit, which is the standard setting recommended by the U.S. Department of Energy for residential water heaters.
Once the tank reaches temperature, run a hot water faucet for 30 seconds and confirm the water arrives hot at normal pressure. That’s your signal that the installation is complete and the unit is working correctly.
Wrapping Up
Now you have a complete picture of how to install a water heater, from shutting down utilities and pulling the old tank to making the water, gas, or electrical connections and running the final checks. The process is manageable for someone with solid DIY experience, the right tools, and a willingness to be patient.
That said, plenty of homeowners reach this article and decide the gas line work, the electrical connections, or the permit process is more than they want to take on alone. That’s a reasonable call. If you’d rather have it handled correctly the first time, Bizzy B Plumbing serves Knoxville, Maryville, Alcoa, and the surrounding East Tennessee communities with same-day service and an upfront estimate before any work begins.
When you’re ready, schedule your water heater repair or replacement and we’ll take it from there.