Your water heater doesn’t usually give you much warning before it quits. One morning you’re stepping into a cold shower or watching a puddle spread across the garage floor, and suddenly you need to figure out how to install a water heater, fast. The good news: with the right tools, some basic mechanical confidence, and a clear set of instructions, a DIY water heater installation is doable for many homeowners.
That said, this job involves gas lines, electrical connections, water supply hookups, and local building codes, none of which leave much room for guesswork. At Bizzy B Plumbing, we handle water heater replacements across Knoxville and East Tennessee every week, and we’ve seen firsthand what happens when a step gets skipped or a connection isn’t done right. We wrote this guide to give you an honest look at the full process, whether you’re tackling it yourself or just want to understand what the job involves before calling a professional.
Below, you’ll find step-by-step instructions for both gas and electric water heater installations, along with safety precautions, tool lists, and tips on when it makes sense to bring in a licensed plumber instead.
Before you start: safety, codes, and sizing
Before you touch any connections, there are three things you need to get right: safety precautions, local code requirements, and unit sizing. Skip any one of these and you’re setting yourself up for a failed inspection, a gas leak, or a water heater that can’t keep up with your household’s demand. Taking 30 minutes to work through these basics before you start will save you hours of backtracking later.
Safety basics that protect you and your home
Water heater installation means working around pressurized water lines, gas or high-voltage electrical connections, and a heavy appliance that typically weighs between 100 and 150 pounds when empty. Before you do anything else, shut off the main gas supply or circuit breaker feeding the existing unit. If you smell gas at any point during the job, stop immediately, leave the area, and call your gas utility from outside. Do not flip any electrical switches or use any open flames.
Never assume the gas valve or breaker is off just because someone else said they flipped it. Verify it yourself before you disconnect anything.
Working with a gas unit also means checking for proper ventilation clearances and confirming your flue venting isn’t cracked, blocked, or undersized. For electric units, verify that the circuit is rated for the heater’s amperage draw, typically 30 amps for most residential tanks. If the wiring looks corroded or undersized, fix that electrical issue before the new unit goes in.
Permits and local code requirements
Most jurisdictions require a permit for water heater replacement, even when it’s a straightforward like-for-like swap. In Knoxville and Knox County, that typically means pulling a permit through your local codes office and scheduling an inspection after the work is complete. Skipping this step can create real problems when you sell your home or file an insurance claim following a water damage incident.
Call your local building department before you start. Ask specifically whether your project requires a permit, whether a licensed plumber must perform the work, and whether the installation needs to meet any updated code standards. Some areas now require seismic strapping, expansion tanks, or specific venting materials that weren’t standard when your old unit was installed. Getting clarity upfront prevents a failed inspection and costly rework.
Sizing your replacement unit
Choosing the right tank size is one of the most overlooked parts of figuring out how to install a water heater correctly. If you buy a unit that’s too small, you’ll run out of hot water regularly. Buy one that’s too large, and you’ll pay more in energy costs every month to heat water you’re not using.
The general guideline for tank-style water heaters is to match capacity to the number of people in your household:
| Household Size | Recommended Tank Capacity |
|---|---|
| 1-2 people | 30-40 gallons |
| 3-4 people | 40-50 gallons |
| 5+ people | 50-80 gallons |
Beyond tank size, check the first-hour rating (FHR) on the unit’s Energy Guide label. The FHR tells you how many gallons the heater can deliver in the first hour of use starting with a full tank, which is a better real-world measure than capacity alone. Also confirm that the new unit’s connection locations (hot and cold inlets, gas line or electrical hookup, and drain valve) align reasonably well with your existing setup so you’re not rebuilding the surrounding plumbing from scratch.
Step 1. Gather tools, parts, and shutoffs
Pulling together everything before the job starts is the step most DIYers underestimate. When you know how to install a water heater correctly, you know that running back to the hardware store mid-job can mean leaving your home without hot water for hours longer than necessary. Lay out your tools and parts, confirm your shutoffs are working, and start the project only when you’re ready to see it through.
Tools you’ll need
Most water heater installations require a standard set of plumbing and hand tools you may already have in your garage. If you’re working on a gas unit, you’ll also need a few gas-specific items that are worth picking up before you start.
- Adjustable pipe wrenches (two, for counter holding)
- Channel-lock pliers
- Teflon tape (yellow, gas-rated tape for gas lines)
- Flathead and Phillips screwdrivers
- Non-contact voltage tester (electric installations)
- Pipe cutter or hacksaw
- Garden hose for draining the old tank
- Bucket or wet/dry shop vac
- Pipe joint compound rated for gas service (gas installations)
- Leak detection spray (gas installations)
Never use standard white Teflon tape on gas fittings. Use only yellow gas-rated tape or a pipe joint compound rated specifically for gas service.
Parts and fittings to have on hand
Buying the right parts ahead of time prevents a mid-project trip to the hardware store that stretches a two-hour job into a full day. The exact list depends on your existing setup, but these fittings cover most residential installations:
- Flexible water supply connectors (match your pipe diameter, typically 3/4 inch)
- Dielectric unions (if connecting copper pipe to a steel fitting)
- New T&P relief valve with discharge pipe, if not pre-installed on the unit
- Expansion tank, required by many local codes when a check valve is present
- Gas connector rated for your BTU load (gas units only)
- Wire connectors and electrical tape (electric units only)
Confirm your shutoffs before you start
Before moving to the next step, physically locate and test every shutoff you’ll rely on during the installation. Turn the cold water supply valve at the water heater and confirm it fully stops the water flow. For gas units, find the dedicated gas shutoff on the line feeding the unit and confirm it turns smoothly.
If either valve is stuck, corroded, or doesn’t close all the way, replace it before you go any further. A shutoff that fails mid-installation puts you in a difficult position fast, and fixing it after the fact costs far more time than addressing it now.
Step 2. Remove the old water heater
Removing the old unit is the most physically demanding part of the job, but it’s also one of the most straightforward. Your main goal here is to shut off every supply line, drain the tank fully, and disconnect the unit without damaging the surrounding plumbing or flooring. Working through this in order prevents a slow, soggy mess from turning into a bigger repair.
Drain the tank completely
Before you disconnect any fittings, you need to get the water out of the tank. Attach a garden hose to the drain valve near the base of the unit and run the other end to a floor drain, utility sink, or outside. Open the drain valve and open a nearby hot water faucet inside the house at the same time. This breaks the vacuum in the line and lets the tank drain much faster.
A full 40-gallon tank can take 20 to 30 minutes to drain completely, so plan your time before you start disconnecting anything.
Sediment buildup can clog the drain valve on older units, slowing drainage to a trickle. If that happens, open the T&P relief valve briefly to introduce air and push the water through. If the valve is completely blocked, use a wet/dry shop vac to pull water out through the cold inlet once you’ve disconnected that line.
Disconnect the supply and energy lines
Once the tank is empty, disconnect the cold and hot water supply lines at the top of the unit. Keep a bucket nearby since some water will remain in the lines. For gas units, close the dedicated gas shutoff valve on the supply line, then carefully unscrew the gas connector from the unit’s gas valve. Set the connector aside and inspect it for cracks or corrosion before reusing it on the new unit.
For electric units, confirm the circuit breaker is off using a non-contact voltage tester before you touch any wires. Remove the access panel and disconnect the wiring from the terminal block. For gas units, finish by detaching the flue vent collar at the top of the unit, loosening the screws, and pulling the vent section free.
With everything disconnected, tilt the old unit onto an appliance dolly and move it out. Water heaters are heavy and awkward, so get a second person to help you tip and roll it safely. A clean removal like this is what sets up knowing how to install a water heater the right way, because your connections and the surrounding space are ready to work with instead of against you.
Step 3. Install an electric water heater
With the old unit out of the way, you can move the new heater into position. Electric installations move faster than gas because there’s no venting involved, but the electrical connections require the same care and precision as any other part of figuring out how to install a water heater the right way. Work through this section in order and don’t skip the testing steps at the end.
Position and connect the water lines
Roll the new unit into place and confirm it sits level. An uneven tank puts unnecessary stress on the connections over time, so use a level across the top of the unit and adjust the feet if needed. Once it’s stable, attach the flexible water supply connectors to the cold and hot inlets at the top of the tank. Cold goes to the inlet marked with a blue label or “C,” and hot connects to the outlet marked with a red label or “H.”
Hand-tighten each connection first, then use channel-lock pliers for a final quarter turn to seat the fitting without over-tightening. If you’re connecting to copper pipe, install dielectric unions between the copper and the steel tank fittings. Skipping this step causes corrosion at the joint that shortens the tank’s lifespan. Also install the T&P relief valve if it isn’t pre-installed, applying Teflon tape to the threads and tightening it until the discharge opening faces downward or toward the drain pipe location.
Wire the electrical connections
Remove the access panel on top of the unit to reach the terminal block. Feed your supply wires through the conduit opening and connect black to black and white to white using the wire connectors already in the panel. Attach the bare ground wire to the green grounding screw on the terminal block. Tighten each connection firmly so no wire can pull free under normal vibration.
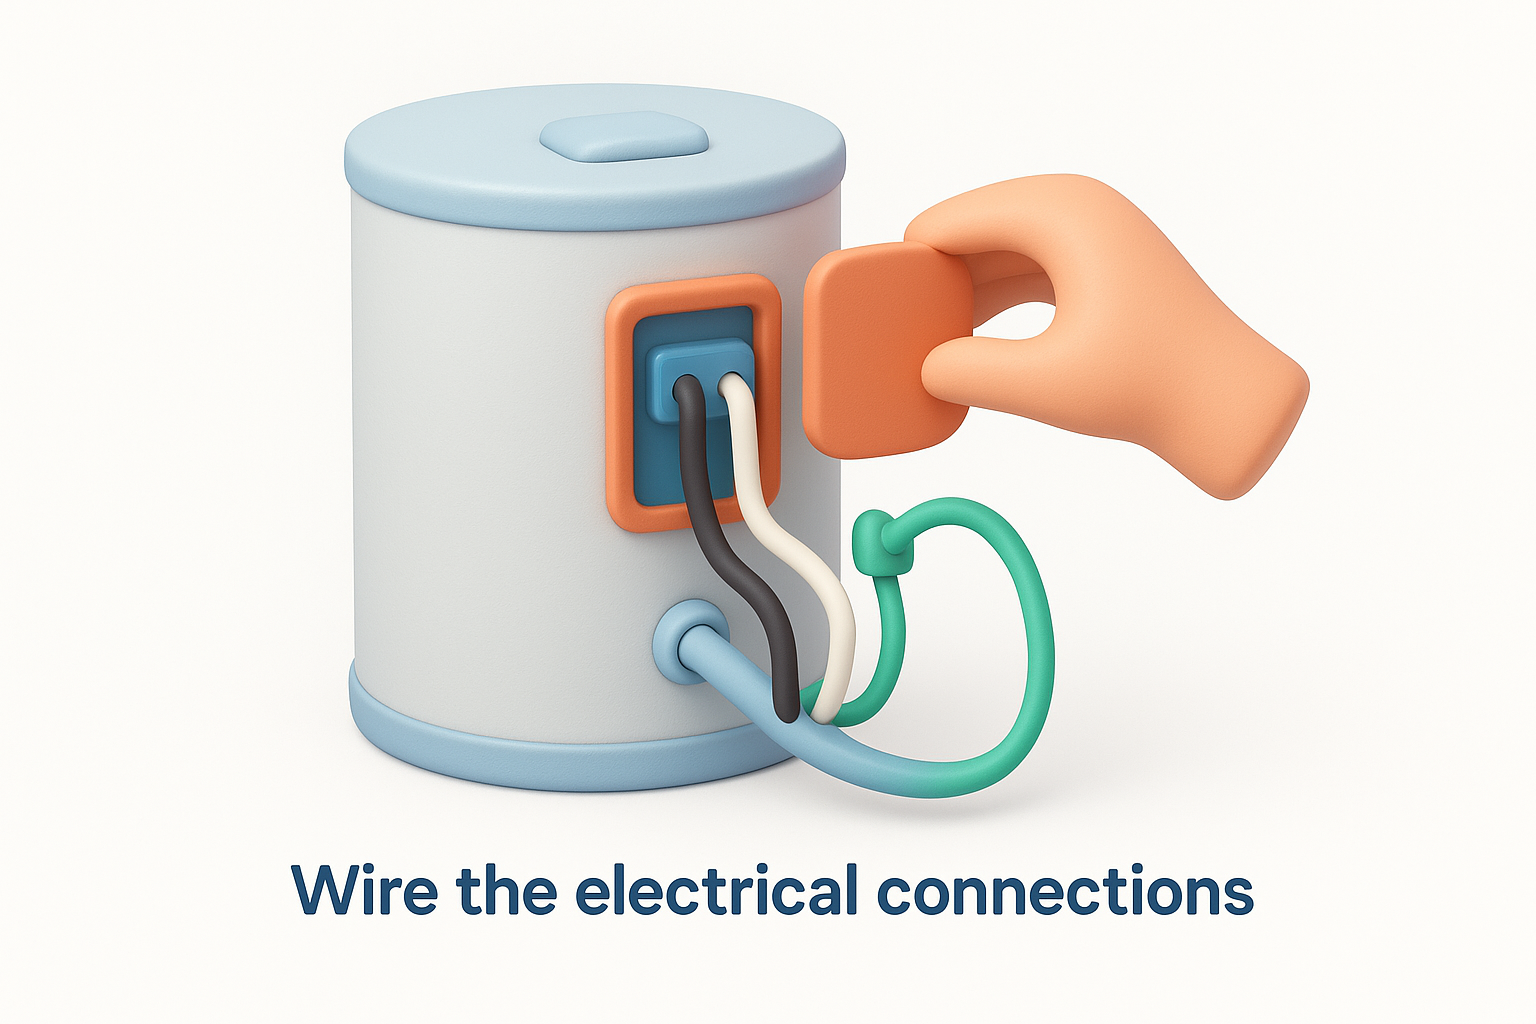
Once the wiring is connected, replace the access panel before you restore power. Never energize the heating elements while the tank is empty or you’ll burn them out within minutes.
Fill and test the unit
Open the cold water supply valve and let the tank fill completely. You’ll know it’s full when water flows steadily from an open hot faucet inside the house with no sputtering. Once it’s full, restore power at the breaker and give the unit 60 to 90 minutes to reach temperature before checking for leaks at every connection point.
Step 4. Install a gas water heater
Gas installations follow many of the same steps as electric ones, but the gas line connection and venting add complexity that demands extra care. Knowing how to install a water heater with a gas supply means understanding that a poorly seated fitting or a cracked flue connection creates risks well beyond a leaking pipe. Work through this step in order and don’t treat any part of it as optional.
Position the unit and connect the water lines
Move the new unit into position and check that it sits completely level before you touch any connections. Use a level across the top of the tank and adjust the feet until the reading is flat. Once stable, connect the flexible water supply connectors to the cold and hot inlets, hand-tightening first, then adding a firm quarter turn with channel-lock pliers. Install dielectric unions if you’re connecting to copper pipe, and thread the T&P relief valve into its port with yellow gas-rated Teflon tape, positioning the discharge opening downward toward the drain location.
Connect the gas line and vent
Attach the flexible gas connector from the gas supply line to the unit’s gas valve, using yellow gas-rated Teflon tape or pipe joint compound on every threaded fitting. Hand-tighten, then snug it with a wrench while counter holding the valve so you don’t twist it out of alignment. Once the gas line is secure, slide the flue vent sections together starting at the draft hood on top of the unit, working up toward the existing vent collar. Tighten the sheet metal screws at each joint so no section can separate.
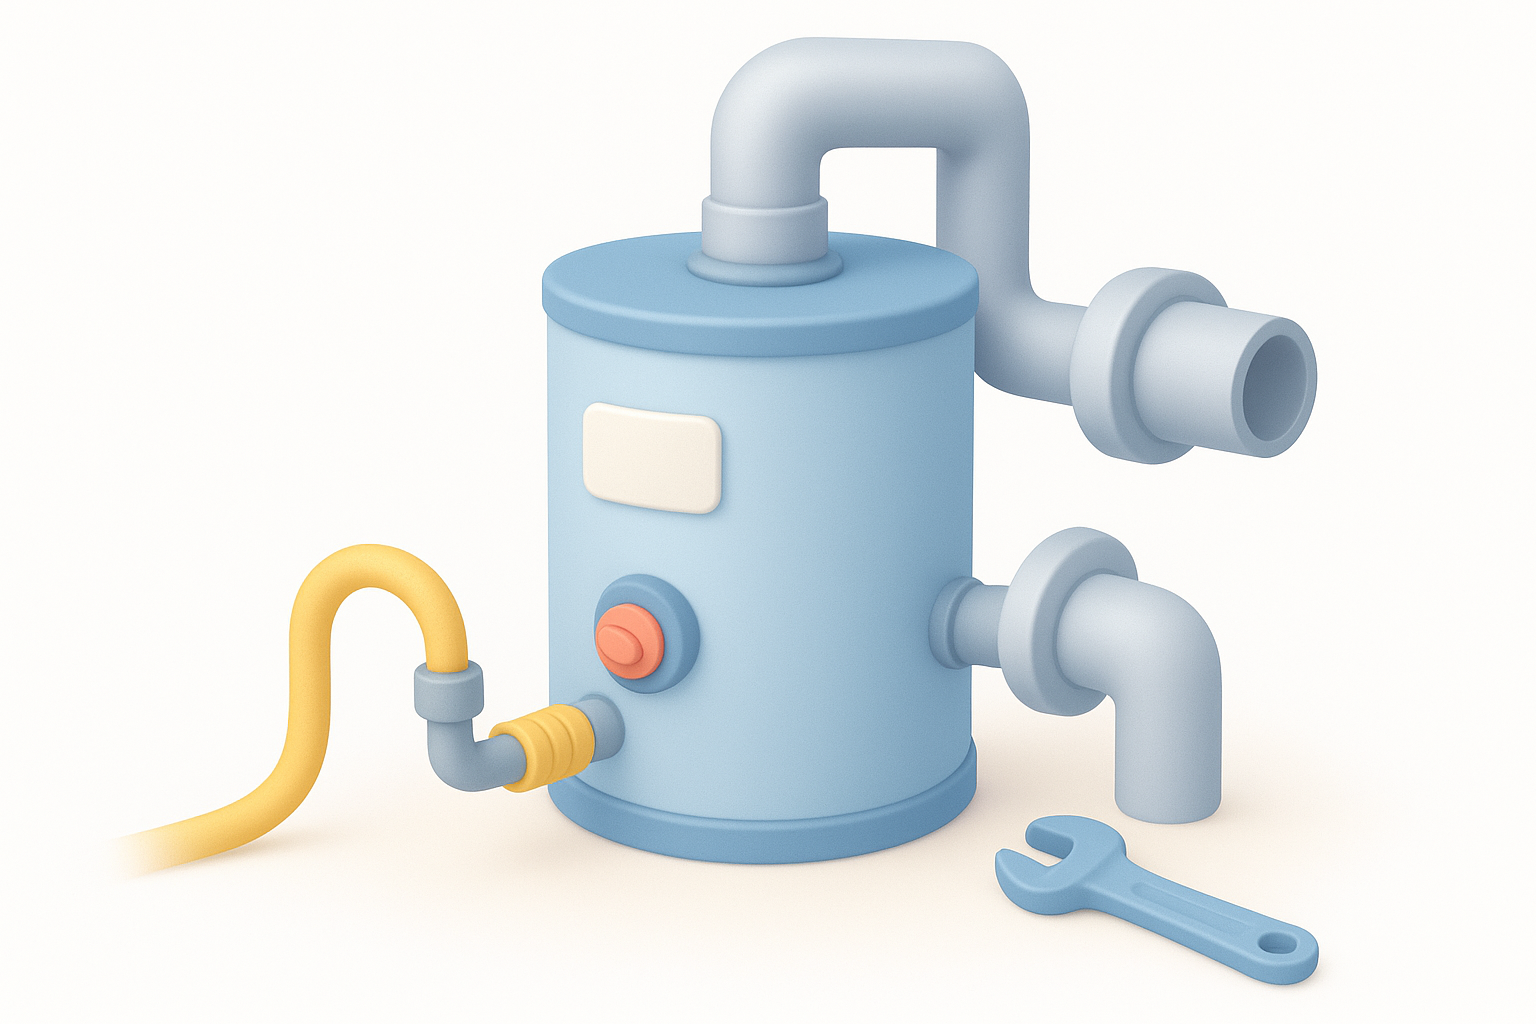
Once every gas fitting is connected, open the gas valve slowly and apply leak detection spray to each joint. Bubbles mean a leak. Shut the gas off immediately and re-seat that fitting before you proceed.
Light the pilot and check for leaks
Follow the manufacturer’s lighting instructions printed on the unit’s label, which typically involves turning the control knob to “Pilot,” pressing it in, and igniting the pilot while holding the knob depressed for 30 to 60 seconds. Once the pilot stays lit, turn the control to your desired temperature setting (120°F is recommended for most households). Give the unit 60 to 90 minutes to reach temperature, then check every water connection and gas fitting one final time before calling the installation complete.
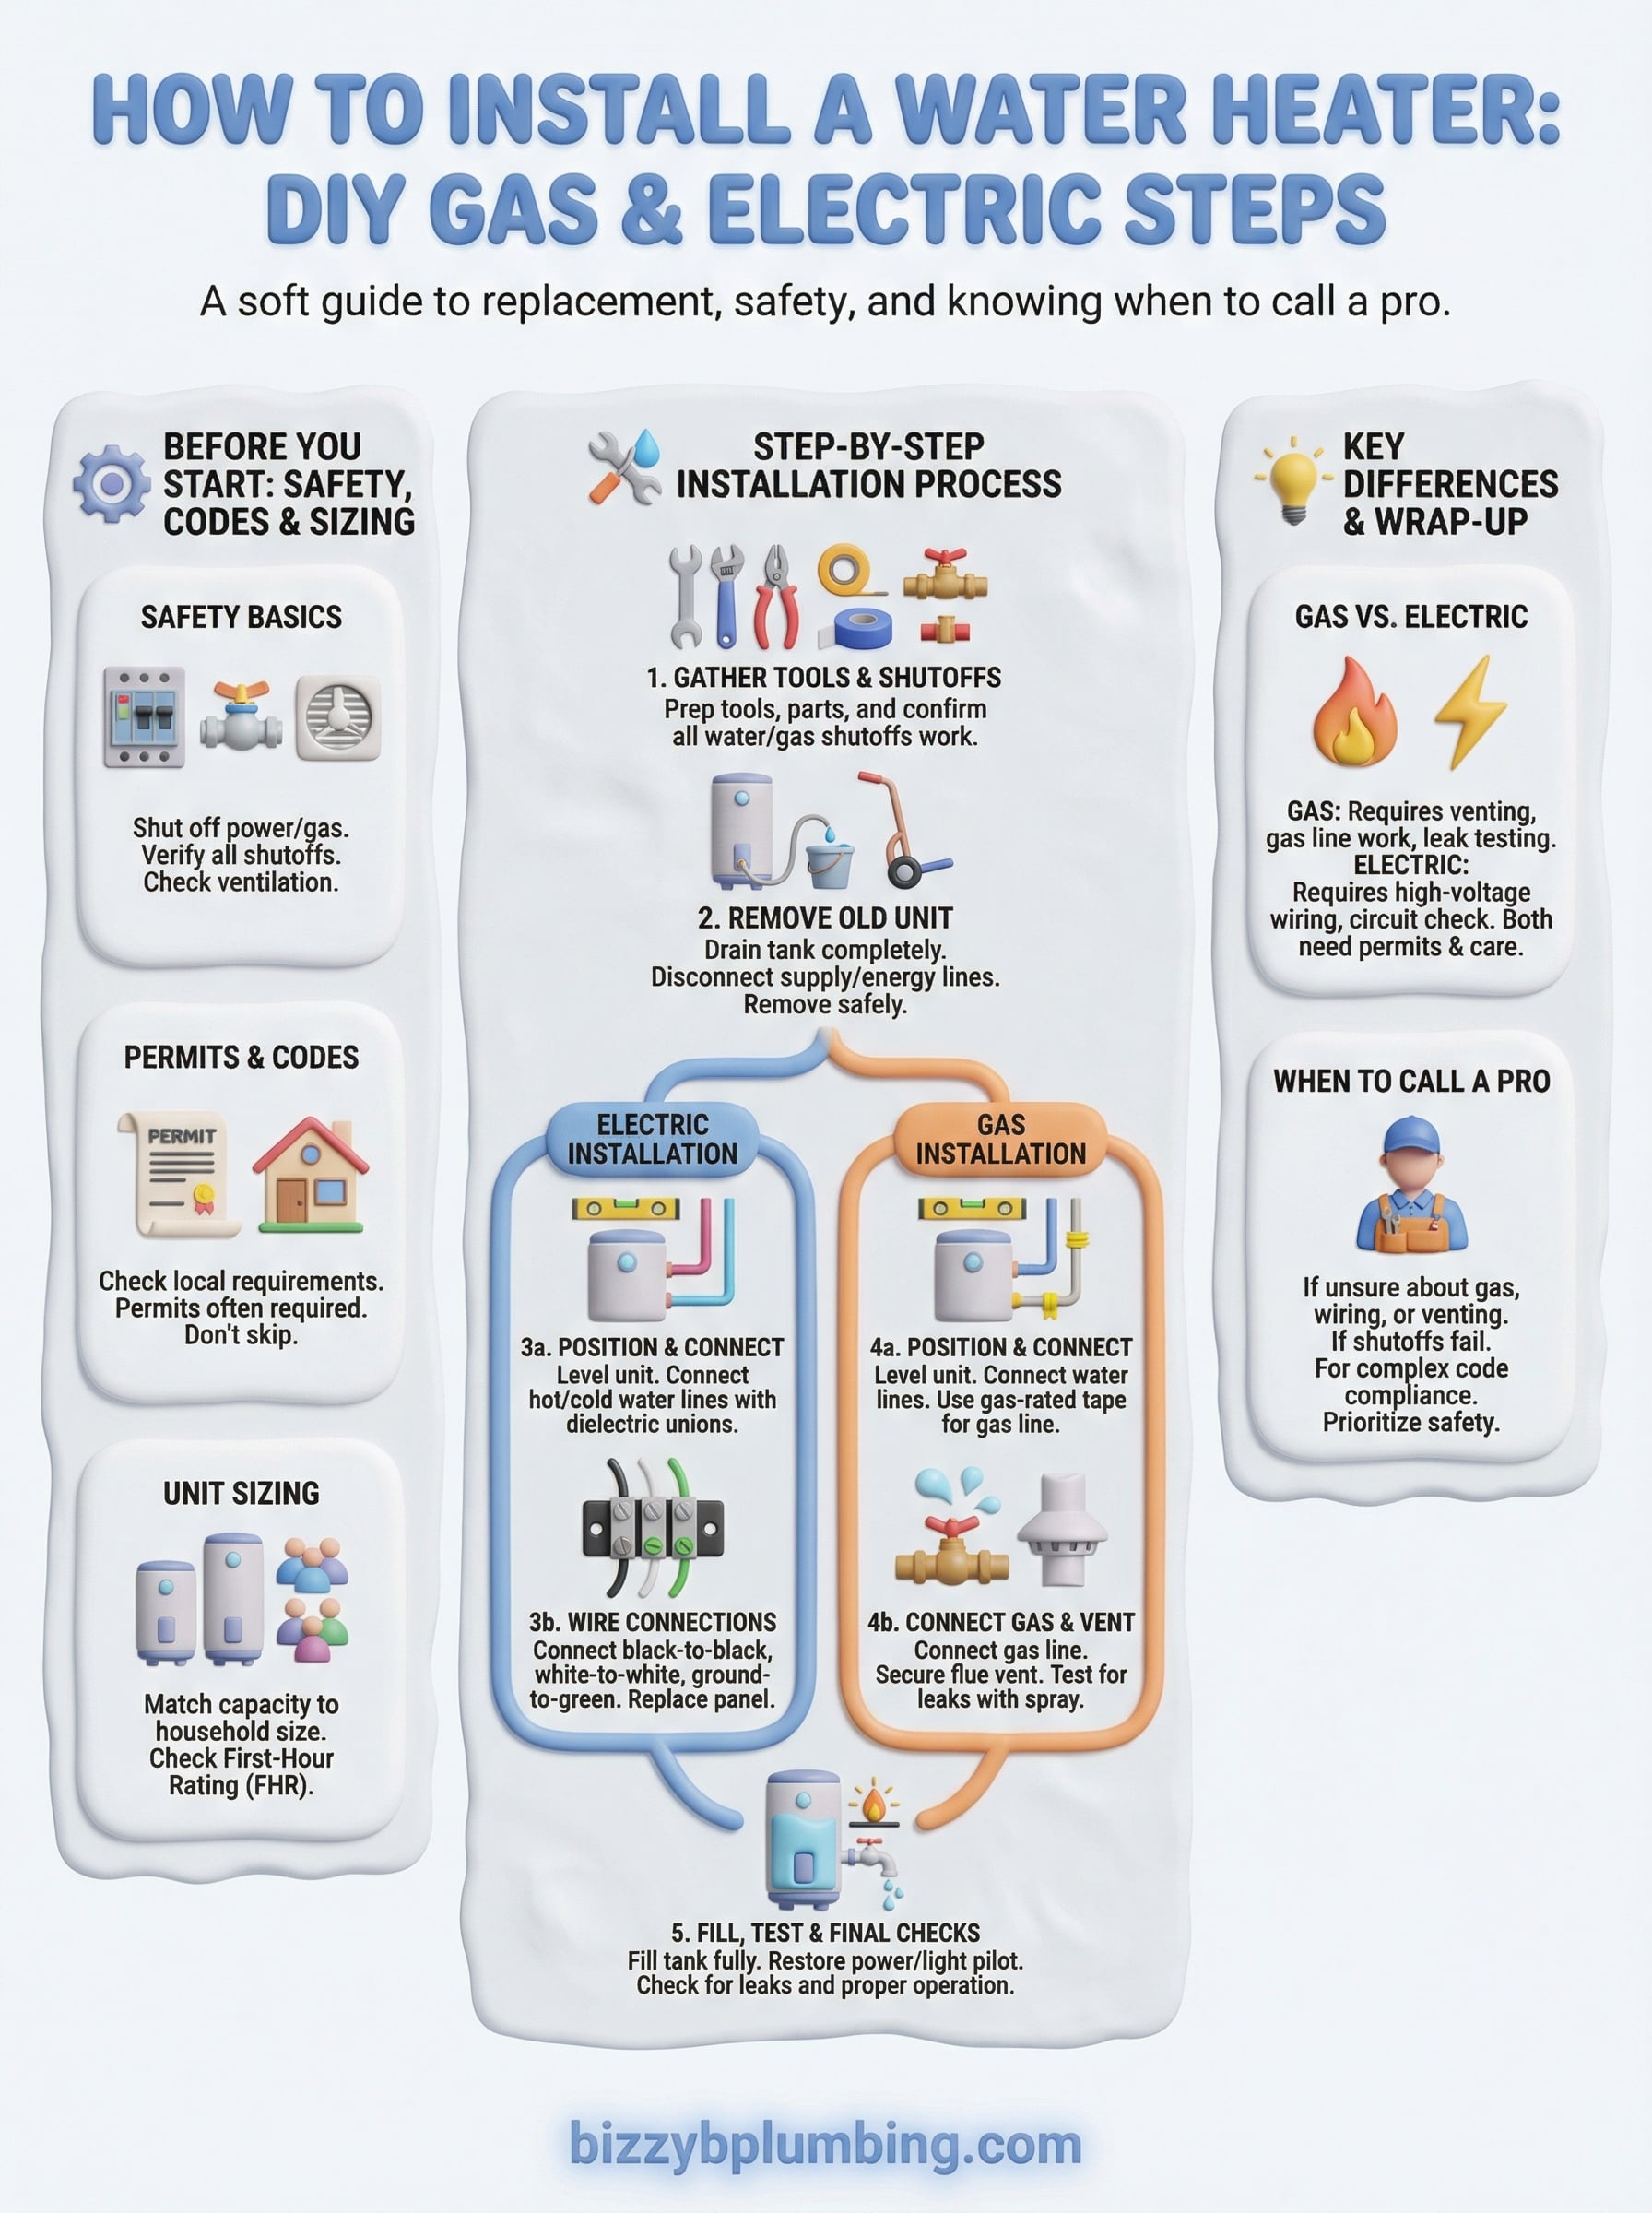
Wrap up and stay safe
Knowing how to install a water heater gives you a real advantage when the time comes to replace yours. Whether you’re working with a gas or electric unit, the process follows the same core logic: shut off every supply, work in order, test every connection before you call it done, and never skip the permit step just to save a few hours. A proper installation protects your home, keeps your insurance valid, and means your new unit runs efficiently from day one.
That said, gas line work, electrical wiring, and venting are areas where a single mistake carries serious consequences. If you hit a point where something doesn’t look right or you’re not confident in what you’re looking at, stopping is the smart call. The job will still be there when you get help. If you’re in East Tennessee and need a hand, contact Bizzy B Plumbing for honest, same-day service.