You walk into your garage or utility closet and spot a puddle forming around the base of your water heater. Maybe there’s a slow drip coming from a pipe connection, or water is pooling where it definitely shouldn’t be. Either way, the question hits fast: why is my water heater leaking, and how bad is this going to get?
The good news is that not every water heater leak means a full replacement. Some causes are straightforward and fixable. Others point to a unit that’s reached the end of its life. The key is figuring out where the water is coming from and what’s causing it before the problem gets worse, or before water damage spreads to the surrounding area.
At Bizzy B Plumbing, we handle water heater issues across Knoxville and the surrounding East Tennessee communities every day. This guide walks you through the most common reasons water heaters leak, what you can check yourself, and when it’s time to call in a professional. We’ll cover everything from minor valve issues to signs that your tank is failing, so you can make a clear, informed decision about your next step.
Safety first: what to do right now
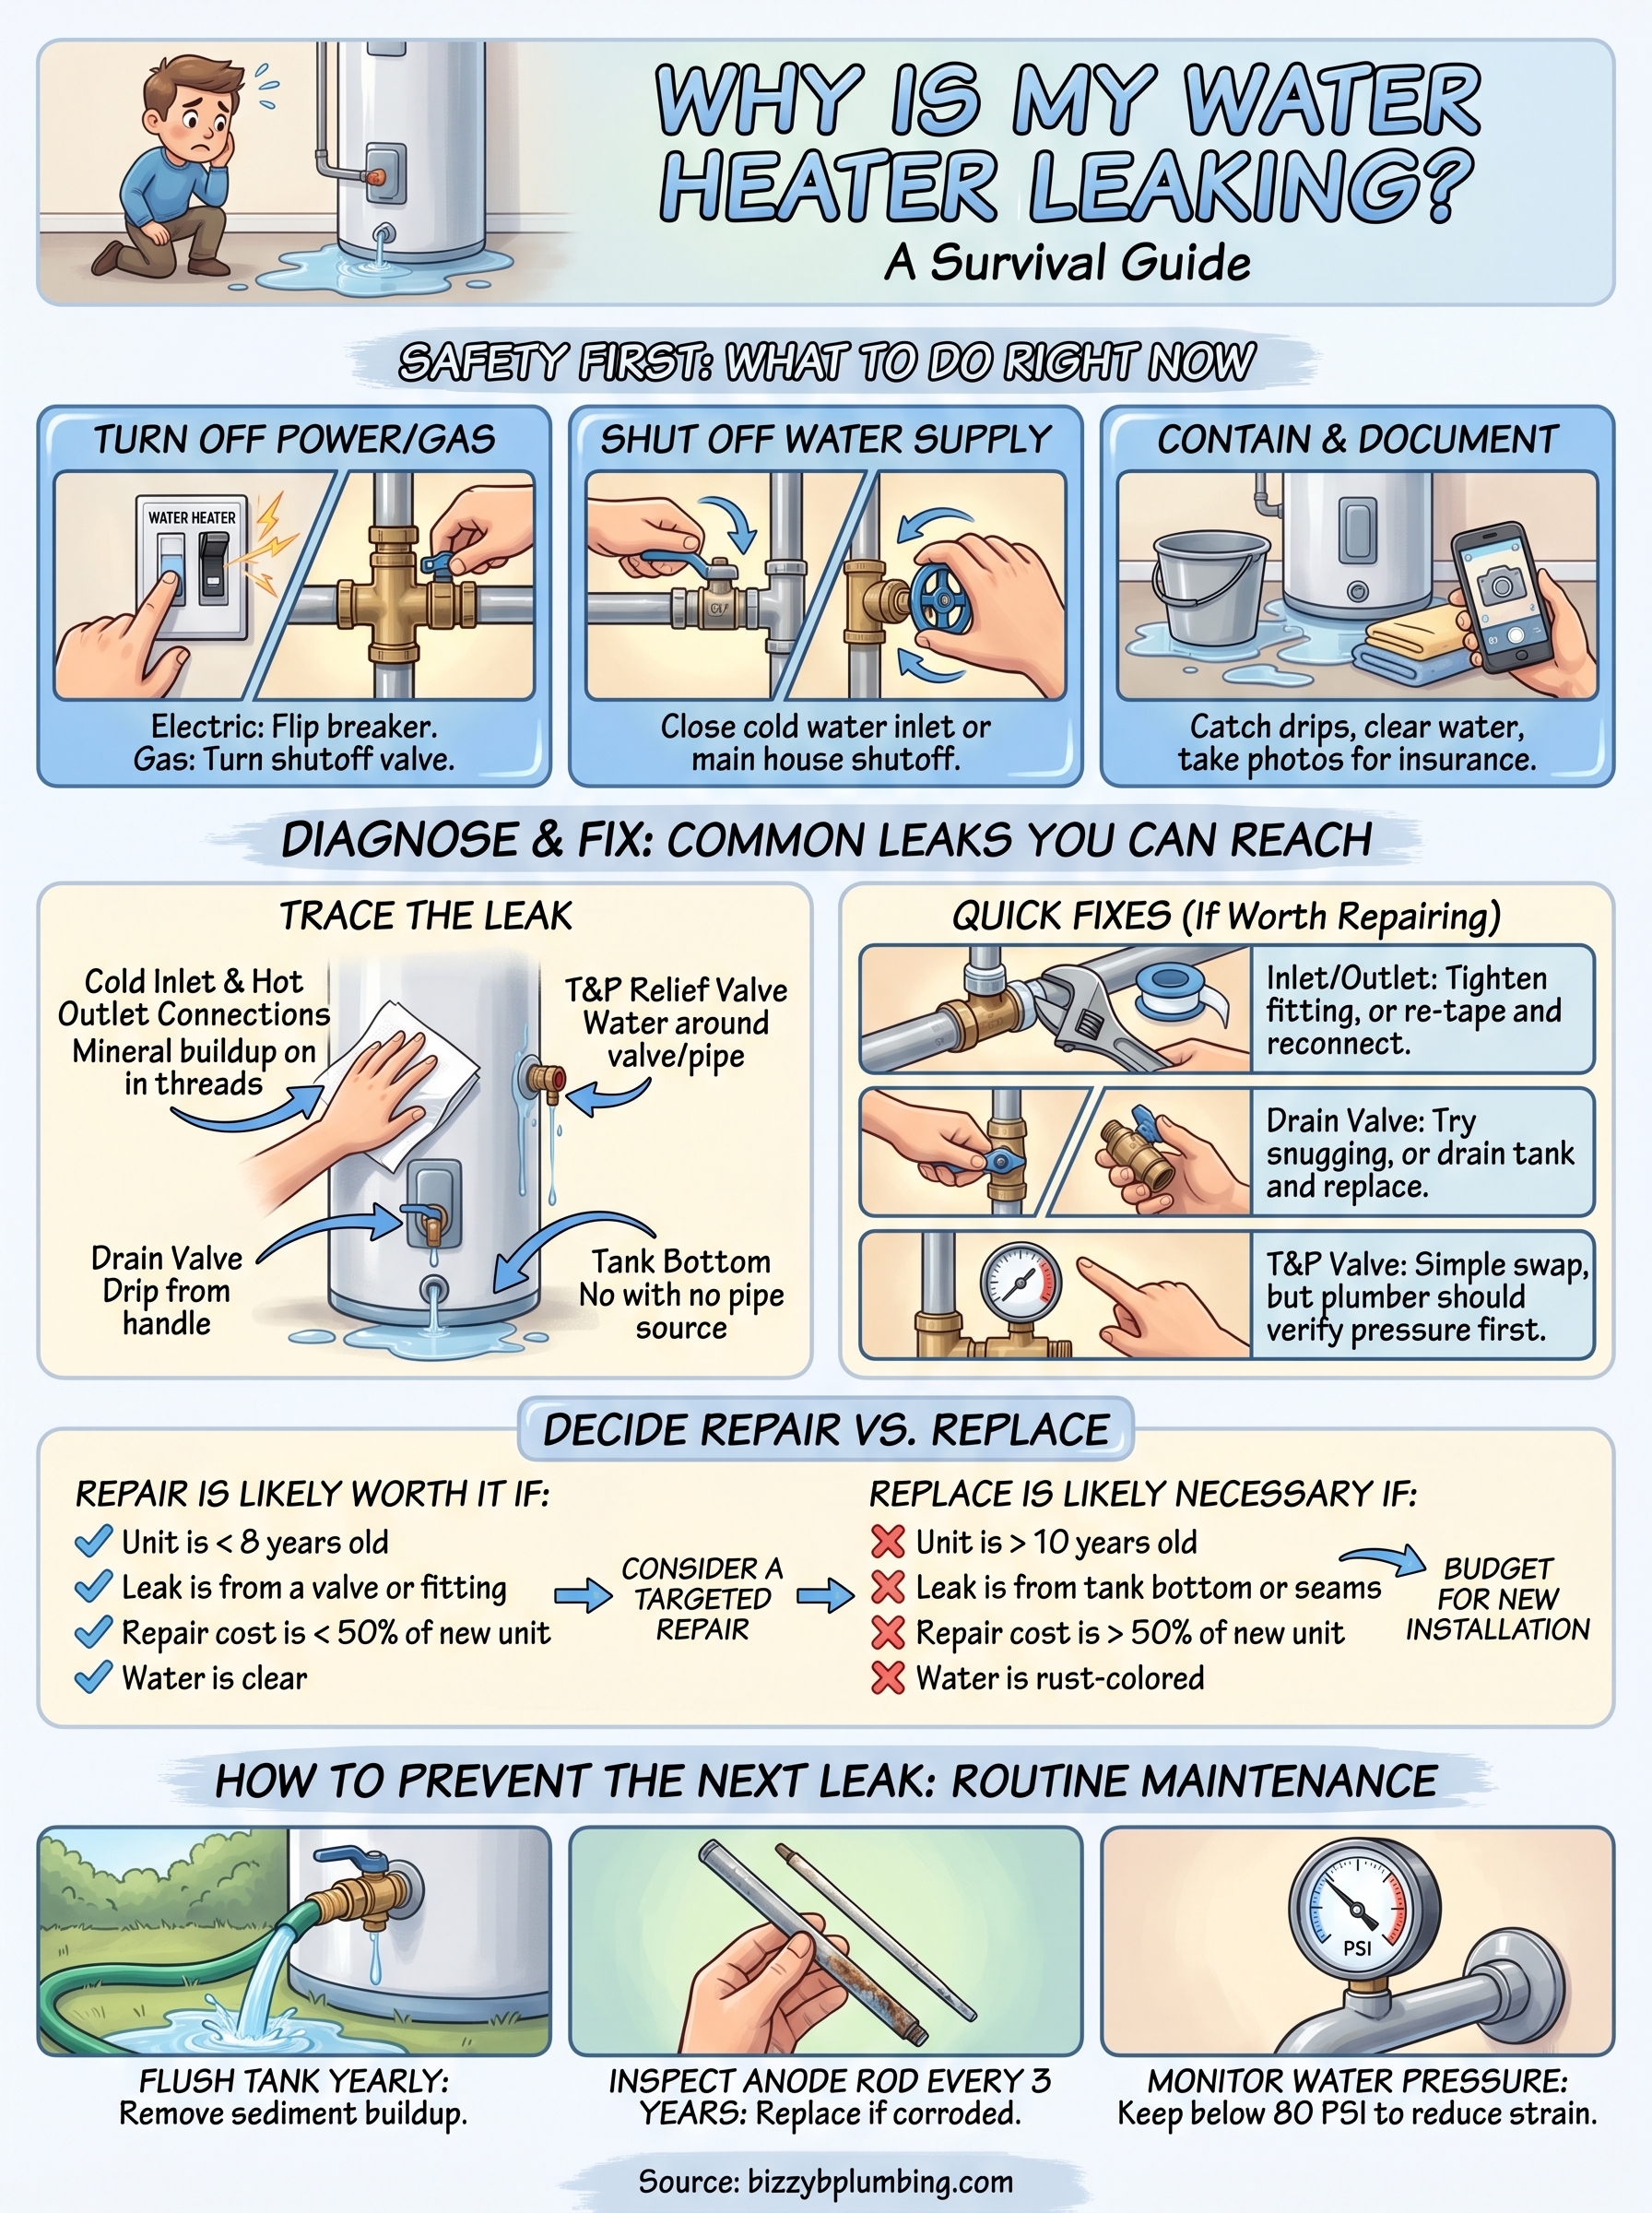
Before you start investigating why is my water heater leaking, take a few immediate steps to protect yourself and your home. A leaking water heater can involve hot water under pressure, live electrical components, and in homes with gas units, a potential ignition risk. Taking two minutes to work through these steps first makes everything safer and limits damage to the surrounding area.
Turn off the power or gas
Electric water heaters connect to a dedicated circuit breaker in your electrical panel. Find the breaker labeled “water heater” and flip it to the off position before you touch anything near the unit. If the labels in your panel are unclear, turn off the main breaker temporarily.
Never reach around or touch a water heater that is sitting in standing water while the power is still on. Water and live electricity are a fatal combination.
Gas water heaters have a dedicated shutoff valve on the gas supply line running into the unit. Turn the valve so it sits perpendicular to the pipe to close the gas flow. If you smell gas at any point, stop what you are doing, leave the house immediately, and call your gas provider from outside.
Shut off the water supply
Your water heater has a cold water inlet valve located on or directly above the unit. Turn it clockwise until it stops to cut off the water feeding the tank. Most valves are either a gate valve with a round handle or a ball valve with a lever handle that turns 90 degrees.
If the valve is stuck, corroded, or difficult to reach, shut off water to the entire home at the main shutoff instead. This valve is usually located near your water meter, in a utility room, or along an exterior wall facing the street.
Contain the water and document the damage
Once the power and water are off, place old towels or a bucket around the base of the unit to catch any remaining drips. If water has spread across the floor, clear it quickly with a mop or wet/dry vacuum. Standing water on a wood subfloor or against drywall can lead to mold growth within 24 to 48 hours if you leave it sitting.
Take photos before you clean anything up. If your homeowner’s insurance covers water damage, clear photographic documentation of the source and the spread of the leak is something your adjuster will ask for. Shoot the leak location, the surrounding floor, and the full unit before you start mopping anything up.
Step 1. Confirm it is a leak and find the source
Before you assume the worst, verify that what you’re seeing is actually a leak rather than condensation. On humid days or after a cold-water refill, moisture can collect on the outside of the tank and drip to the floor without any internal problem at all. Dry the surface of the unit with a towel, then check again in 30 minutes to see if the moisture returns.
Check for condensation first
Run your hand along the outside of the tank and the connecting pipes. If the surface feels cold and damp in patches, condensation is likely the culprit rather than a true leak. Condensation typically disappears on its own once the ambient temperature in the room stabilizes or the unit finishes a heating cycle.
If the moisture reappears quickly and feels warm to the touch, you are dealing with an actual leak and need to keep investigating.
Trace the leak to its source
This is where you answer the real question behind why is my water heater leaking. Systematically check each area of the unit using a dry paper towel or tissue, which picks up moisture more clearly than your hand. Work through these common leak points in order:
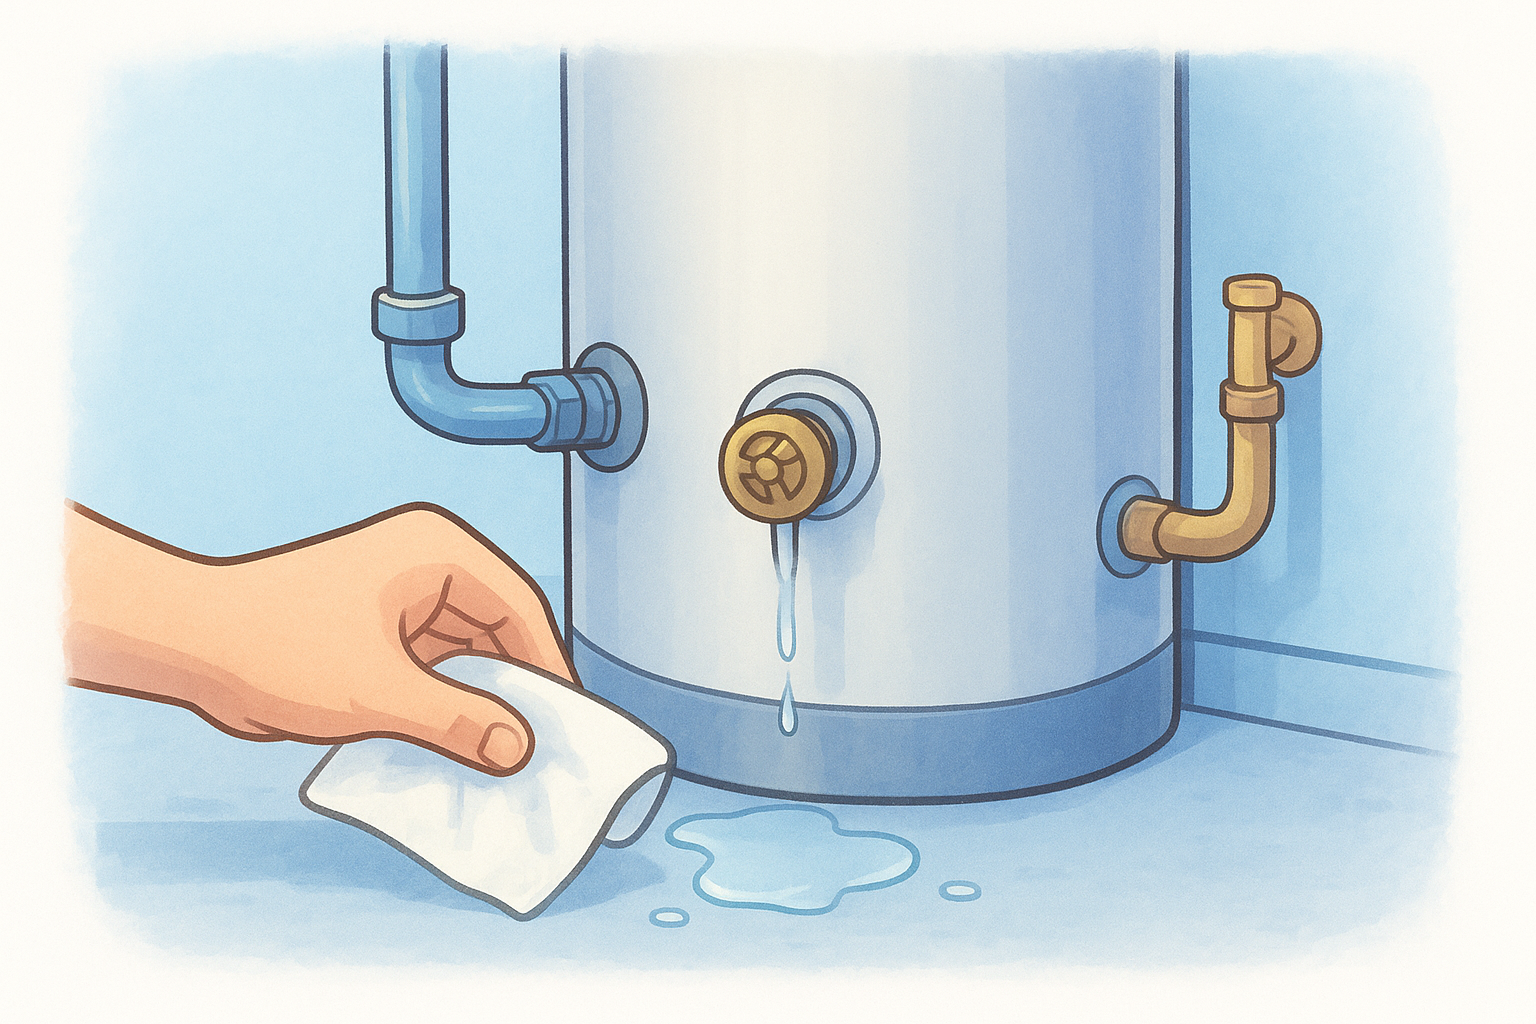
| Location | What to look for |
|---|---|
| Cold water inlet and hot water outlet connections | Mineral buildup or visible dripping at the threaded fittings |
| Temperature and pressure relief (T&P) valve | Water or crust around the valve body or discharge pipe |
| Drain valve near the base | Dripping at the handle or threads |
| Tank bottom | Pooling water with no visible pipe source above it |
Water pooling directly under the tank with no pipe source above it often signals internal corrosion, which no repair can fix.
Step 2. Fix common leaks you can reach
Once you know where the water is coming from, some fixes are genuinely within reach for most homeowners. Loose fittings and worn valve seats account for a large share of why is my water heater leaking calls, and a basic repair on those connections can stop the problem fast. Grab an adjustable wrench and PTFE tape before you start.
Inlet and outlet connection leaks
Leaking at the cold water inlet or hot water outlet usually means the threaded fitting has loosened from normal pipe movement and heat cycling. Follow these steps to address it:
- Tighten the fitting with a wrench first and check if the dripping stops.
- If it continues, shut off the water supply and disconnect the fitting.
- Wrap the threads with two to three layers of PTFE tape, reconnect, and hand-tighten plus one quarter turn.
Do not overtighten the connection – one quarter turn past hand-tight seats most fittings without cracking them.
Drain valve drips
The drain valve sits near the base of the tank and sees little regular use, which causes the rubber seat inside to degrade. Try snugging the valve clockwise with a wrench first to see if that stops the drip. If water keeps coming through, the valve itself needs replacement.
Drain valves use standard garden hose threads, so most hardware stores carry compatible replacements for under $15. Shut off the water supply, attach a garden hose to partially drain the tank, then swap the old valve out.
T&P valve discharge
A T&P valve that releases water occasionally is working correctly, but continuous dripping between pressure events signals a failed valve or consistently high system pressure. Replacing the valve is a straightforward part swap in most cases.
That said, a plumber should verify your system pressure before you install a new T&P valve, because persistent discharge sometimes points to a broader pressure problem the new part alone will not fix.
Step 3. Decide repair vs replacement
Once you know the source of the leak, the next question is whether a repair makes sense or whether the unit has reached the end of its useful life. Age and tank condition are the two biggest factors in that decision. Most water heaters last 8 to 12 years, and pushing a failing unit past that window tends to cost more in repeated repairs than a full replacement would.
Signs the unit is worth repairing
A repair makes financial sense when the water heater is less than 8 years old and the leak source is a valve, fitting, or connection rather than the tank itself. Parts like drain valves and T&P valves are inexpensive, and labor to swap them is usually straightforward. If you are asking why is my water heater leaking and the answer points to a worn fitting on a relatively new unit, a targeted repair is almost always the right call.
A useful benchmark: if the repair cost exceeds 50% of the price of a comparable new unit, replacement makes more financial sense.
Use this quick reference to guide your decision:
| Factor | Repair | Replace |
|---|---|---|
| Unit age | Under 8 years | 10 years or older |
| Leak source | Valve or fitting | Tank bottom or seam |
| Repair cost | Under 50% of new unit | Over 50% of new unit |
| Water discoloration | Clear or minimal | Rust-colored or heavy sediment |
Signs it’s time to replace
Rust-colored water coming from your hot taps, a visible crack along the tank, or corrosion around the base welds are strong indicators that the unit itself has failed internally. No valve swap or fitting repair can reverse internal tank corrosion once it takes hold.
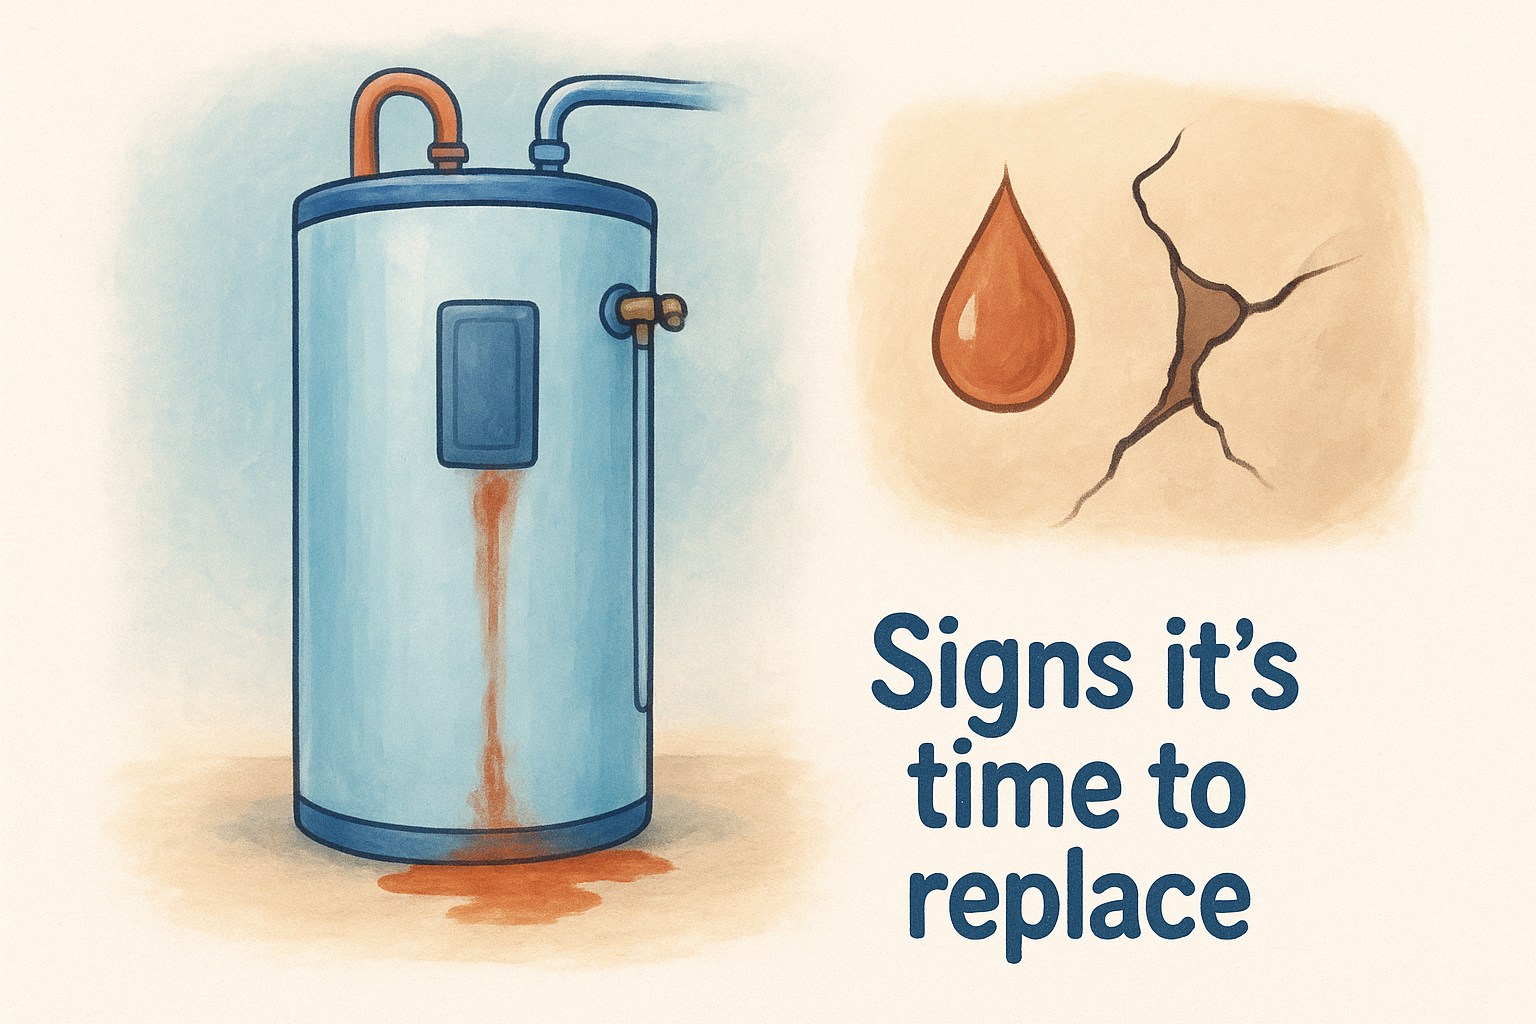
Watch for these specific replacement signals:
- Water pooling under the tank with no pipe source above it
- Rumbling or popping sounds during the heating cycle
- Consistently lukewarm water despite a functioning thermostat
- Repeated leaks returning within weeks of a prior repair
If your unit shows any combination of these signs, budgeting for a new installation is the practical next step rather than spending more on a unit that has already begun to fail.
How to prevent the next leak
Understanding why is my water heater leaking helps you respond after the fact, but routine maintenance keeps most leaks from starting in the first place. Sediment buildup, corroded components, and high water pressure are the three main drivers behind most water heater failures, and all three are manageable with a simple annual routine.
Flush the tank once a year
Hard water minerals settle at the bottom of your tank over time, accelerating corrosion and forcing the unit to work harder to heat water. Flushing the tank each year removes that buildup before it causes damage.
Follow this straightforward flush routine:
- Set the thermostat to “vacation” mode to cool the water before you start.
- Connect a garden hose to the drain valve and run it to a floor drain or outside.
- Open the valve and let 2 to 3 gallons flow out until the water runs clear.
- Close the valve, disconnect the hose, and return the thermostat to its normal setting.
Inspect the anode rod every 3 years
The anode rod inside your tank is a sacrificial metal component that pulls corrosion away from the tank walls. Once it fully degrades, the tank itself becomes the target. Pull the rod through the hex head fitting on top of the unit and replace it when more than 6 inches of core wire is exposed or the rod has worn below half an inch in diameter.
Replacing an anode rod costs roughly $30 to $50 in parts and protects a tank worth several hundred dollars, making it one of the most cost-effective maintenance steps available.
Monitor your water pressure
Sustained pressure above 80 PSI strains every fitting, valve, and connection in your plumbing system. Thread an inexpensive pressure gauge onto an outdoor hose bib to get a reading. If pressure exceeds 80 PSI, a plumber can install a pressure-reducing valve at your main supply line to bring it back into a safe, manageable range.
Next steps
A leaking water heater moves from minor inconvenience to serious water damage faster than most homeowners expect. Now that you understand why is my water heater leaking and what each source means, you have a clear path forward: shut off the supply, identify the source, make the repair if it’s a valve or fitting, and replace the unit if the tank itself is failing.
If you’ve worked through these steps and still aren’t sure what you’re looking at, or if the leak points to the tank bottom or internal corrosion, don’t wait. Delaying a call when a water heater is actively failing often turns a replacement job into a water damage restoration project. The Knoxville area team at Bizzy B Plumbing handles water heater diagnostics and same-day repairs across East Tennessee with upfront pricing and no hidden fees. Reach out today and get a straight answer about what your unit actually needs.


