A puddle forming beneath your water heater is never something you want to find. If you’ve noticed your water heater leaking from bottom, your first reaction is probably a mix of concern and frustration, and both are justified. Even a small leak can cause serious water damage to floors, walls, and nearby belongings if it’s ignored for too long.
The good news is that not every bottom leak means your water heater is done for. Some causes are straightforward fixes, like a loose drain valve, while others, such as a corroded tank, point to a unit that’s reached the end of its life. Knowing the difference saves you from either overpaying for a replacement you don’t need or dumping money into repairs on a tank that’s already failing. The key is acting quickly and understanding what you’re looking at before the problem gets worse.
At Bizzy B Plumbing, we handle water heater issues across Knoxville, Maryville, Alcoa, and the surrounding East Tennessee area every day. As a veteran-owned, local plumbing company, we believe you deserve a clear explanation of what’s going on before anyone tries to sell you anything. This guide walks you through the most common reasons a water heater leaks from the bottom, the safety steps you should take right now, and how to decide whether a repair or full replacement makes the most sense for your situation.
Why water pools under your water heater
Before you panic, it helps to know that not every puddle under your unit means catastrophe. Several different issues can cause water to collect at the base, and they range from minor nuisances to situations that demand immediate professional attention. Identifying the source correctly is what separates a quick fix from an expensive mistake, so take a few minutes to understand what you’re actually dealing with.
Condensation that mimics a real leak
Sometimes what you’re seeing isn’t a leak at all. Cold water entering a warm tank can cause moisture to form on the outside of the unit, especially during humid East Tennessee summers or in poorly ventilated utility closets. If you notice small amounts of moisture that seem to disappear after the tank finishes a heating cycle, condensation is likely your answer, and no repair is needed. Wipe the surface dry, wait an hour, and check again to confirm.
A loose or corroded drain valve
The drain valve sits near the very base of your tank and is used to flush out sediment buildup during routine maintenance. Over time, this valve can loosen from vibration or corrode from mineral deposits, allowing a steady drip to form on the floor below. A water heater leaking from bottom in this spot is actually one of the more manageable problems you can face. Tightening the valve with a wrench sometimes stops the drip entirely, and a full valve replacement is a low-cost repair.
A leaking drain valve is one of the most common and most fixable causes of water pooling at the base of a residential water heater.
T&P relief valve discharge running downward
The temperature and pressure (T&P) relief valve is a built-in safety device that releases water when pressure or temperature inside the tank climbs too high. On many units, the discharge pipe runs down the side of the tank and terminates near the floor, so water from this valve can easily look like it’s originating from the bottom. Frequent or continuous T&P discharge points to an underlying pressure problem that goes beyond the valve itself and needs a licensed plumber to diagnose safely.
Internal tank corrosion
This is the cause homeowners dread most. When rust eats through the inner lining of a steel tank, water seeps directly out of the tank body and pools underneath. You will often notice rusty or brownish water on the floor or discolored water coming from your hot taps. At this stage, repair is rarely viable because the structural integrity of the tank is gone, and replacement is the only practical solution.
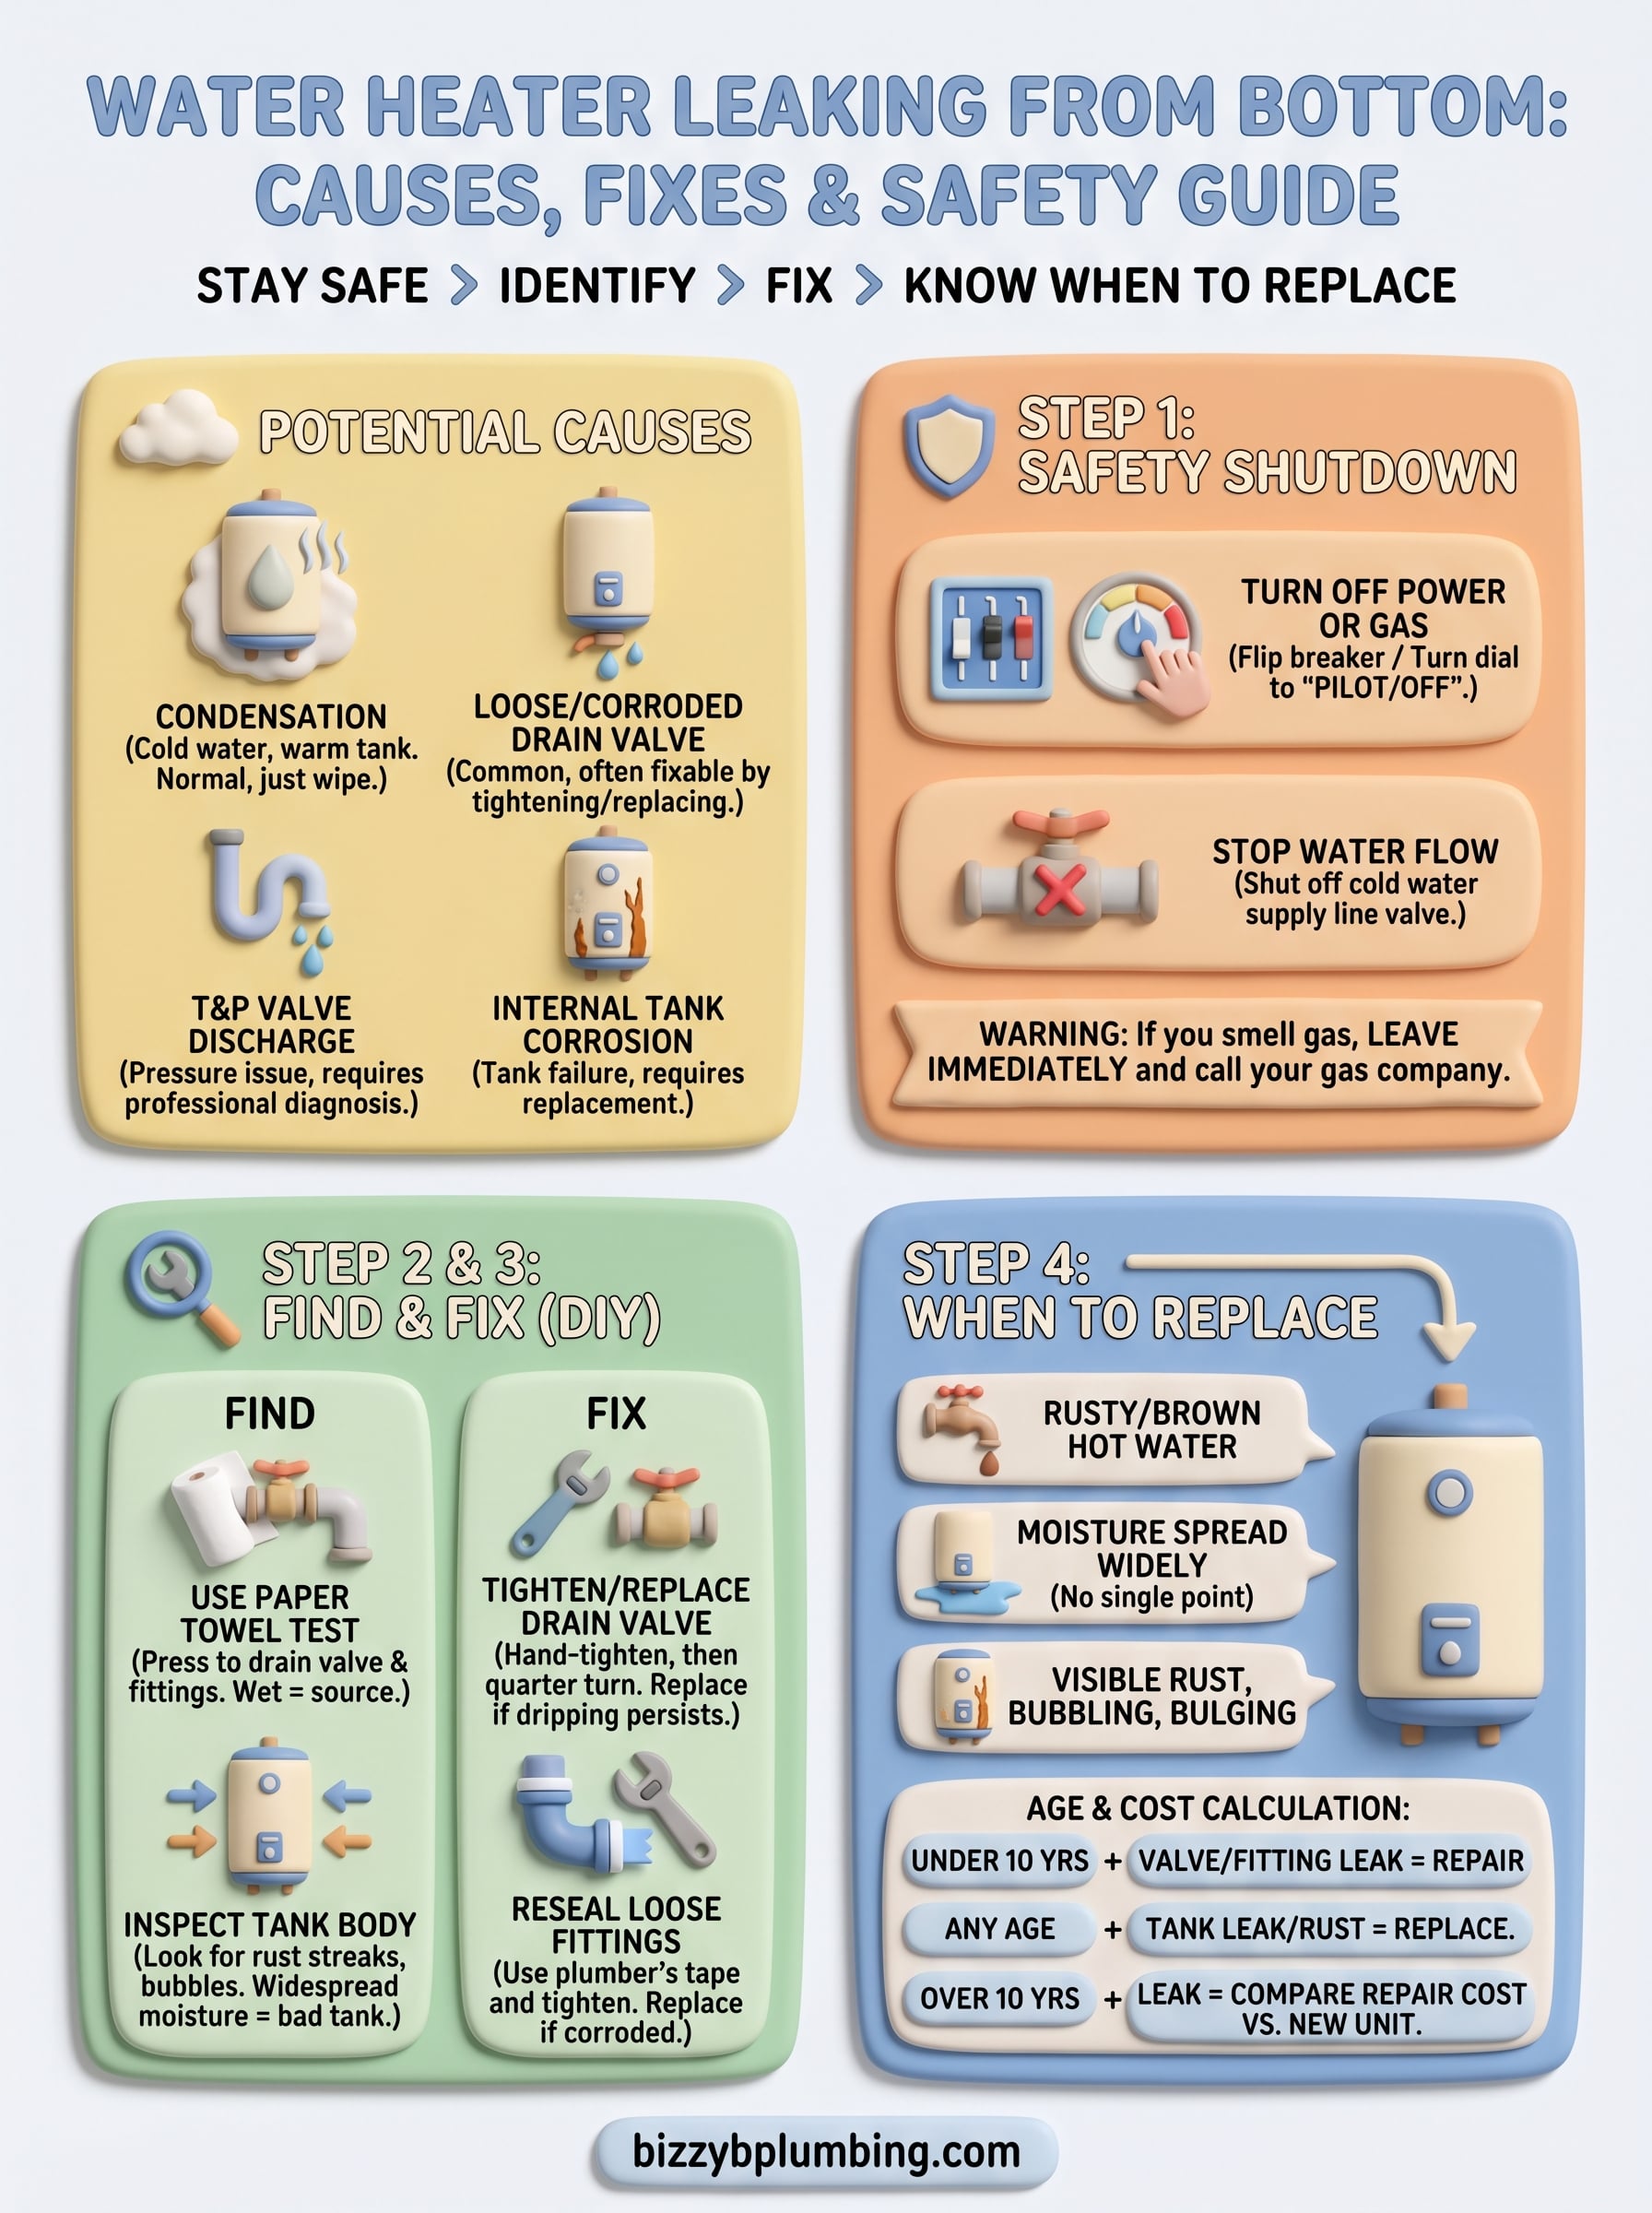
Step 1. Shut it down and protect your home
When you spot a water heater leaking from bottom, the first move is not to investigate the source; it is to stop the situation from getting worse. Water and electricity are a dangerous combination, and a leaking tank near live wiring creates a real safety risk. Acting quickly in the first few minutes limits both the physical danger and the cost of water damage to your floors, walls, and subfloor.
Turn off the power or gas supply
Your water heater runs on either electricity or natural gas, and you need to shut down the energy source before you do anything else. For electric water heaters, locate your home’s main electrical panel and flip the breaker labeled for the water heater to the off position. For gas water heaters, turn the gas control dial on the unit itself to the “pilot” or “off” setting; do not attempt to shut off the main gas line unless you smell gas, in which case you should leave the house immediately and call your gas utility company.
If you ever smell gas near a leaking water heater, leave the house right away and call your gas company before calling a plumber.
Stop the water flow
Once the energy source is off, shut off the cold water supply to the tank. Look for the supply line running into the top of the unit; the shutoff valve is typically a handle or knob located directly on that line. Turn it clockwise until it stops. This cuts off incoming water and prevents the tank from continuing to fill and leak further while you assess the damage.
Step 2. Find where the water really starts
With the power and water supply off, you can now safely investigate the actual source of the leak. Resist the urge to assume the tank itself is the problem before you look at every connection point. Misidentifying the source leads to unnecessary replacement costs or, worse, leaving the real issue unaddressed.
Check the drain valve and bottom fittings
Start at the drain valve, located near the base of the tank. Press a dry paper towel firmly against the valve body and threads and hold it there for ten seconds. If the towel comes away wet, the valve is your leak source. Next, check any pipe fittings or connections at the bottom of the unit using the same paper towel method. Moisture at fittings often means a loose connection rather than a failing tank.
A dry paper towel is the most reliable low-tech tool for pinpointing exactly where water is escaping from your water heater.
Inspect the tank body itself
Run a dry cloth slowly along the entire exterior surface of the tank, from the top down to the base. Pay close attention to any areas showing rust streaks, white mineral deposits, or bubbling paint, as these are signs that water is pushing through the tank wall from inside. If you find moisture only at a specific connection point rather than along the tank body, you are likely dealing with a fixable component failure. A water heater leaking from bottom due to a cracked or corroded tank will typically show moisture spread across a wider area at the base with no obvious single point of origin.
Step 3. Fix valves, fittings, and easy leaks
Once you know where your water heater leaking from bottom originates, you can handle several common issues yourself before calling a plumber. Not every repair requires a professional, and attempting a straightforward fix first can save you both time and money. The repairs in this step apply specifically to drain valves and pipe fittings, which are the two most manageable causes of a bottom leak.
Tighten or replace the drain valve
Start by hand-tightening the drain valve clockwise to see if the drip stops. If tightening by hand does not work, use a wrench to give it a quarter turn further, but avoid overtightening or you risk cracking the valve body. If the valve continues to drip after tightening, replace the entire valve rather than attempting further adjustments.
Replacing a drain valve costs between $10 and $20 for parts and takes roughly 30 minutes with the tank fully drained.
Follow these steps to replace the drain valve:
- Attach a garden hose to the valve and route it to a floor drain or outside.
- Open the valve and let the tank drain completely.
- Unscrew the old valve counterclockwise using a wrench.
- Wrap the threads of the new valve with plumber’s tape.
- Thread the new valve in clockwise, hand-tighten it, then snug it with a wrench.
Reseal loose pipe fittings
Pipe fittings at the bottom of your unit can work loose over time from water pressure fluctuations and thermal expansion. Wrap the threads with fresh plumber’s tape (PTFE tape), then reattach the fitting and snug it firmly with an adjustable wrench.
If the fitting shows visible corrosion, cracking, or rust, do not attempt to reseal it. A compromised fitting will fail again quickly, and replacing the component entirely is the safer and more cost-effective choice at that point.
Step 4. Know when to replace the tank
Some problems with a water heater leaking from bottom go beyond what a valve swap or fitting repair can solve. When the tank body itself is the source of the leak, no patch or sealant will hold for long. Continuing to run a failing tank puts your home at risk of a sudden, full collapse that can release gallons of water in minutes and cause serious structural damage to your floor and subfloor.
Signs the tank has failed beyond repair
Three specific indicators tell you that replacement is the only practical path forward:
- Rust-colored or brown water flowing from your hot taps, which signals the tank lining is deteriorating from the inside out
- Moisture spread across the base with no single identifiable point of origin, indicating a breach in the tank wall rather than a loose component
- Visible rust, bubbling, or bulging on the exterior surface, which means internal pressure and corrosion have already compromised the tank structure
Once water starts escaping through the tank wall itself, no repair will reliably stop the leak from returning or spreading.
The age and cost calculation
Most water heaters last between 8 and 12 years, and your unit’s age plays a major role in the repair-versus-replace decision. If your unit is already past the 10-year mark, putting significant money into repairs rarely makes financial sense because another component will likely fail within a short window anyway.
Use this simple comparison before committing to a repair:
| Situation | Recommended Action |
|---|---|
| Leak from valve or fitting, unit under 10 years old | Repair |
| Leak from tank body, any age | Replace |
| Leak from valve or fitting, unit over 10 years old | Evaluate repair cost against price of a new unit |
| Rust in hot water at any age | Replace immediately |
Next steps
A water heater leaking from bottom is a problem that rewards fast, methodical action. You now know how to shut the system down safely, trace the leak to its actual source, handle valve and fitting repairs on your own, and recognize when the tank itself has failed and needs a full replacement. Taking these steps in order protects your home from unnecessary water damage and puts you in control of the repair-versus-replace decision before a plumber ever shows up.
If you have completed the diagnostic steps and still cannot pinpoint the source, or if you found signs of tank corrosion, do not delay calling a licensed plumber. Some leaks escalate quickly, and waiting over a weekend can turn a manageable repair into a flooded utility room. The team at Bizzy B Plumbing offers same-day service across Knoxville, Maryville, Alcoa, and surrounding East Tennessee communities, with upfront pricing and no pressure tactics.