Your sump pump does its job, it pulls water out of the crawl space or basement. But if the discharge line dumps that water too close to the foundation, it cycles right back in and the pump runs nonstop. A proper sump pump discharge line installation routes water far enough from the house that it actually stays gone, and getting it right isn’t complicated once you know where to run it and what materials to use.
This guide walks you through the full process step by step, from choosing the right pipe diameter and fittings to trenching the line and making sure the grade keeps water moving in the right direction. You’ll also learn common mistakes that cause the line to freeze or back up, so the system works when it matters most.
If you’d rather have it handled than do it yourself, Bizzy B Plumbing installs and repairs sump pump discharge lines for homeowners across Knoxville and Blount County. We’ll show up, explain what needs to happen in plain English, and give you an upfront estimate before any work starts, so you’re never guessing about the cost. But if you want to tackle this one on your own, here’s exactly how to do it right.
Before you start: choose a safe discharge location
Before you cut a single piece of pipe, pick the right exit point for the water. This decision shapes every other step of sump pump discharge line installation, because a bad location sends water right back toward the foundation and the pump runs nonstop. You need a spot that keeps water moving away from the house permanently, not just for a few minutes after the pump kicks on.
Find the lowest natural slope on your property
Walk the perimeter of your home after a rain and watch where water flows naturally. That direction is your guide. The discharge line should end at least 10 to 20 feet from the foundation, at a point that sits lower than the pipe exit so gravity keeps water moving. If the outlet leads to a garden bed, a fence line, or a low spot near the house, choose a different path.
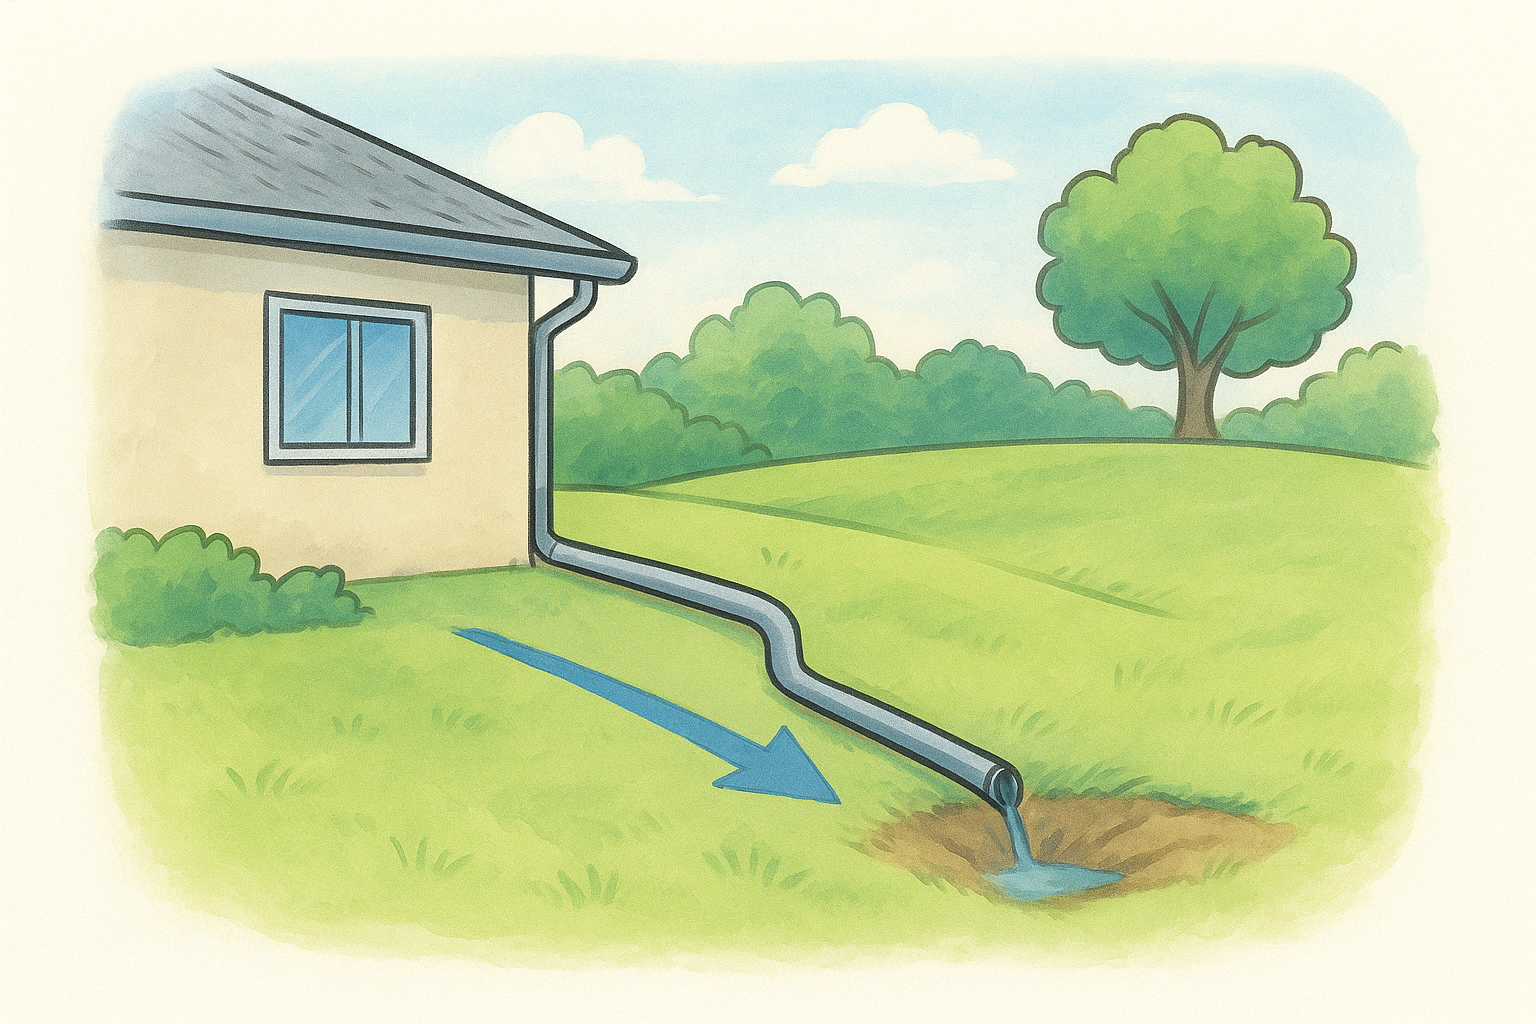
The discharge point must sit lower than where the pipe leaves the house so gravity moves water out and nothing sits in the line waiting to freeze.
Check local code before you dig
Knox County and Blount County both have drainage rules that set minimum distances from property lines and neighboring structures. A quick call to your local building department confirms what applies to your address. You also want to avoid routing water toward a driveway, a septic system, or any area prone to pooling, because that creates erosion and neighbor complaints down the road.
Avoid locations that freeze or clog easily
Dense shrubs, mulch beds, and areas with poor airflow trap debris and ice. Skip those spots and choose an open area with clear year-round access. Good locations to target:
- A sloped lawn at least 15 feet from the house
- A dry well or French drain if your yard is relatively flat
- A storm drain easement where permitted by local code
Step 1. Gather materials and map the discharge route
Getting your materials sorted and your route mapped before you start cutting saves time and prevents mid-project problems. A standard sump pump discharge line installation uses 1.5-inch or 2-inch PVC schedule 40 pipe, and the right size depends on your pump’s outlet diameter. Measure the outlet first so every fitting you buy matches on the first trip to the hardware store.
What materials you need
Pick up everything on this list before you cut a single piece of pipe:
- 1.5-inch or 2-inch PVC schedule 40 pipe (match your pump outlet diameter)
- PVC primer and cement
- 90-degree and 45-degree elbows for direction changes
- A freeze-resistant check valve rated for your pipe size
- A critter-proof discharge cap or grate for the exit point
- Pipe hangers or straps for any indoor sections
- Landscape fabric and gravel if you plan to bury the outdoor run
Map the route before you dig
Sketch the path from your pump to the exit point before cutting anything. Mark every turn and every wall penetration so you know exactly how many fittings you need. Aim for gradual turns rather than sharp 90-degree bends wherever possible, because sharp bends slow flow and create spots where debris and ice collect.
Fewer bends mean better flow and fewer places for the line to clog or freeze in winter.
Step 2. Connect the pump and run the pipe to the exit
With your route mapped and materials on hand, start at the pump itself to begin the interior portion of your sump pump discharge line installation. Dry-fit every piece before applying PVC cement so you can confirm the route works before anything is permanent. A dry run catches fitting gaps and misaligned elbows before any primer touches the pipe.
Install the check valve first
The check valve sits directly above the pump outlet, typically within the first 12 inches of vertical pipe. It keeps water from draining back into the sump pit every time the pump shuts off, which protects the motor from constant re-starts. Make sure the arrow on the valve body points away from the pump and toward the discharge direction before you cement it in place.
A check valve installed too far up the line lets water hammer back into the pit and shortens pump life significantly.
Run the interior pipe to the wall
From the check valve, run schedule 40 PVC toward your chosen wall penetration, securing the pipe with hangers every 4 to 6 feet so it does not sag over time. Use 45-degree elbows instead of 90-degree turns wherever the route allows, because gradual bends keep flow moving smoothly and reduce stress on cemented joints. Seal the wall penetration with hydraulic cement or foam backer rod once the pipe sits in final position.
Step 3. Run the outside line and end it the right way
Once the pipe exits the wall, the outdoor portion of your sump pump discharge line installation needs to handle whatever East Tennessee weather throws at it. Bury the pipe at least 12 inches deep along the entire outdoor run to protect it from freeze-thaw cycles and foot traffic above.
Trench and bury the pipe correctly
Dig your trench on a consistent downward slope from the house to the exit point, aiming for at least a 1-inch drop for every 10 feet of run. Lay the pipe in the trench, check the slope with a level, and backfill with gravel before adding soil so water drains away from the pipe rather than pooling around it.
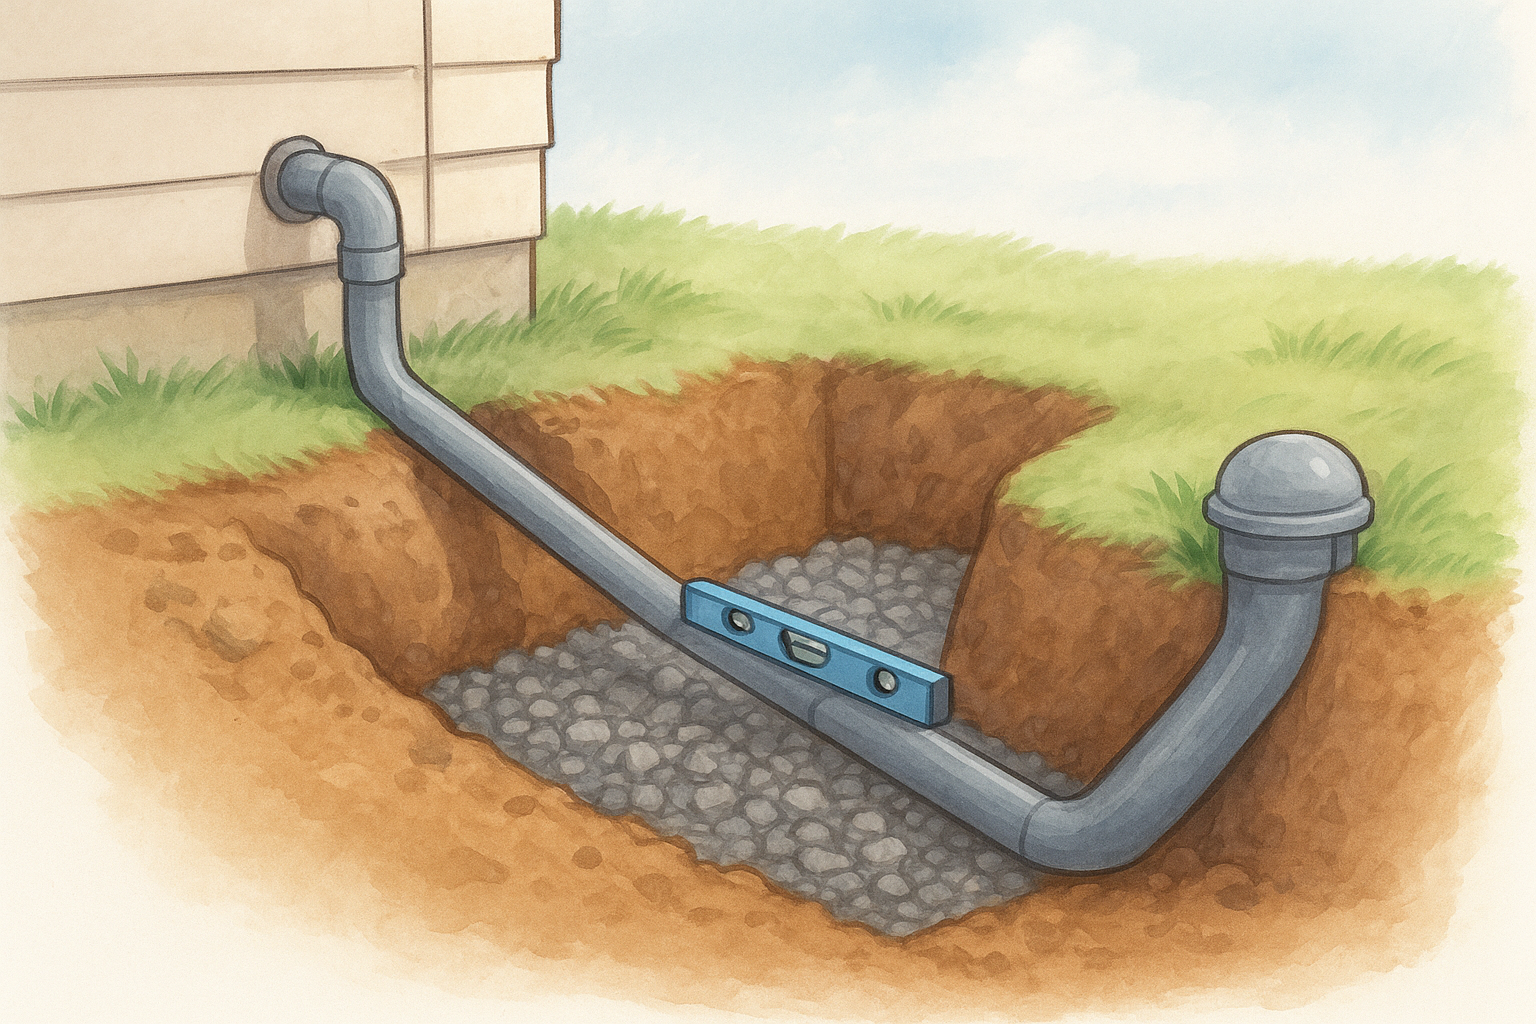
A steady downward slope from the wall to the exit point keeps water moving and prevents standing water from freezing inside the line.
Cap the exit point properly
The end of the line needs a critter-proof discharge cap that opens when water flows and closes when the pump stops. Position the outlet at least 6 inches above grade to keep it clear of mud, standing water, and debris. A correct exit cap setup covers three things:
- Opens freely under normal pump pressure
- Closes completely when the pump is off to keep pests out
- Sits at least 6 inches above the surrounding ground level
Step 4. Prevent freezing and clogs, then test the system
The last step in a solid sump pump discharge line installation is making sure the line survives cold weather and stays clear year-round. A line that freezes or clogs in January defeats everything you built, so add the right protection now before you fill in the trench.
Protect the line from freezing
Pipe insulation foam wrap handles most of the freeze risk on any above-grade sections near the wall penetration. For the buried outdoor run, keeping the pipe at least 12 inches below grade puts it below the frost line in most of East Tennessee. If shallow soil or rock prevents deep burial, slope the pipe aggressively so water never sits in the line long enough to freeze.
An empty line between pump cycles is your best freeze protection, and a proper slope is what keeps it empty.
To keep clogs from building up over time, check these points each fall:
- Clear debris from the discharge cap opening
- Confirm the cap flap opens and closes freely
- Flush the line with a garden hose and watch for slow drainage
Test before you close the trench
Pour five gallons of water directly into the sump pit and watch the full cycle. Confirm the pump activates and water flows steadily to the exit point. Then verify the check valve holds with no backflow once the pump shuts off, and watch that the discharge drains away from the foundation before you backfill.
Wrap-up and next steps
A properly installed sump pump discharge line moves water far from your foundation, stays clear through winter, and gives your pump a fighting chance to do its job without running itself to death. You now have everything you need: the right pipe size, a safe exit location, a correct slope, freeze protection, and a working test before you close the trench. Follow these steps in order and the system will handle heavy rain without cycling water back to the same spot it started.
If you run into something unexpected during the project, like a cracked wall penetration, corroded fittings near the pump, or standing water that points to a bigger problem, that is worth a second look before you backfill. Hidden moisture problems often show up during this kind of work. Bizzy B Plumbing serves homeowners across Knoxville and Blount County, and we offer professional leak detection with an upfront estimate before any work begins.