That steady drip, drip, drip from the kitchen faucet isn’t just annoying, it’s costing you money on every water bill. The good news is that learning how to fix a leaky kitchen faucet is one of those home repairs most homeowners can handle themselves with basic tools and about an hour of patience.
Before you call a plumber, it’s worth trying the fix on your own. Most kitchen faucet leaks come down to a worn-out O-ring, a bad cartridge, or a failing valve seat, parts that cost a few dollars and don’t require any special training to replace. The key is figuring out where the leak is actually coming from, because a drip from the spout, a leak around the handle, and water pooling at the base are three different problems with three different fixes.
This guide walks you through diagnosing the source of your leak and repairing it step by step, whether you have a single-handle or two-handle faucet. And if you get into it and realize the problem is bigger than expected, corroded valve seats, a cracked faucet body, or plumbing you’d rather not wrestle with, Bizzy B Plumbing handles kitchen faucet repairs across Knoxville and Blount County, usually the same day you call, with an upfront estimate before any work starts.
Before you start: tools, parts, and safety
Pulling a faucet apart without the right tools on the counter is the fastest way to turn a 30-minute fix into a frustrating afternoon. Before you start figuring out how to fix a leaky kitchen faucet, spend five minutes gathering everything listed below so you’re not hunting through the garage mid-repair with the water shut off.
Tools you’ll need
Most of what you need is probably already in your toolbox. A set of Allen wrenches (hex keys) handles the set screws on most single-handle faucets, and an adjustable wrench or channel-lock pliers takes care of the packing nut or cartridge retaining nut. You’ll also want a Phillips and flat-head screwdriver, needle-nose pliers, and a utility knife for trimming old plumber’s tape.
- Allen wrench set
- Adjustable wrench or channel-lock pliers
- Phillips and flat-head screwdrivers
- Needle-nose pliers
- Utility knife or box cutter
- Silicone-based plumber’s grease
- Plumber’s tape (Teflon tape)
Parts to have on hand
The right replacement part depends on your faucet type, so look up your faucet’s brand and model number before heading to the hardware store. That number is usually on the original box or stamped on the faucet body itself. Common parts that fix most kitchen faucet leaks include O-rings, cartridges, ceramic disc assemblies, and rubber seat washers. Buying a full repair kit for your specific faucet model is often cheaper than buying parts one at a time and means you have everything in one bag.
Taking a photo of your faucet before you disassemble it makes reassembly much easier, especially if this is your first time.
Safety basics before you turn a wrench
Turn off the water supply valves under the sink before you do anything else. Turn both the hot and cold valves clockwise until they stop, then open the faucet to release any pressure still sitting in the line. Put the drain stopper in or lay a towel over the drain opening so small parts don’t vanish down the pipe.
Step 1. Pinpoint where the leak comes from
Before you touch any tools, dry off the faucet and the surrounding counter completely, then run the water and watch carefully. The location of the drip tells you which parts have failed and which repair you actually need. Skipping this step means you could take apart the wrong section of the faucet and still have a leak when you put everything back together.
Watching the faucet with dry surfaces for 60 seconds saves you from replacing the wrong part entirely.
Three spots that leak on kitchen faucets
Most kitchen faucet leaks fall into one of three categories, and each one points to a different repair. Identifying which category fits your situation is the first real step in figuring out how to fix a leaky kitchen faucet.
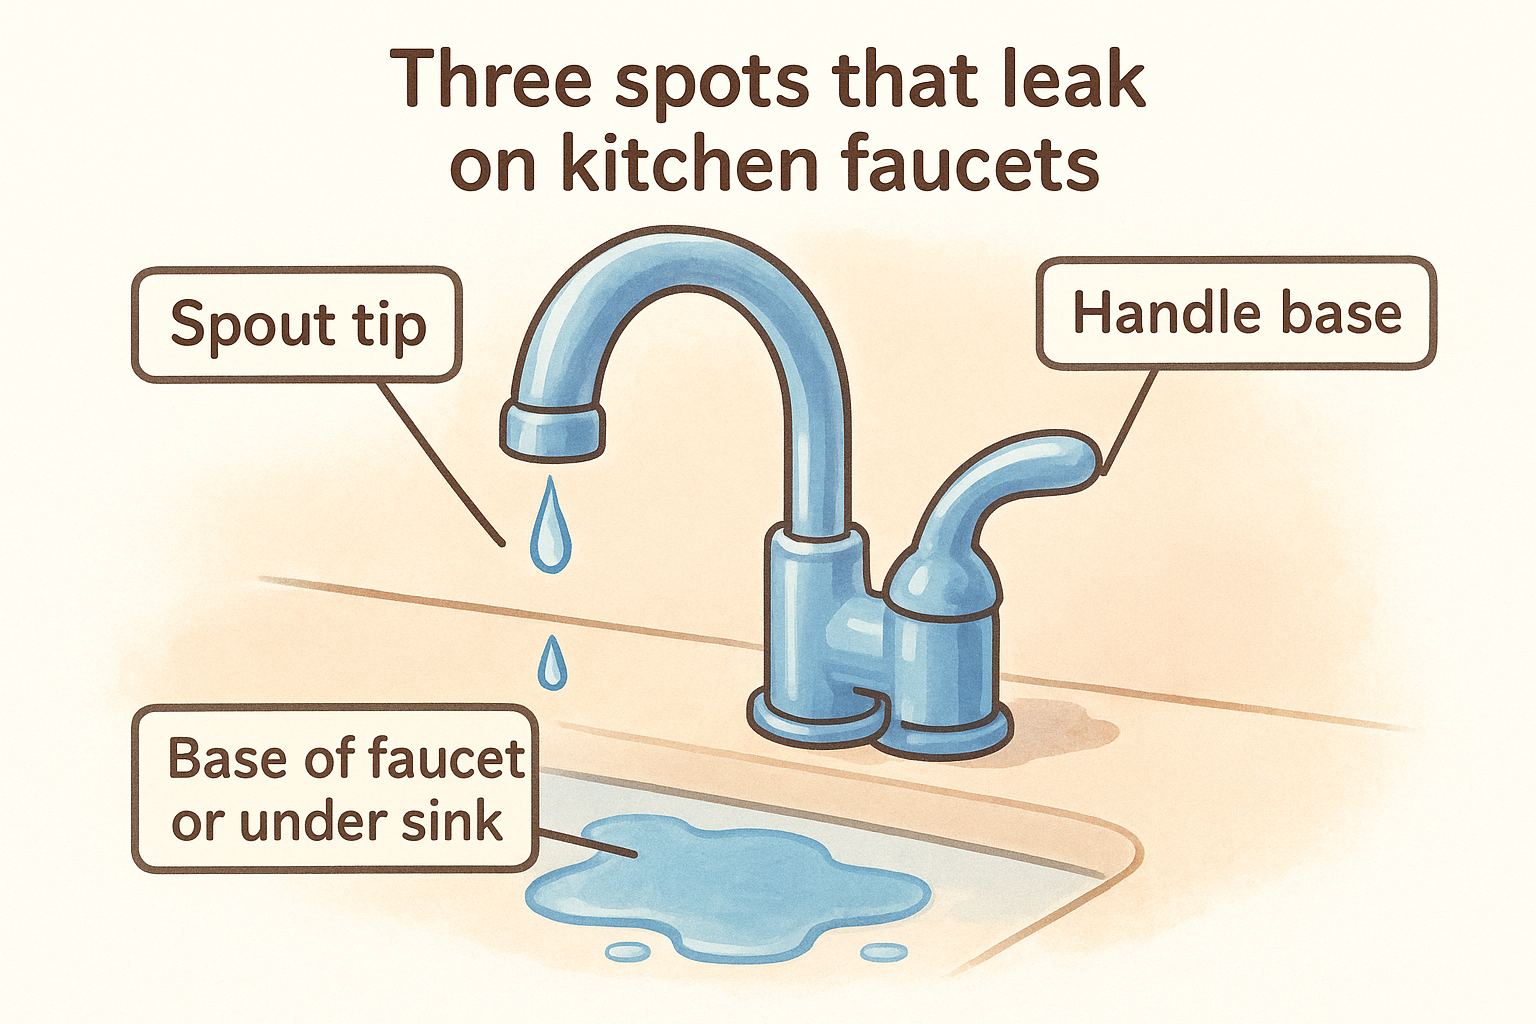
| Leak location | What you’ll see | Likely cause |
|---|---|---|
| Spout tip | Drip continues after faucet is off | Worn cartridge, O-ring, or seat washer |
| Handle base | Wet ring around the handle | Damaged O-ring on the stem |
| Base of faucet or under sink | Puddle on the counter or inside the cabinet | Loose mounting nut or failed body O-ring |
Run the faucet at normal pressure, shut it off, then check each of these three zones separately. Press a dry paper towel against each area so you can confirm exactly where the moisture is coming from before you pick up a wrench.
Step 2. Shut off water and prep the work area
Every part of how to fix a leaky kitchen faucet depends on this step going right. Skipping it or rushing through it leads to water spraying across the cabinet when you pull a fitting loose. Take two minutes here and the rest of the repair goes much smoother.
Turn off the supply valves
Open the cabinet under the sink and look for two oval-shaped valves on the supply lines running up to the faucet, one for hot and one for cold. Turn each valve clockwise until it stops moving. Then open the faucet handle fully to bleed the water still sitting in the line, and let it run until the flow drops to nothing. If the valves under the sink are old and won’t budge, shut off the main water supply to the house instead.
If the under-sink valves are stiff or corroded, that’s worth noting for a plumber to replace while the work is already underway.
Prep the work area
Lay a dry towel inside the cabinet to catch drips and save your knees while you work. Cover the drain opening with the stopper or a rag so small parts don’t disappear. Before you pick up any tools, have these items ready at arm’s reach:
- Small bowl or bucket for trapped water in the lines
- Extra rags
- Your replacement parts and tools from the previous step
- A phone or tablet to reference your faucet photos
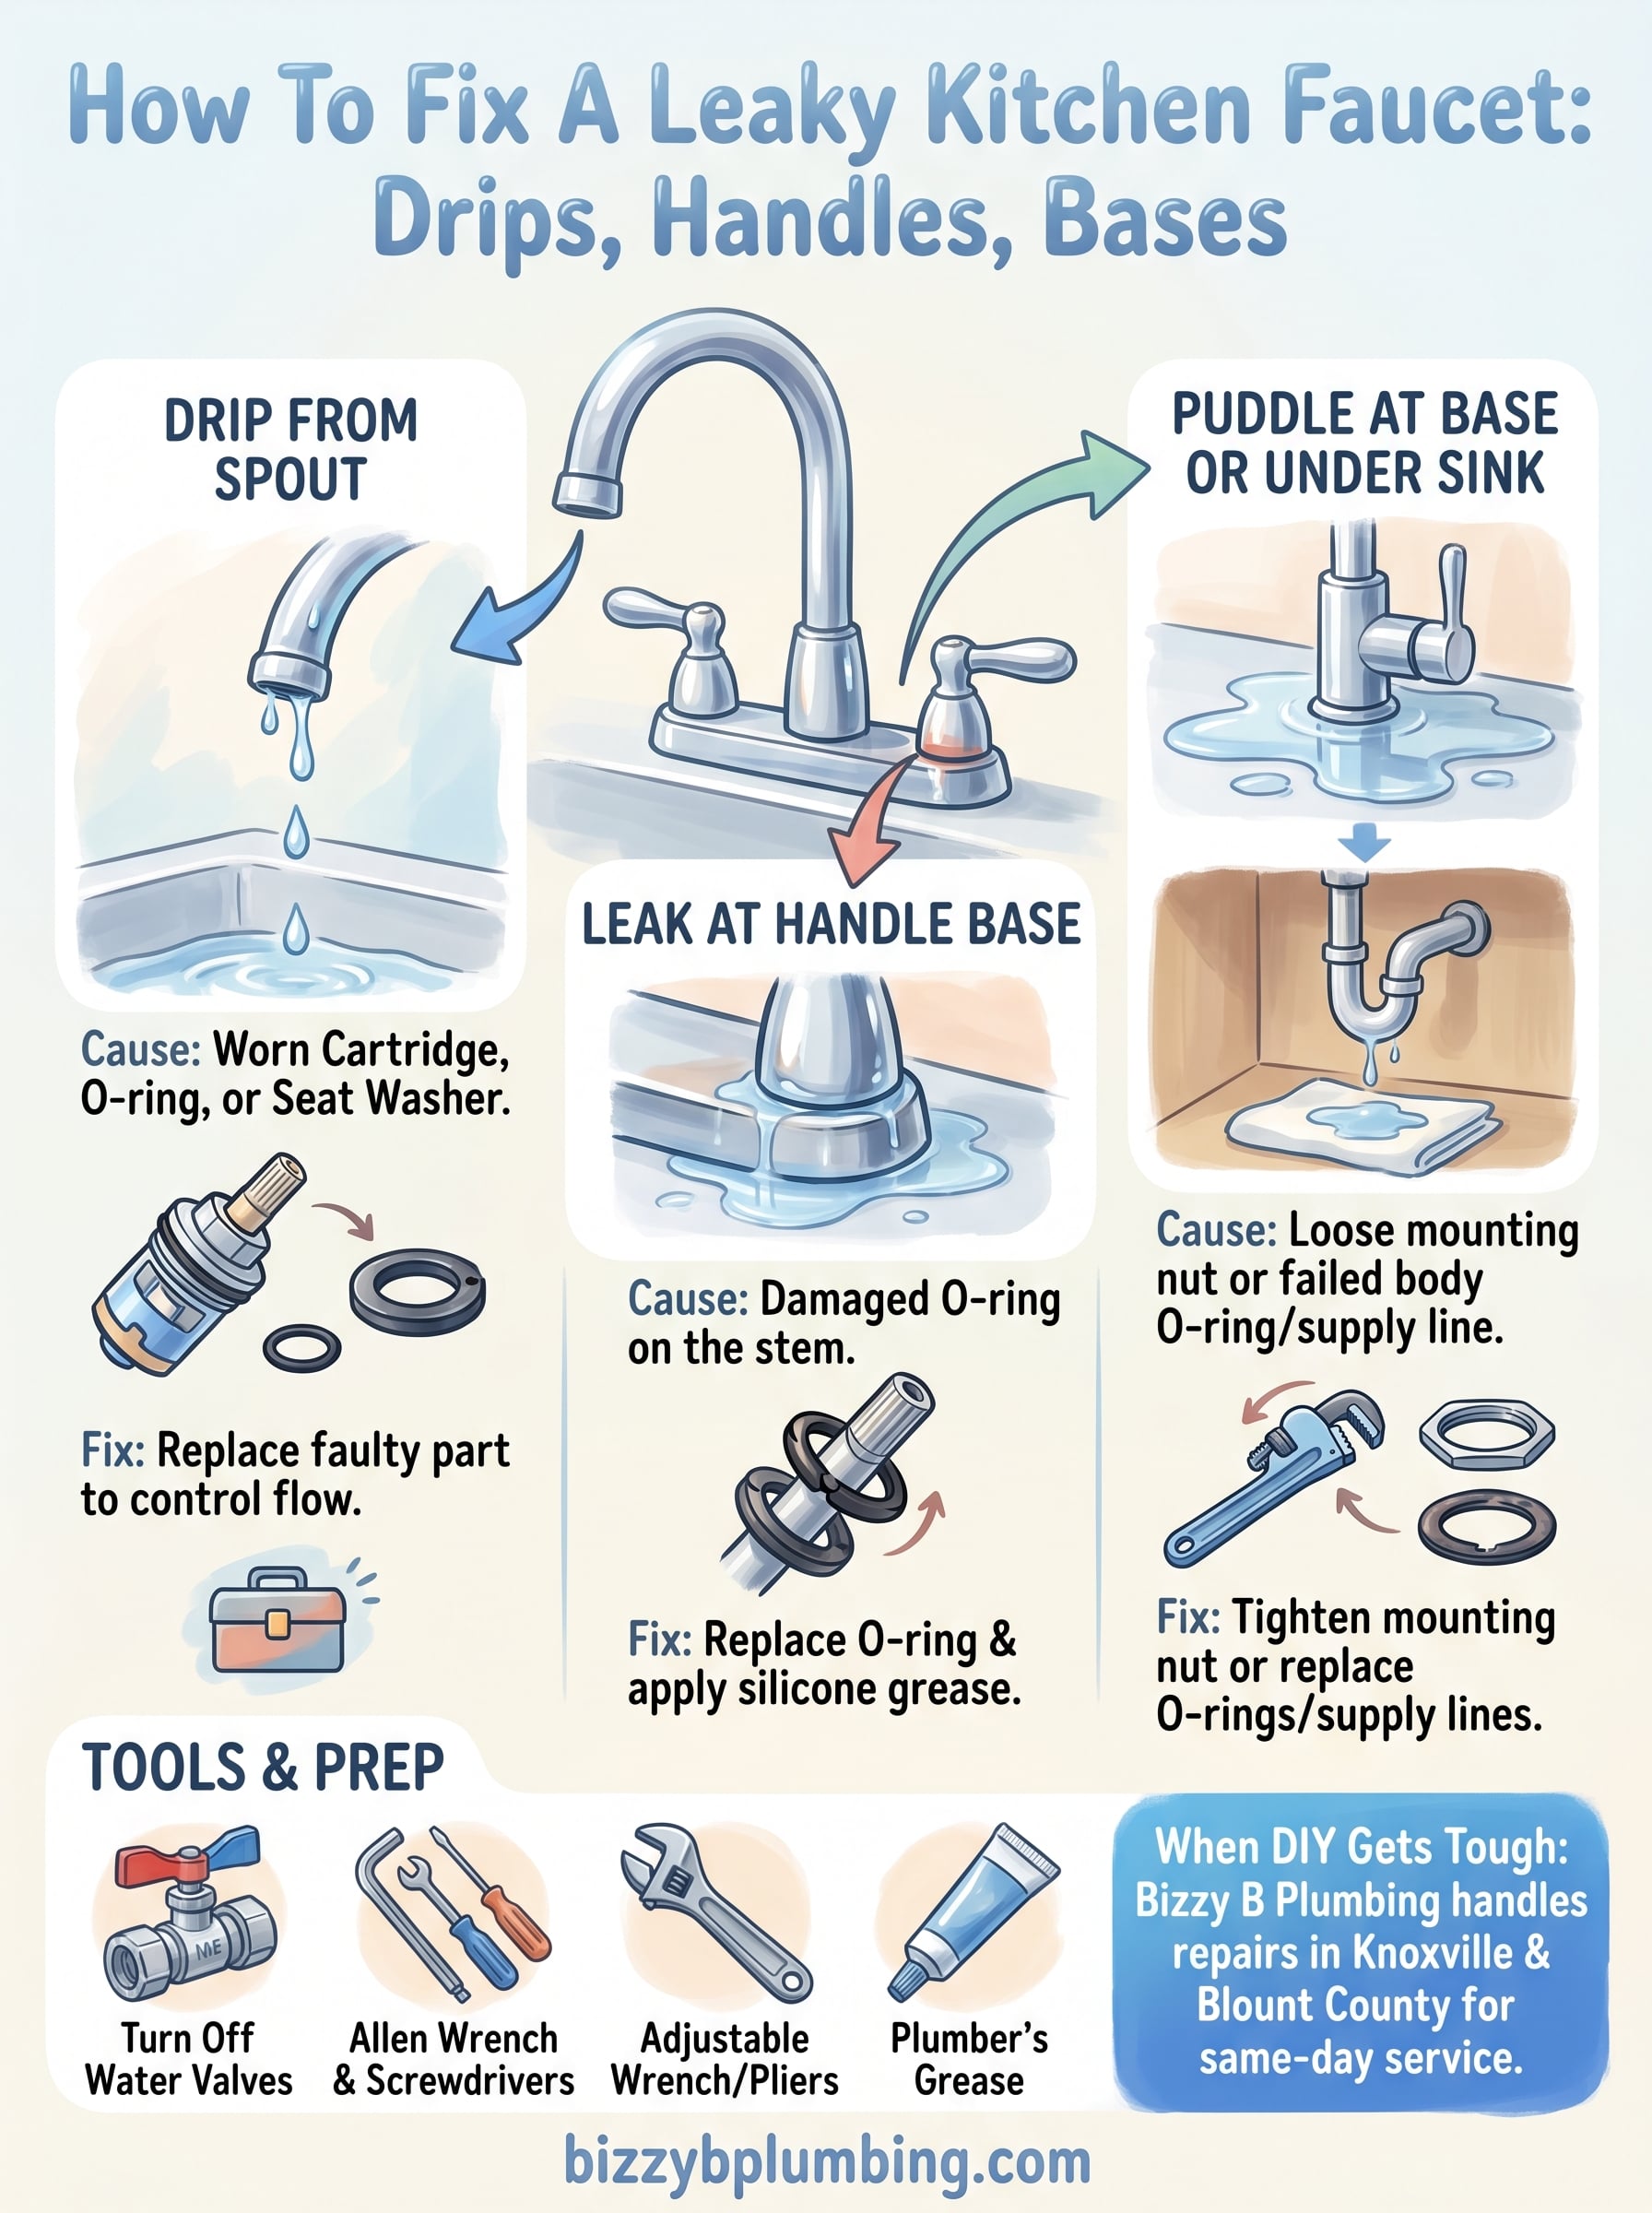
Step 3. Fix a drip from the spout
A spout that keeps dripping after you shut the faucet off means an internal seal has worn out. The repair depends on your faucet type, but you’re always swapping the part that controls water flow. This is the most hands-on step in learning how to fix a leaky kitchen faucet.
Single-handle faucets
Single-handle faucets use a cartridge or ceramic disc to control water. When that part fails, water slips past the seal even with the handle in the off position. Replace it with these steps:

- Pry off the decorative cap and unscrew the handle screw underneath
- Lift the handle off the valve body
- Remove the retaining clip with needle-nose pliers and pull the cartridge straight out
- Match the replacement at the hardware store, then press the new one in with the same orientation
- Replace the clip and reassemble the handle
Pressing the new cartridge in with the correct orientation prevents hot and cold from reversing when you restore water.
Two-handle faucets
Two-handle faucets use a rubber seat washer at the base of each stem to block flow. Unscrew the packing nut, pull the stem out, and check the washer. If it’s flat, cracked, or torn, here’s how you finish:
- Press a matching seat washer into the base of the stem
- Apply a light coat of silicone grease to the rubber before seating it
- Reinstall the stem, tighten the packing nut, and restore water
Step 4. Stop leaks at the handle
A wet ring collecting around the base of the handle is a different problem from a dripping spout. Handle leaks almost always trace back to a worn O-ring on the valve stem underneath. This is one of the more straightforward fixes when learning how to fix a leaky kitchen faucet, since the part costs less than a dollar and the repair takes under 20 minutes.
Identify the O-ring
The O-ring sits on the valve stem and creates a watertight seal between the stem and the faucet body. Heat cycles and mineral deposits harden the rubber over time until it cracks or compresses unevenly. Match the replacement O-ring by diameter before buying, since a slightly wrong size leaks just as fast as the original.
Bringing the old O-ring to the hardware store is the easiest way to find an exact match on the first trip.
Replace the O-ring
Remove the handle following the same process from Step 3: pry the decorative cap, unscrew the handle screw underneath, and lift the handle free. Then follow these steps to swap the O-ring:
- Loosen and remove the packing nut with an adjustable wrench
- Pull the stem straight out of the valve body
- Roll the old O-ring off the stem groove
- Apply a thin coat of silicone grease to the new O-ring and press it firmly into the groove
- Reinstall the stem, tighten the packing nut, and reassemble the handle
Step 5. Fix leaks at the base or under the sink
Water pooling at the base of the faucet or dripping inside the cabinet points to a different set of problems than a dripping spout. Two main culprits cause leaks in this area: a loose mounting nut underneath the sink or worn body O-rings that seal the faucet to the counter. Knowing which one you’re dealing with is the last major diagnostic step in learning how to fix a leaky kitchen faucet.
Dry the area completely and run the faucet at normal pressure before inspecting, so you can trace the water to its exact source.
Leaks at the faucet base
A puddle forming on the counter around the faucet base usually means the large rubber O-rings inside the faucet body have broken down. Start by tightening the mounting nut under the sink with a basin wrench, since a loose nut is often the quicker fix. If tightening it doesn’t stop the leak, replace the O-rings:
- Turn off supply valves and lift the faucet out from above
- Locate the O-rings on the faucet body and peel off the old ones
- Press a matching set coated with silicone grease firmly into the grooves
- Reinstall the faucet and restore water to test
Leaks under the sink
Dripping from inside the cabinet usually traces back to a loose or corroded supply line connection where the line meets the shutoff valve or faucet inlet. Hand-tighten each connection first and check whether the drip stops. Brittle lines or visible mineral buildup mean the line itself needs replacing rather than just tightening:
- Turn off the shutoff valve and unscrew the old supply line at both ends
- Bring the old line to the hardware store to match the length and fitting size
- Install a new braided stainless supply line, hand-tighten both ends, then snug each connection a half-turn with an adjustable wrench
When you want it handled today
Working through how to fix a leaky kitchen faucet on your own is absolutely worth trying. Most drips, handle leaks, and base leaks come down to a $5 part and an hour of your time. But sometimes you pull the cartridge and find a cracked faucet body, or you open the cabinet and realize the supply lines are corroded all the way back to the wall. At that point, the repair has moved past a simple DIY fix.
Bizzy B Plumbing serves Knoxville and Blount County, including Alcoa, Maryville, Farragut, and the surrounding East Tennessee communities. In most cases, you’ll get someone there the same day you call. Before any work starts, you’ll get an upfront estimate and real options so you decide what happens next. No surprises on the invoice. If the leak turns out to be hiding somewhere deeper, the team handles leak detection too.


