A dripping faucet might seem like a minor annoyance, but it can waste thousands of gallons of water per year and quietly inflate your utility bill. The good news? Learning how to fix a leaky faucet is one of the more straightforward plumbing repairs most homeowners can handle themselves.
The fix usually comes down to identifying your faucet type and replacing a worn-out internal part, a cartridge, O-ring, or valve seat. With a few basic tools and about 30 minutes of your time, you can stop that drip for good. No special skills required, just a willingness to turn off the water and take things apart carefully.
In this guide, we’ll walk you through diagnosing the cause of your leak, matching the repair to your specific faucet type, and completing the fix step by step. At Bizzy B Plumbing, we handle leaky faucets across Knoxville and East Tennessee every day, so we know exactly where DIY can save you money and where a repair might call for professional backup. Let’s get that drip stopped.
Before you start: find the leak and prep
Before you pick up a wrench, knowing exactly where the water is coming from saves you time and keeps you from replacing the wrong part entirely. A faucet can leak from three distinct spots: the spout tip when the faucet is off, the base where it meets the sink, or around the handles. Each location points to a different worn component inside the faucet, so a quick diagnosis first makes the actual repair much faster.
Locate where your faucet is leaking
Dry the entire faucet with a paper towel first, then turn off the water supply and wait two to three minutes before watching for where moisture reappears. Water dripping from the spout when the faucet is off typically means a worn cartridge, a cracked O-ring, or a damaged valve seat. A puddle forming at the base usually signals a failed O-ring around the faucet body. Moisture appearing around a handle points to a worn packing nut or stem seal.
Drying the faucet completely before watching for the drip is the fastest way to pinpoint the exact source without guessing.
Use this quick reference to match the leak location to the likely culprit:
| Leak Location | Likely Worn Part |
|---|---|
| Spout drips when faucet is off | Cartridge, O-ring, or valve seat |
| Water pooling around the base | O-ring on faucet body |
| Moisture seeping around the handle | Packing nut or stem seal |
Gather the right tools before you begin
Having everything within reach before you start means you won’t find yourself stuck mid-repair with a disassembled faucet and wet countertops. Knowing how to fix a leaky faucet goes much faster when you’re not making emergency hardware store trips. The tools required are basic, and most homeowners already have several of them.
Here’s what to gather ahead of time:
- Adjustable wrench (for supply line nuts and packing nuts)
- Flathead and Phillips screwdrivers
- Needle-nose pliers
- Replacement cartridge or O-ring repair kit matched to your faucet brand
- Plumber’s grease (silicone grease works best)
- Small bucket and old towels
- Masking tape to protect chrome finishes from wrench scratches
Before heading to the hardware store, find your faucet’s brand and model number, usually printed on the faucet body or listed in the original installation paperwork. Bringing the old cartridge with you gives you the best shot at an exact match on the first trip.
Step 1. Shut off water and protect the sink
Before you touch anything inside the faucet, shut off the water supply to avoid an unexpected spray flooding your cabinet. This step is non-negotiable whether you’re learning how to fix a leaky faucet for the first time or you’ve done it before. Skipping it turns a simple repair into a wet, frustrating mess.
Turn off the water supply valves
Supply shut-off valves sit underneath the sink, one for hot and one for cold. Turn each valve clockwise until it stops moving. If your valves are older and won’t budge, don’t force them. Instead, shut off the main water supply to your home, typically located where the water line enters the house or near the water meter.
If your shut-off valves are stiff or corroded, replacing them during this repair is worth the extra effort before they fail completely.
Once the valves are closed, open the faucet handles fully to release any remaining pressure and drain water sitting in the lines. Let it run until the flow stops completely.
Protect your sink and workspace
Lay old towels across the bottom of the sink basin and across the countertop around the faucet. This absorbs drips and protects the surface from dropped tools. Place a small bucket under the supply lines before disconnecting anything since residual water will spill out when you loosen connections.
Wrap the jaws of your adjustable wrench with masking tape to avoid scratching chrome or brushed nickel finishes. Keep a zip-close bag nearby to hold small parts like screws and retaining clips so nothing disappears down the drain while you work.
Step 2. Identify your faucet type fast
Knowing your faucet type before you start disassembly tells you exactly which replacement parts to buy and how to take the faucet apart correctly. Skipping this step is a common reason homeowners end up with mismatched parts and a second hardware store trip. Take 60 seconds to identify your faucet type here before moving forward.
The four common faucet types
Most residential faucets fall into one of four categories, and each one has a distinct internal mechanism that wears out differently. The table below gives you a fast way to match what you see at your sink to the faucet type, so you can buy the right repair kit on the first try.
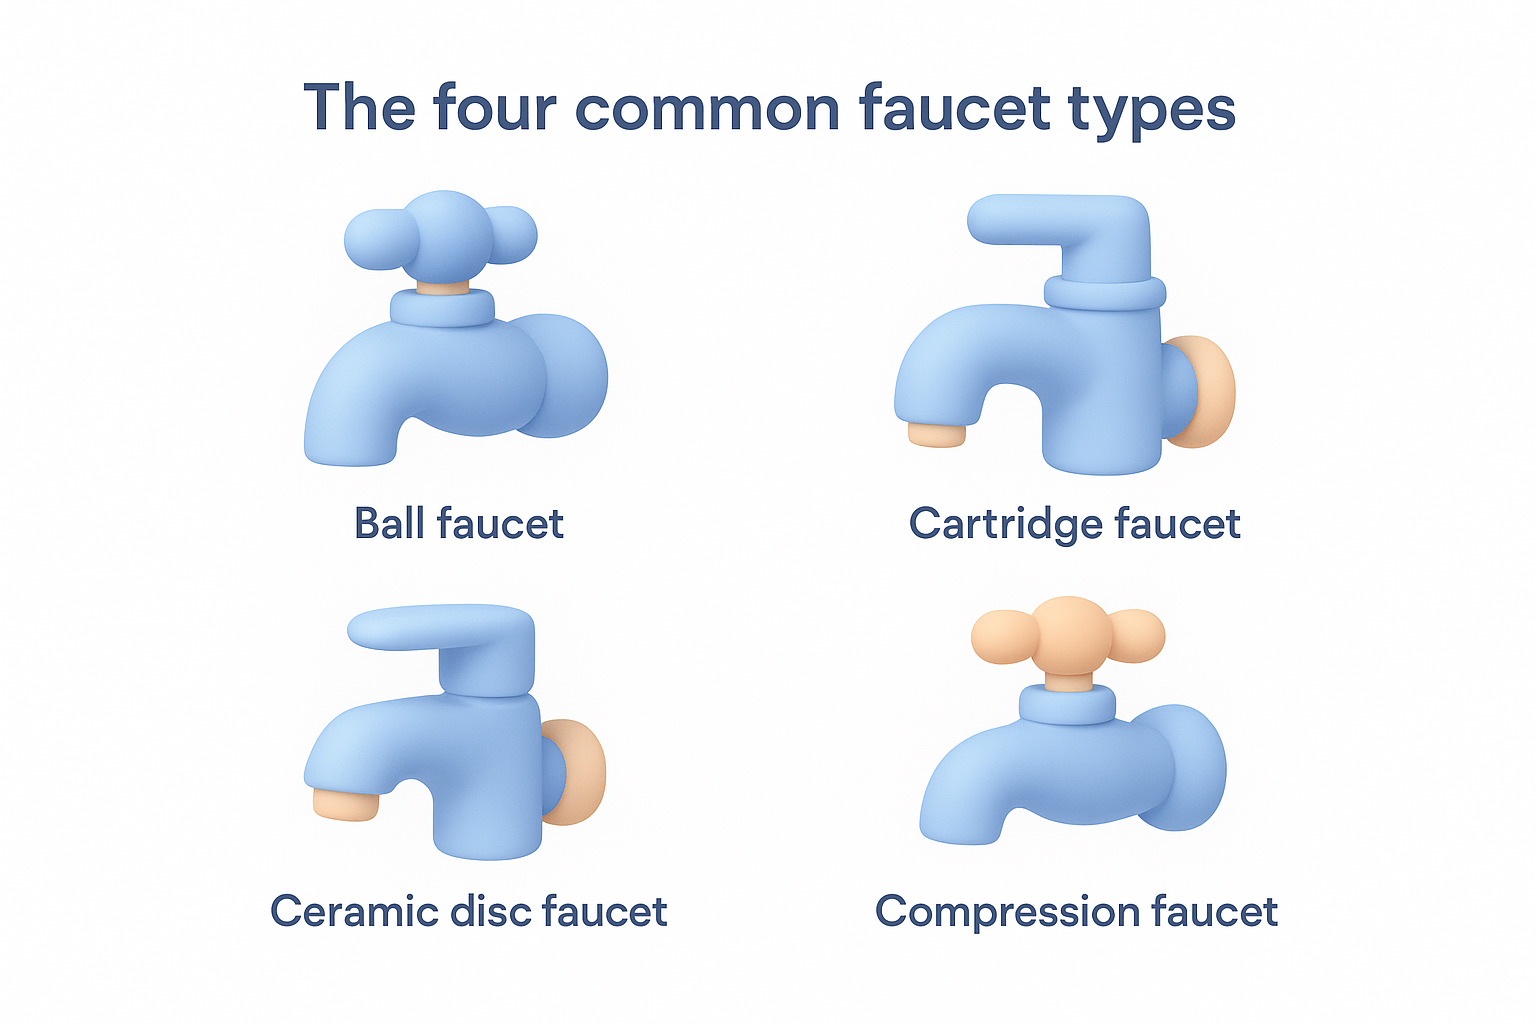
| Faucet Type | What It Looks Like | Most Common Leak Cause |
|---|---|---|
| Ball faucet | Single handle that rotates in a ball-shaped cap | Worn springs, seats, or ball |
| Cartridge faucet | Single or double handle with smooth operation | Worn cartridge |
| Ceramic disc faucet | Wide single lever over a cylinder body | Cracked or dirty ceramic disc |
| Compression faucet | Two handles you tighten to shut off | Worn rubber washer |
Compression faucets are the oldest design and the most common in homes built before 1980, so if your home is older, start there.
How to confirm your faucet type
Remove the handle by unscrewing the decorative cap on top and backing out the screw underneath. Lift the handle off and look at what sits below it. A cartridge or disc cylinder will be obvious, while a ball faucet reveals a rounded metal ball and a compression faucet shows a rubber-tipped stem. Knowing how to fix a leaky faucet correctly depends entirely on this identification step, so take a photo of what you see before pulling anything else apart.
Step 3. Fix the leak by replacing worn parts
With your faucet type confirmed, replacing the worn component is the core of knowing how to fix a leaky faucet. This step looks slightly different depending on your faucet type, but the principle stays the same: pull out the old part, match it to a new one, and install the replacement with a light coat of silicone grease before reassembly.
Replacing a cartridge faucet
Grab your needle-nose pliers and remove the retaining clip or nut holding the cartridge in place. Pull the cartridge straight up and out, noting which direction it faces before removing it. Take the old cartridge to the hardware store or match it using your faucet’s model number to get an exact replacement.
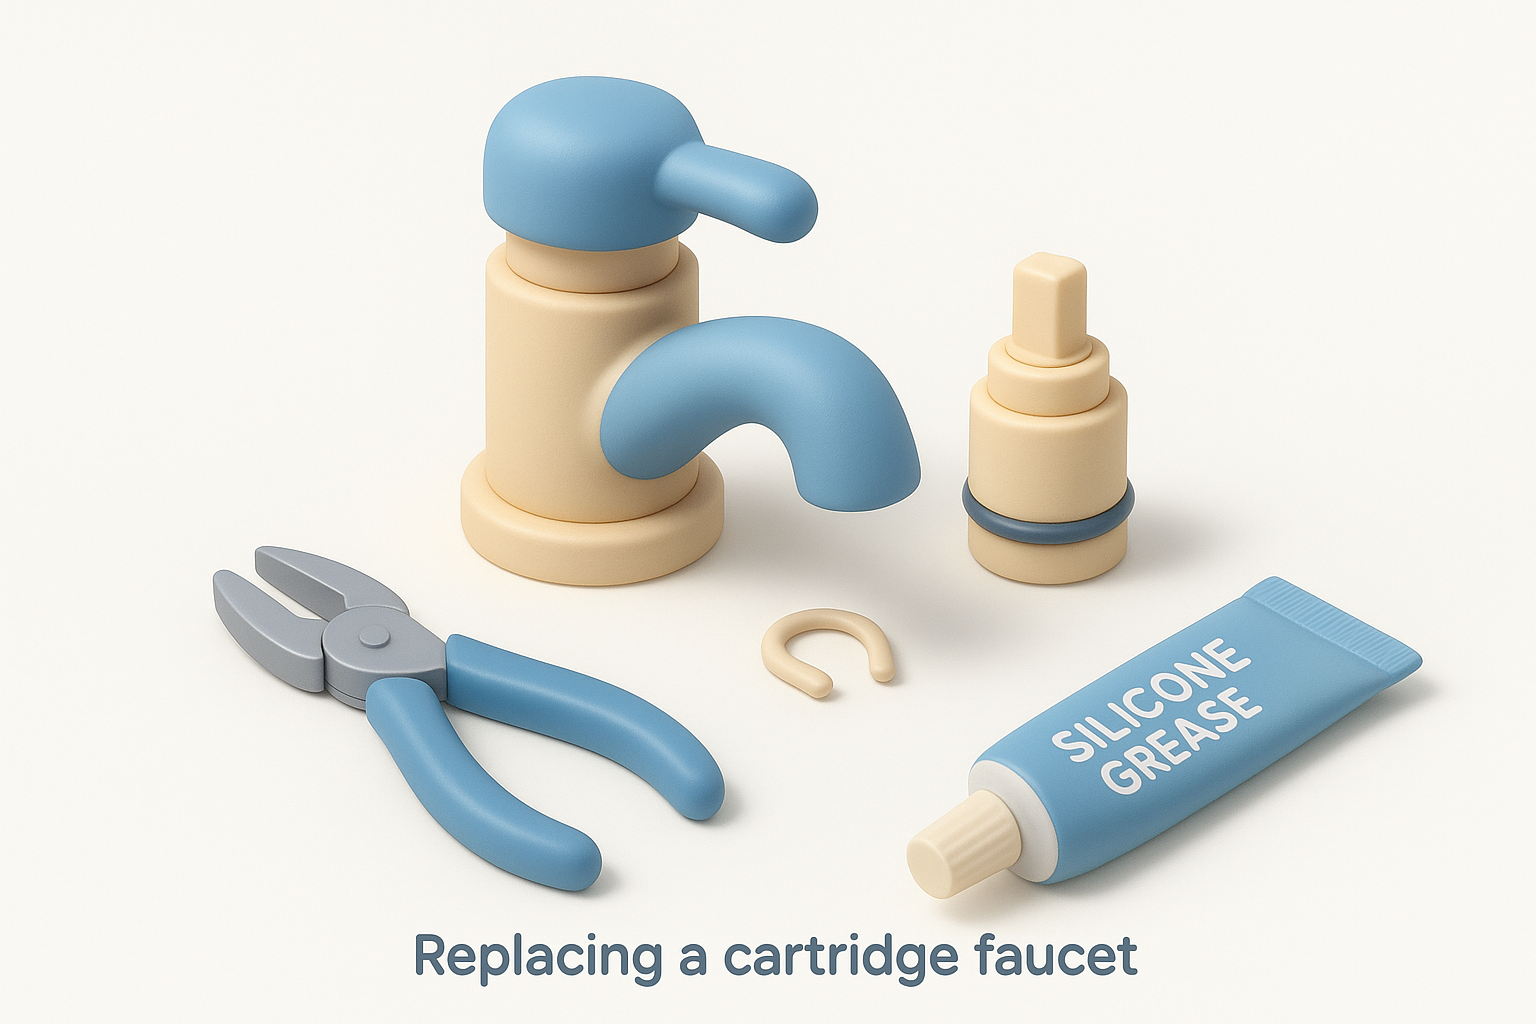
Apply a thin layer of plumber’s silicone grease to the new cartridge before inserting it to extend its lifespan and ensure a watertight seal.
Slide the new cartridge into position in the same orientation as the old one, then secure the retaining clip or nut. Misaligning the cartridge is the most common reason hot and cold get reversed after a repair, so double-check the orientation before locking anything in.
Replacing a compression faucet washer
Unscrew the packing nut with your adjustable wrench and pull out the stem. At the bottom of the stem you’ll find a rubber washer held by a brass screw. Remove the screw, swap in a matching rubber washer, and apply a small amount of silicone grease before reassembling the stem. Compression faucet washers cost under a dollar and are available at any hardware store.
Step 4. Reassemble and test for drips
With the new part installed, putting everything back together in the exact reverse order you took it apart is the key to a leak-free result. Work slowly here. Rushing reassembly is how small screws get cross-threaded or handles end up sitting crooked on the stem.
Reassemble in reverse order
Start by sliding the stem or cartridge back into the faucet body, making sure it seats fully before tightening the retaining nut or clip. Place the handle back onto the stem, press it down firmly, and secure the handle screw. Snap the decorative cap back into place last. Finger-tighten every connection first, then give each one a final snug turn with your wrench rather than over-tightening, which can crack plastic components or strip threads.
- Seat the cartridge or stem fully before securing the retaining clip
- Hand-tighten first, then wrench-snug each connection
- Reattach the handle screw before snapping the decorative cap back on
Test the repair
Before you call the job done, turn your supply valves back on slowly, one at a time, with the faucet handle still in the off position. Keep that handle closed as pressure rebuilds in the line and watch the base, handle, and spout closely for any moisture over the next two to three minutes.
If the spout still drips after you’ve replaced the cartridge or washer, the valve seat inside the faucet body may be corroded and need resurfacing or replacement.
Once you confirm no drips appear anywhere, turn the faucet on and off several times to verify smooth operation and correct hot and cold response. Completing this final check is how you know how to fix a leaky faucet properly, rather than just masking the problem temporarily.
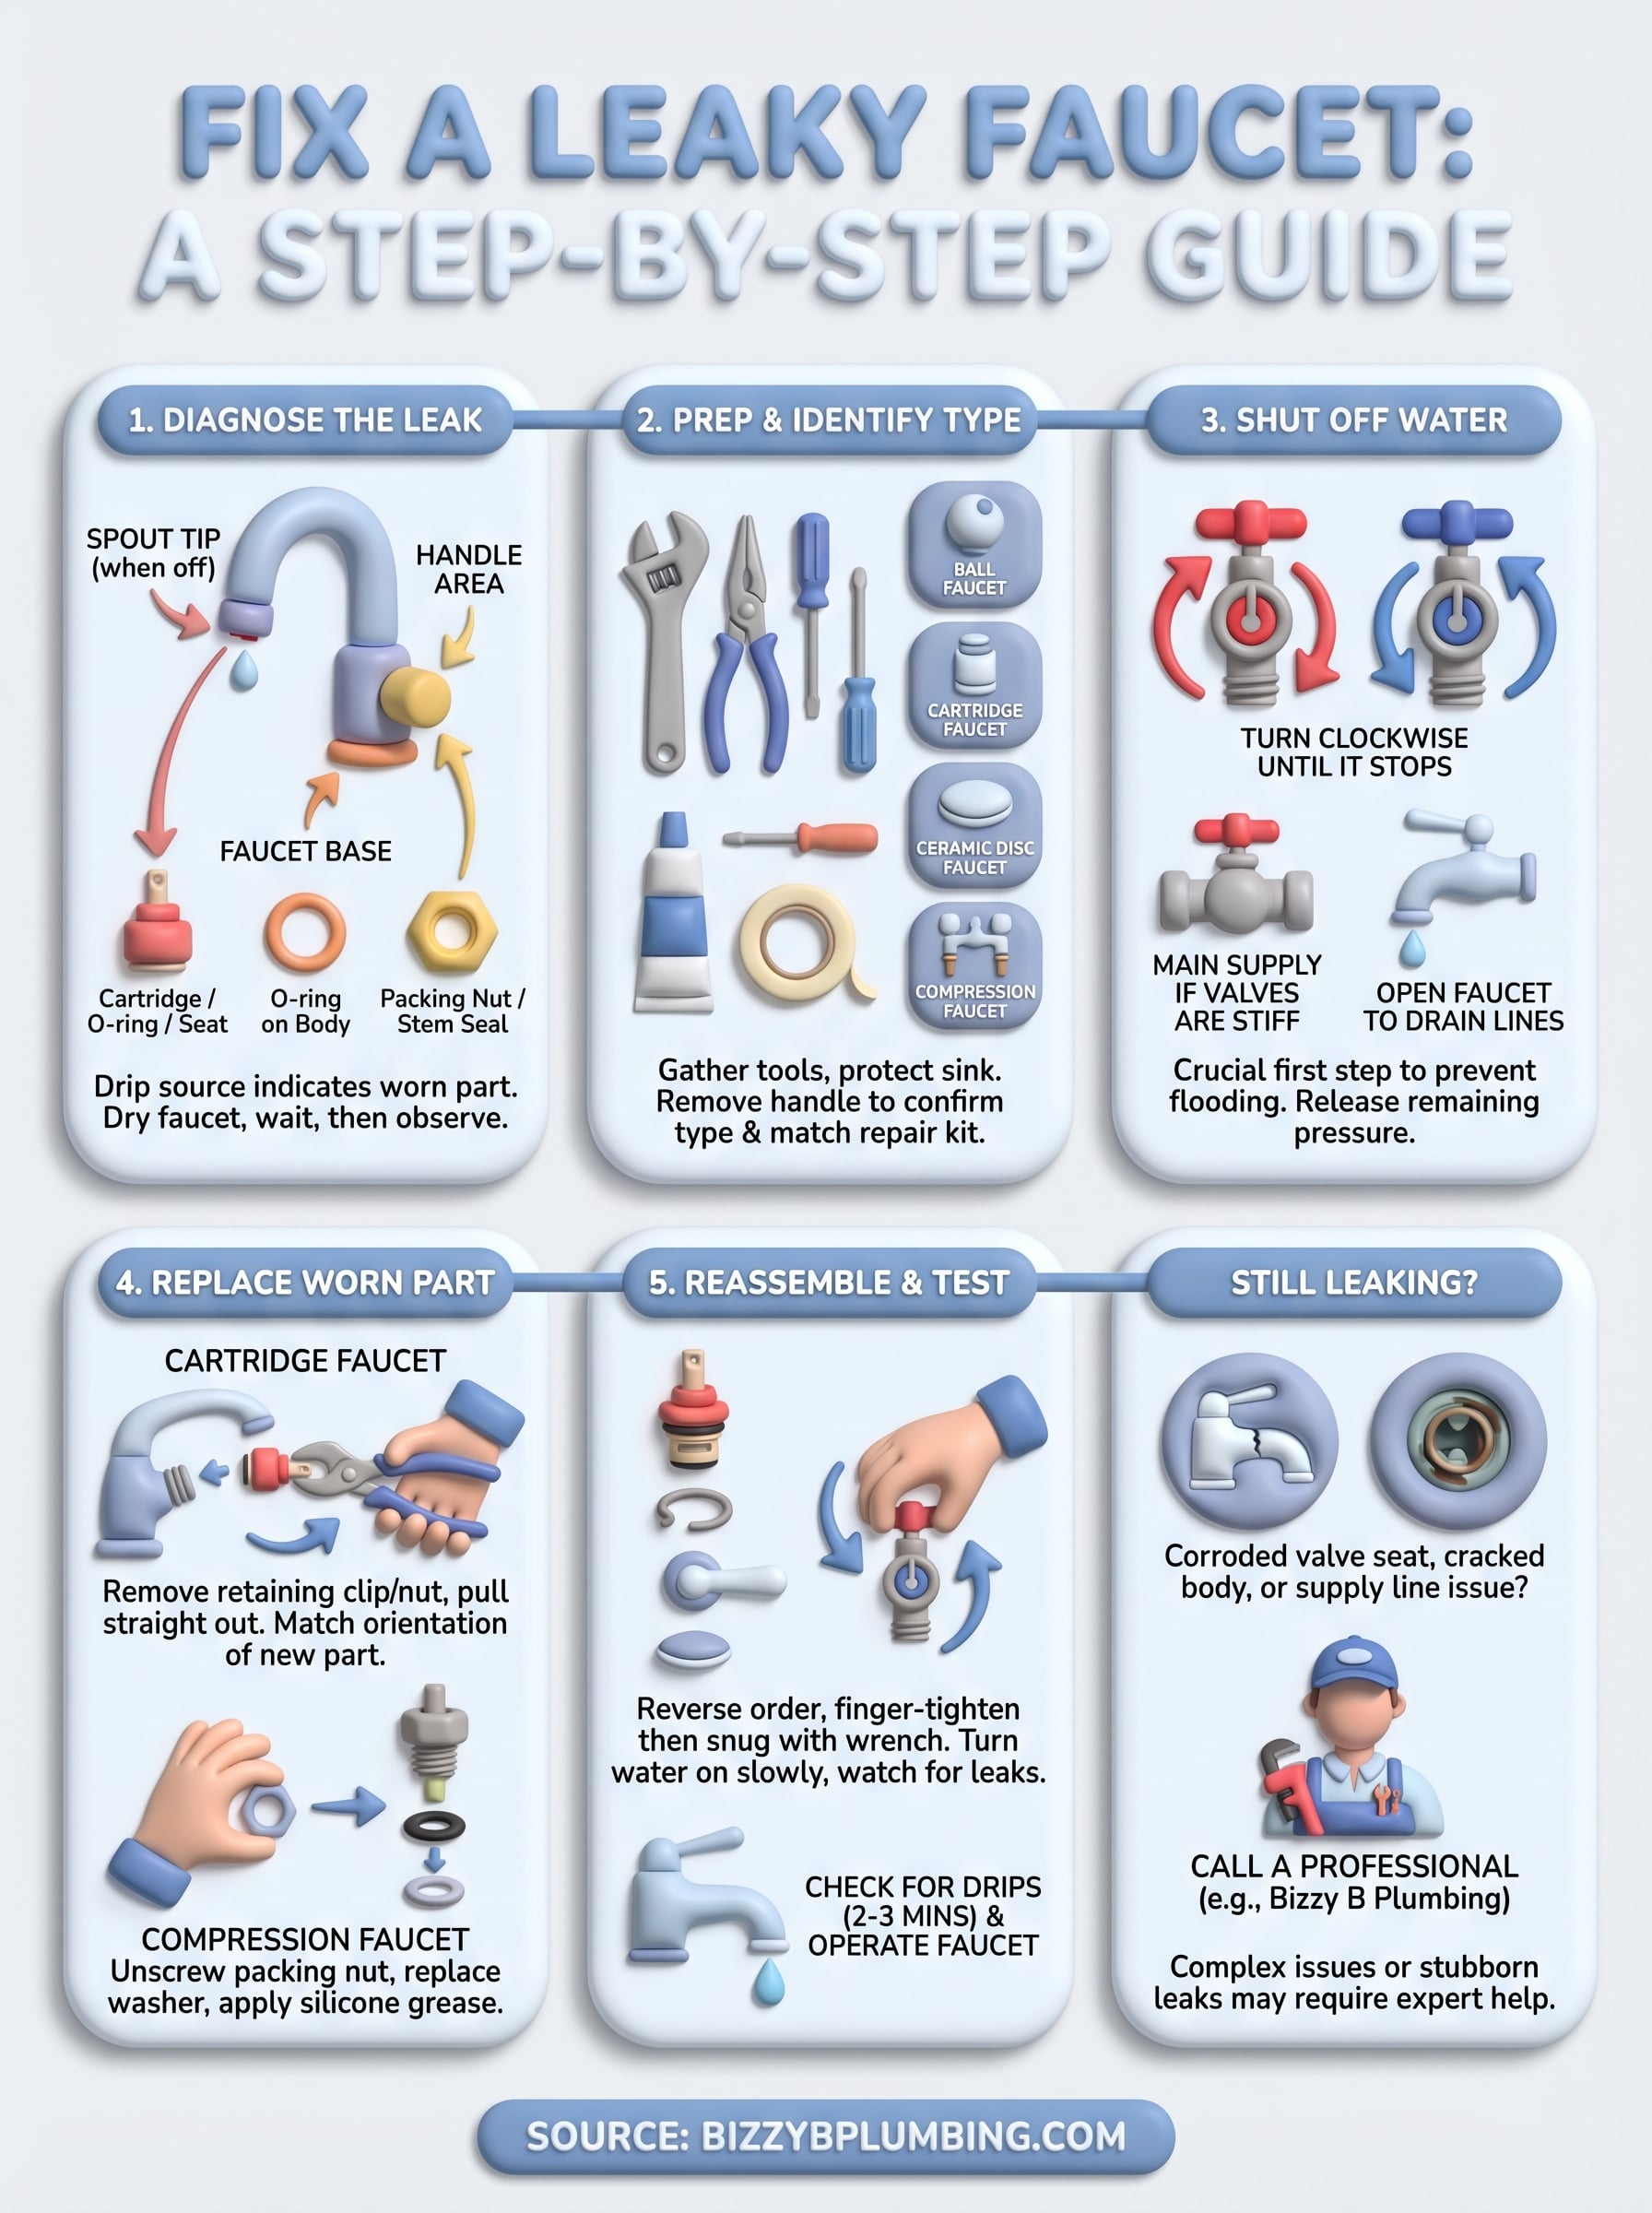
Next steps if it still leaks
You followed every step above on how to fix a leaky faucet and the drip is still there. That usually points to a corroded valve seat, a cracked faucet body, or a supply line connection that no amount of cartridge swapping will resolve. At that point, continuing to disassemble and reassemble the same faucet risks damaging threads or cracking older hardware and turning a simple repair into a full faucet replacement.
Some repairs are also worth handing off simply because the right fix requires specialized tools or diagnostic experience. A plumber can resurface a valve seat, identify hidden corrosion, or swap out a faucet completely in under an hour without the trial-and-error involved in a second DIY attempt. If the leak persists, is coming from the supply lines behind the wall, or your shut-off valves are corroded and won’t close fully, those are clear signs to call a professional. The team at Bizzy B Plumbing offers same-day service across Knoxville and East Tennessee with upfront pricing and no pressure tactics.