That constant sound of water trickling in your toilet tank isn’t just annoying, it’s wasting up to 200 gallons of water per day and driving your utility bill up with it. The good news? Learning how to fix a running toilet is one of the more straightforward plumbing repairs you can handle without calling in a pro.
Most running toilets come down to three common culprits: a worn-out flapper, a faulty fill valve, or an improperly set float. Each one has a clear fix that takes basic tools and less than an hour of your time. We see these issues daily at Bizzy B Plumbing, serving homeowners across Knoxville, Alcoa, Maryville, and East Tennessee, so we know exactly what to look for and how to walk you through it.
This guide breaks the process into simple, step-by-step instructions so you can diagnose the problem and repair it yourself. And if things turn out to be more complicated than expected, our licensed technicians are a phone call away with same-day service and honest, upfront pricing.
Before you start: tools, parts, and safety
Getting prepared before you start saves time and keeps the job clean. Most of what you need to fix a running toilet is already in a basic toolbox, and any replacement parts are available at your local hardware store for under $20 in most cases.
Tools and parts to gather
You won’t need specialized equipment for this repair. A standard adjustable wrench, slip-joint pliers, and a sponge or small bucket cover the mechanical side of the job. For parts, pick up a universal flapper kit and a fill valve replacement kit. These come with instructions and fit most standard toilets, so you don’t need to know your toilet’s brand before heading to the store.
Here’s a quick checklist to gather before you start:
- Adjustable wrench
- Slip-joint pliers
- Sponge or small bucket
- Rubber gloves
- Universal flapper kit (with chain)
- Fill valve replacement kit
- Replacement tank bolts and washers (optional, for leak repairs)
- Old towels or rags
Buying a flapper and fill valve kit together costs less than $15 at most hardware stores and covers the two most common causes of a running toilet.
Safety steps before you open the tank
Before you touch anything inside the tank, locate the shut-off valve on the wall or floor behind the toilet and turn it clockwise to cut off the water supply. This prevents an accidental overflow while you work. The water inside the tank is clean, not wastewater, so there’s no health risk involved, but wear rubber gloves anyway to protect your hands from mineral deposits and grime that collect in older tanks.
Once the valve is off, flush the toilet to drain as much water from the tank as possible. Then lift the tank lid carefully and set it flat on a folded towel so it won’t crack or roll off the surface. Now you’re ready to find the problem.
Step 1. Find the cause of the running
The first step in learning how to fix a running toilet is identifying which specific part is failing. With the tank lid already off, you can run a few quick checks that narrow down the problem in under five minutes without touching a single tool.
Listen and look first
Watch the water level inside the tank while it refills after a flush. If water spills into the overflow tube (the tall plastic pipe standing in the center of the tank), your float is set too high or the fill valve is worn out. Here’s what each symptom points to:

- Water running into the overflow tube: float or fill valve problem
- Water level looks normal but toilet still runs: flapper leak
- Hissing sound near the fill valve: worn internal seal
The food coloring test
Drop 3 to 4 drops of food coloring into the tank, wait 10 minutes without flushing, then check the bowl for any color.
If color appears in the bowl, water is seeping past the flapper and you need to replace it. If the bowl stays clear, your flapper is sealing correctly and the issue is with the fill valve or float adjustment instead. This test removes the guesswork entirely before you start buying parts.
Step 2. Fix the flapper and chain
If the food coloring test confirmed a leak, replacing the flapper is the most direct fix in this entire guide on how to fix a running toilet. The flapper is a rubber seal at the bottom of the tank that degrades over time from mineral buildup and regular wear.
Replace the flapper
Turn off the water supply if you haven’t already, then flush to empty the tank. Unhook the old flapper from the ears on the overflow tube and disconnect the chain from the flush handle arm. Take the old flapper to the hardware store if you’re unsure about sizing, since most universal flappers fit standard toilets but some brands use proprietary designs.
Follow these steps to install the new flapper:
- Snap the new flapper onto the overflow tube ears
- Attach the chain to the flush handle arm
- Leave 1/2 inch of slack in the chain so the flapper seals fully at rest
- Turn the water supply back on and flush to test the seal
Adjust the chain length
A chain that’s too short holds the flapper open; a chain with too much slack gets caught underneath it and breaks the seal.
Both situations cause continuous running, so check that the chain moves freely without bunching or tangling. Clip it to a different hole on the handle arm until the length feels right and the toilet flushes cleanly.
Step 3. Set the water level and fill valve
If the food coloring test showed no dye in the bowl but the toilet still runs, the fill valve or float setting is your problem. Water draining into the overflow tube means the tank is overfilling, and fixing it requires adjusting the float height or replacing the fill valve altogether.
Adjust the float height
The float controls when the fill valve shuts off. On ball float designs (older style with a ball on an arm), bend the arm slightly downward or turn the adjustment screw to lower the water level. On cup float designs (common in modern toilets), pinch the clip and slide it down the fill valve shaft until the water level sits about 1 inch below the top of the overflow tube.
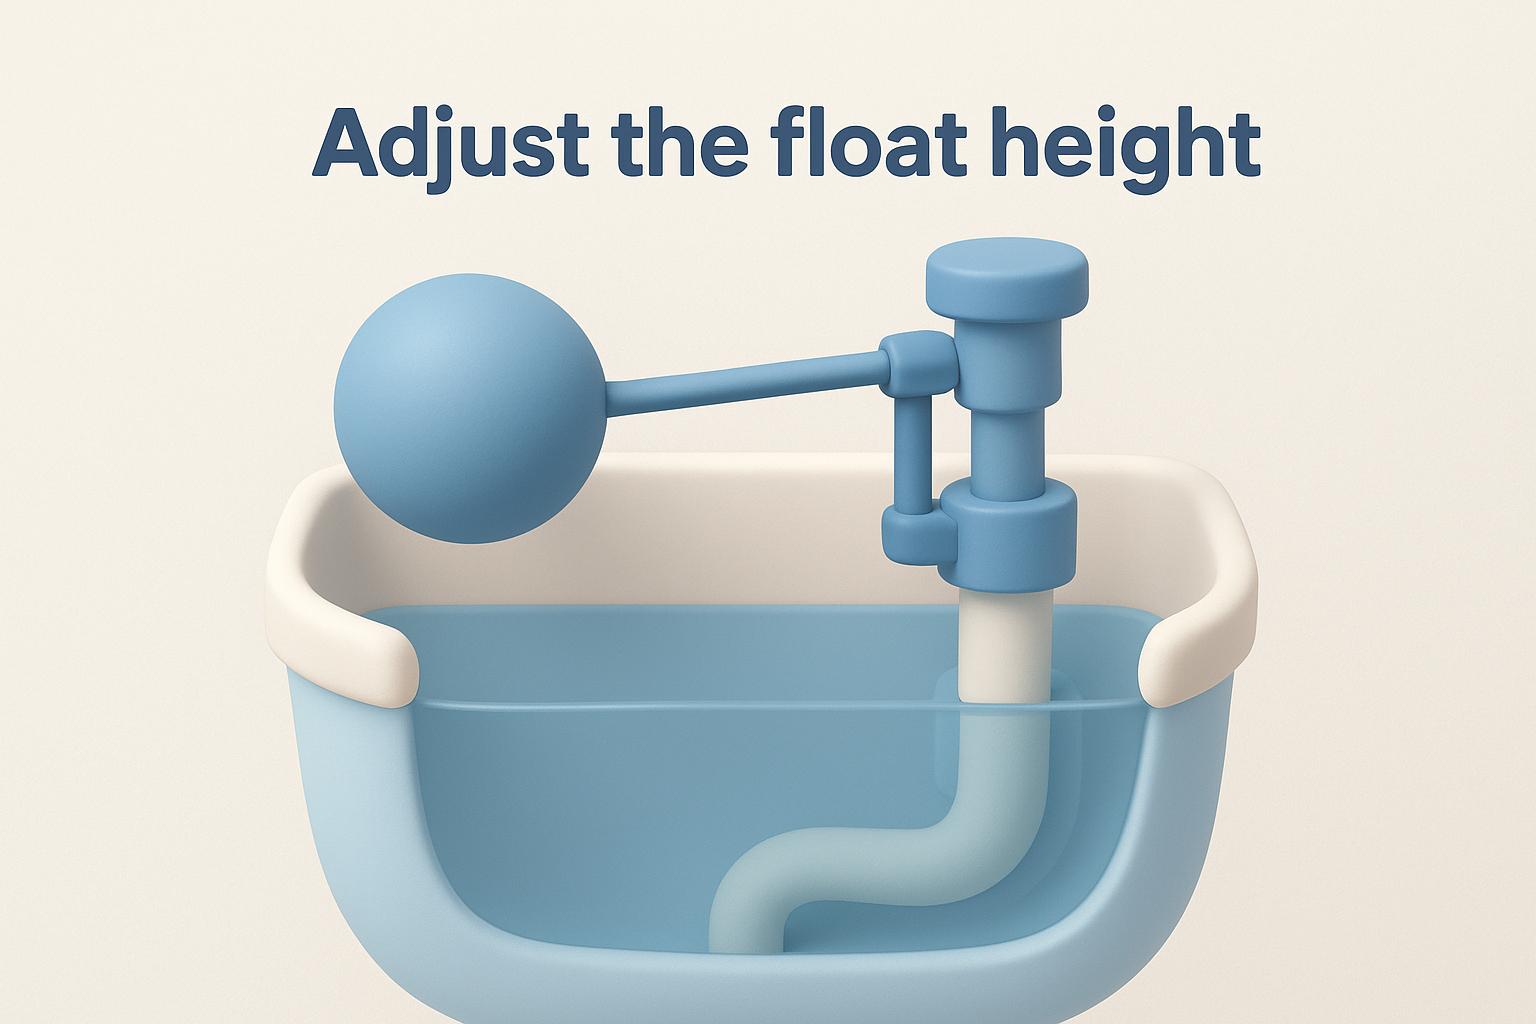
The correct water level mark is usually stamped or molded directly onto the inside wall of the tank.
Replace the fill valve
Sometimes adjusting the float isn’t enough because the fill valve itself is worn out and hissing or running constantly. To replace it, shut off the water supply, flush the tank empty, and disconnect the supply line. Unscrew the locknut holding the old valve in place, swap in the new valve, reconnect the supply line, and turn the water back on. This step resolves the most stubborn cases of how to fix a running toilet when simpler adjustments fail.
Step 4. Stop leaks around the tank and base
Not every toilet problem shows up as running water. Sometimes the issue is water pooling around the base or dripping from the tank bolts, which points to failed rubber components rather than internal valve issues.
Check the tank bolts
The tank sits on the bowl and is held in place by two or three bolts with rubber washers running through the bottom of the tank. Over time, these washers crack and shrink, letting water seep out with every flush. Tighten each bolt with a wrench and flathead screwdriver from inside the tank, alternating sides to keep the pressure even. If tightening doesn’t stop the drip, replace the bolts and washers entirely since a full replacement kit costs under $10 at any hardware store.
Never overtighten tank bolts since ceramic cracks under too much torque and requires a full tank replacement.
Inspect the base for seepage
Water sitting after a flush at the base of your toilet signals a failed wax ring, not a running toilet issue. Watch for these warning signs that confirm the wax ring needs attention:
- Soft or discolored flooring around the toilet base
- A persistent sewage odor in the bathroom
- Water appearing only after flushing, not from supply lines or the tank
Replacing a wax ring involves lifting the entire toilet off the floor and goes beyond the scope of how to fix a running toilet yourself. Call a licensed plumber before the leak damages your subfloor.
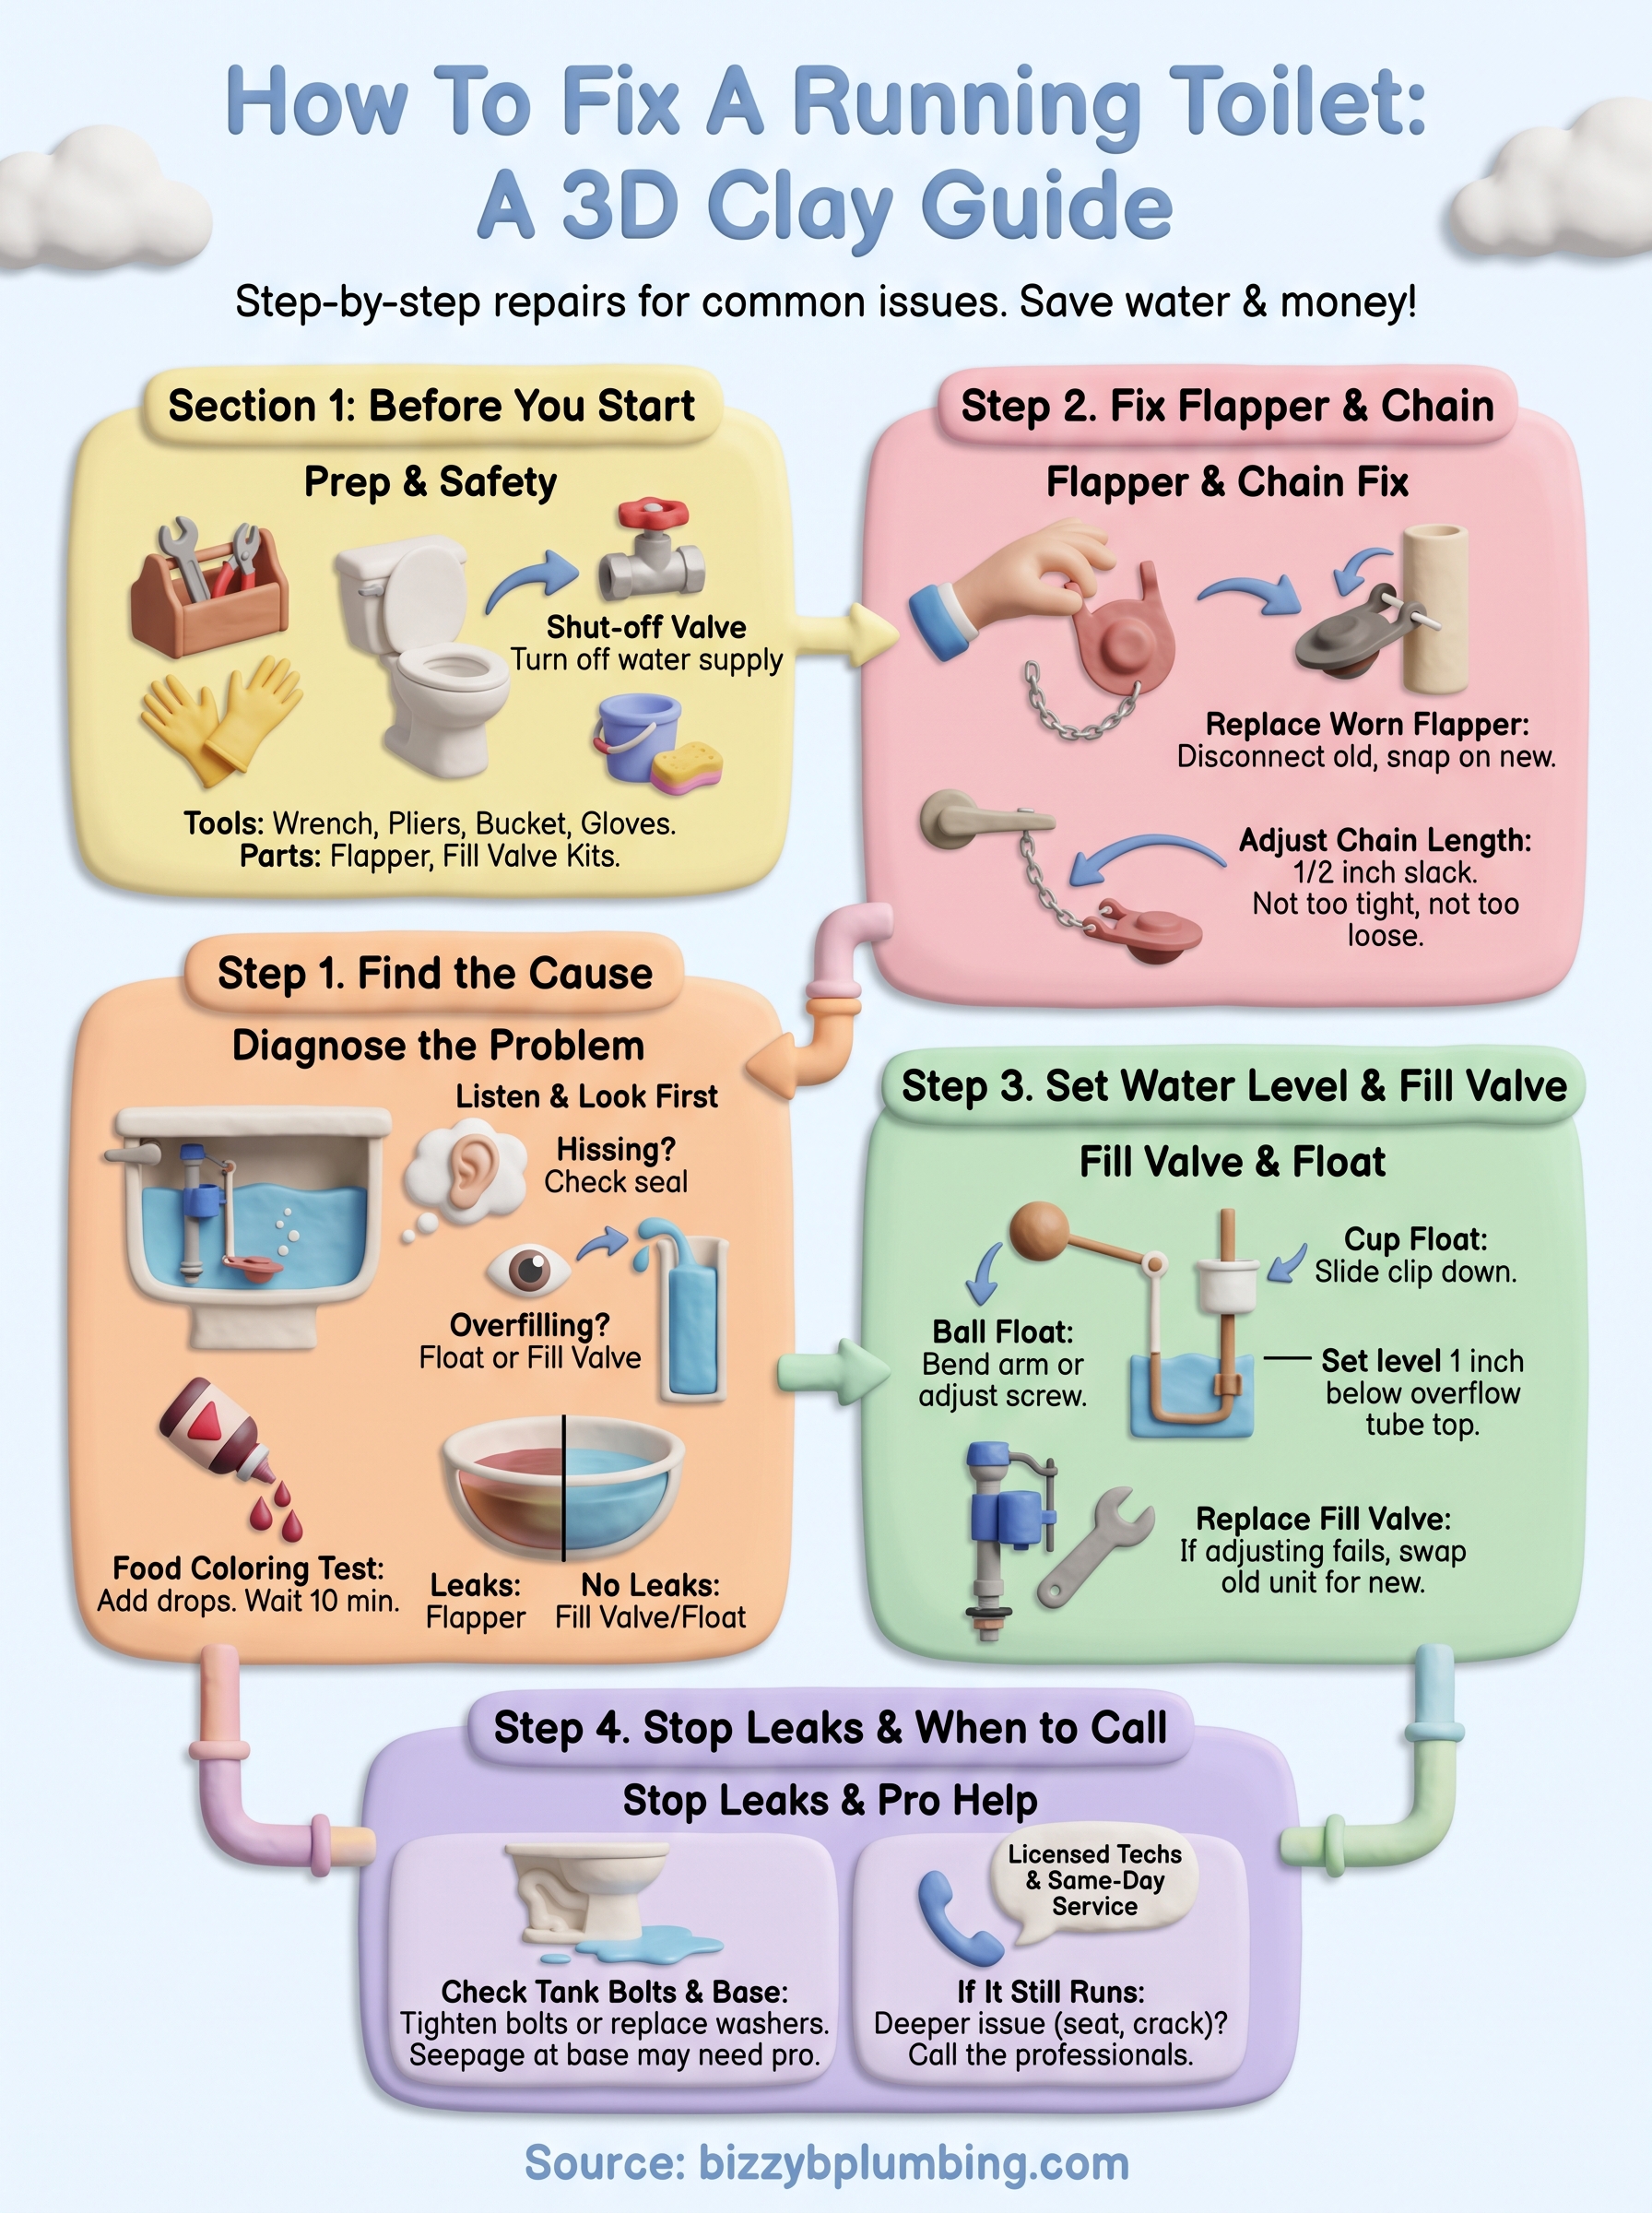
If It Still Runs
You’ve worked through every step in this guide on how to fix a running toilet, and the water keeps going. At that point, the problem likely sits deeper in the plumbing system than a basic flapper or fill valve swap can reach. A cracked flush valve seat, a damaged overflow tube, or corroded internal components can all defeat standard DIY repairs and need professional attention.
Some issues also compound quickly. A toilet that keeps running after repairs may signal a larger supply line problem or a valve failure that, left alone, adds significant cost to your next water bill. Catching it early keeps the repair straightforward and prevents damage to surrounding flooring or cabinetry.
If you’re in Knoxville, Alcoa, Maryville, or anywhere in East Tennessee, contact Bizzy B Plumbing for same-day service with honest, upfront pricing. Our licensed technicians will diagnose the issue fast and fix it right the first time.


