A garbage disposal leaking from top usually means one thing: the connection between your disposal and the sink has failed. That seal, created by the sink flange, mounting assembly, and plumber’s putty, takes a beating over time, and once it gives out, water slips through every time you run the faucet. Left alone, even a slow drip can warp your cabinet floor and invite mold underneath the sink.
The good news is that this is one of the more straightforward disposal leaks to fix. In most cases, you can handle it yourself with basic tools and about thirty minutes. At Bizzy B Plumbing, we help Knoxville-area homeowners deal with leaks like this every week, and we’ve found that understanding the cause first saves a lot of wasted effort and unnecessary part replacements.
This guide walks you through how to pinpoint exactly where the leak originates, tighten or reseal the flange, and get your disposal back to working order without calling for backup. If the fix turns out to be bigger than expected, we’re a phone call away with same-day service across Knoxville and East Tennessee.
What to do first before you start
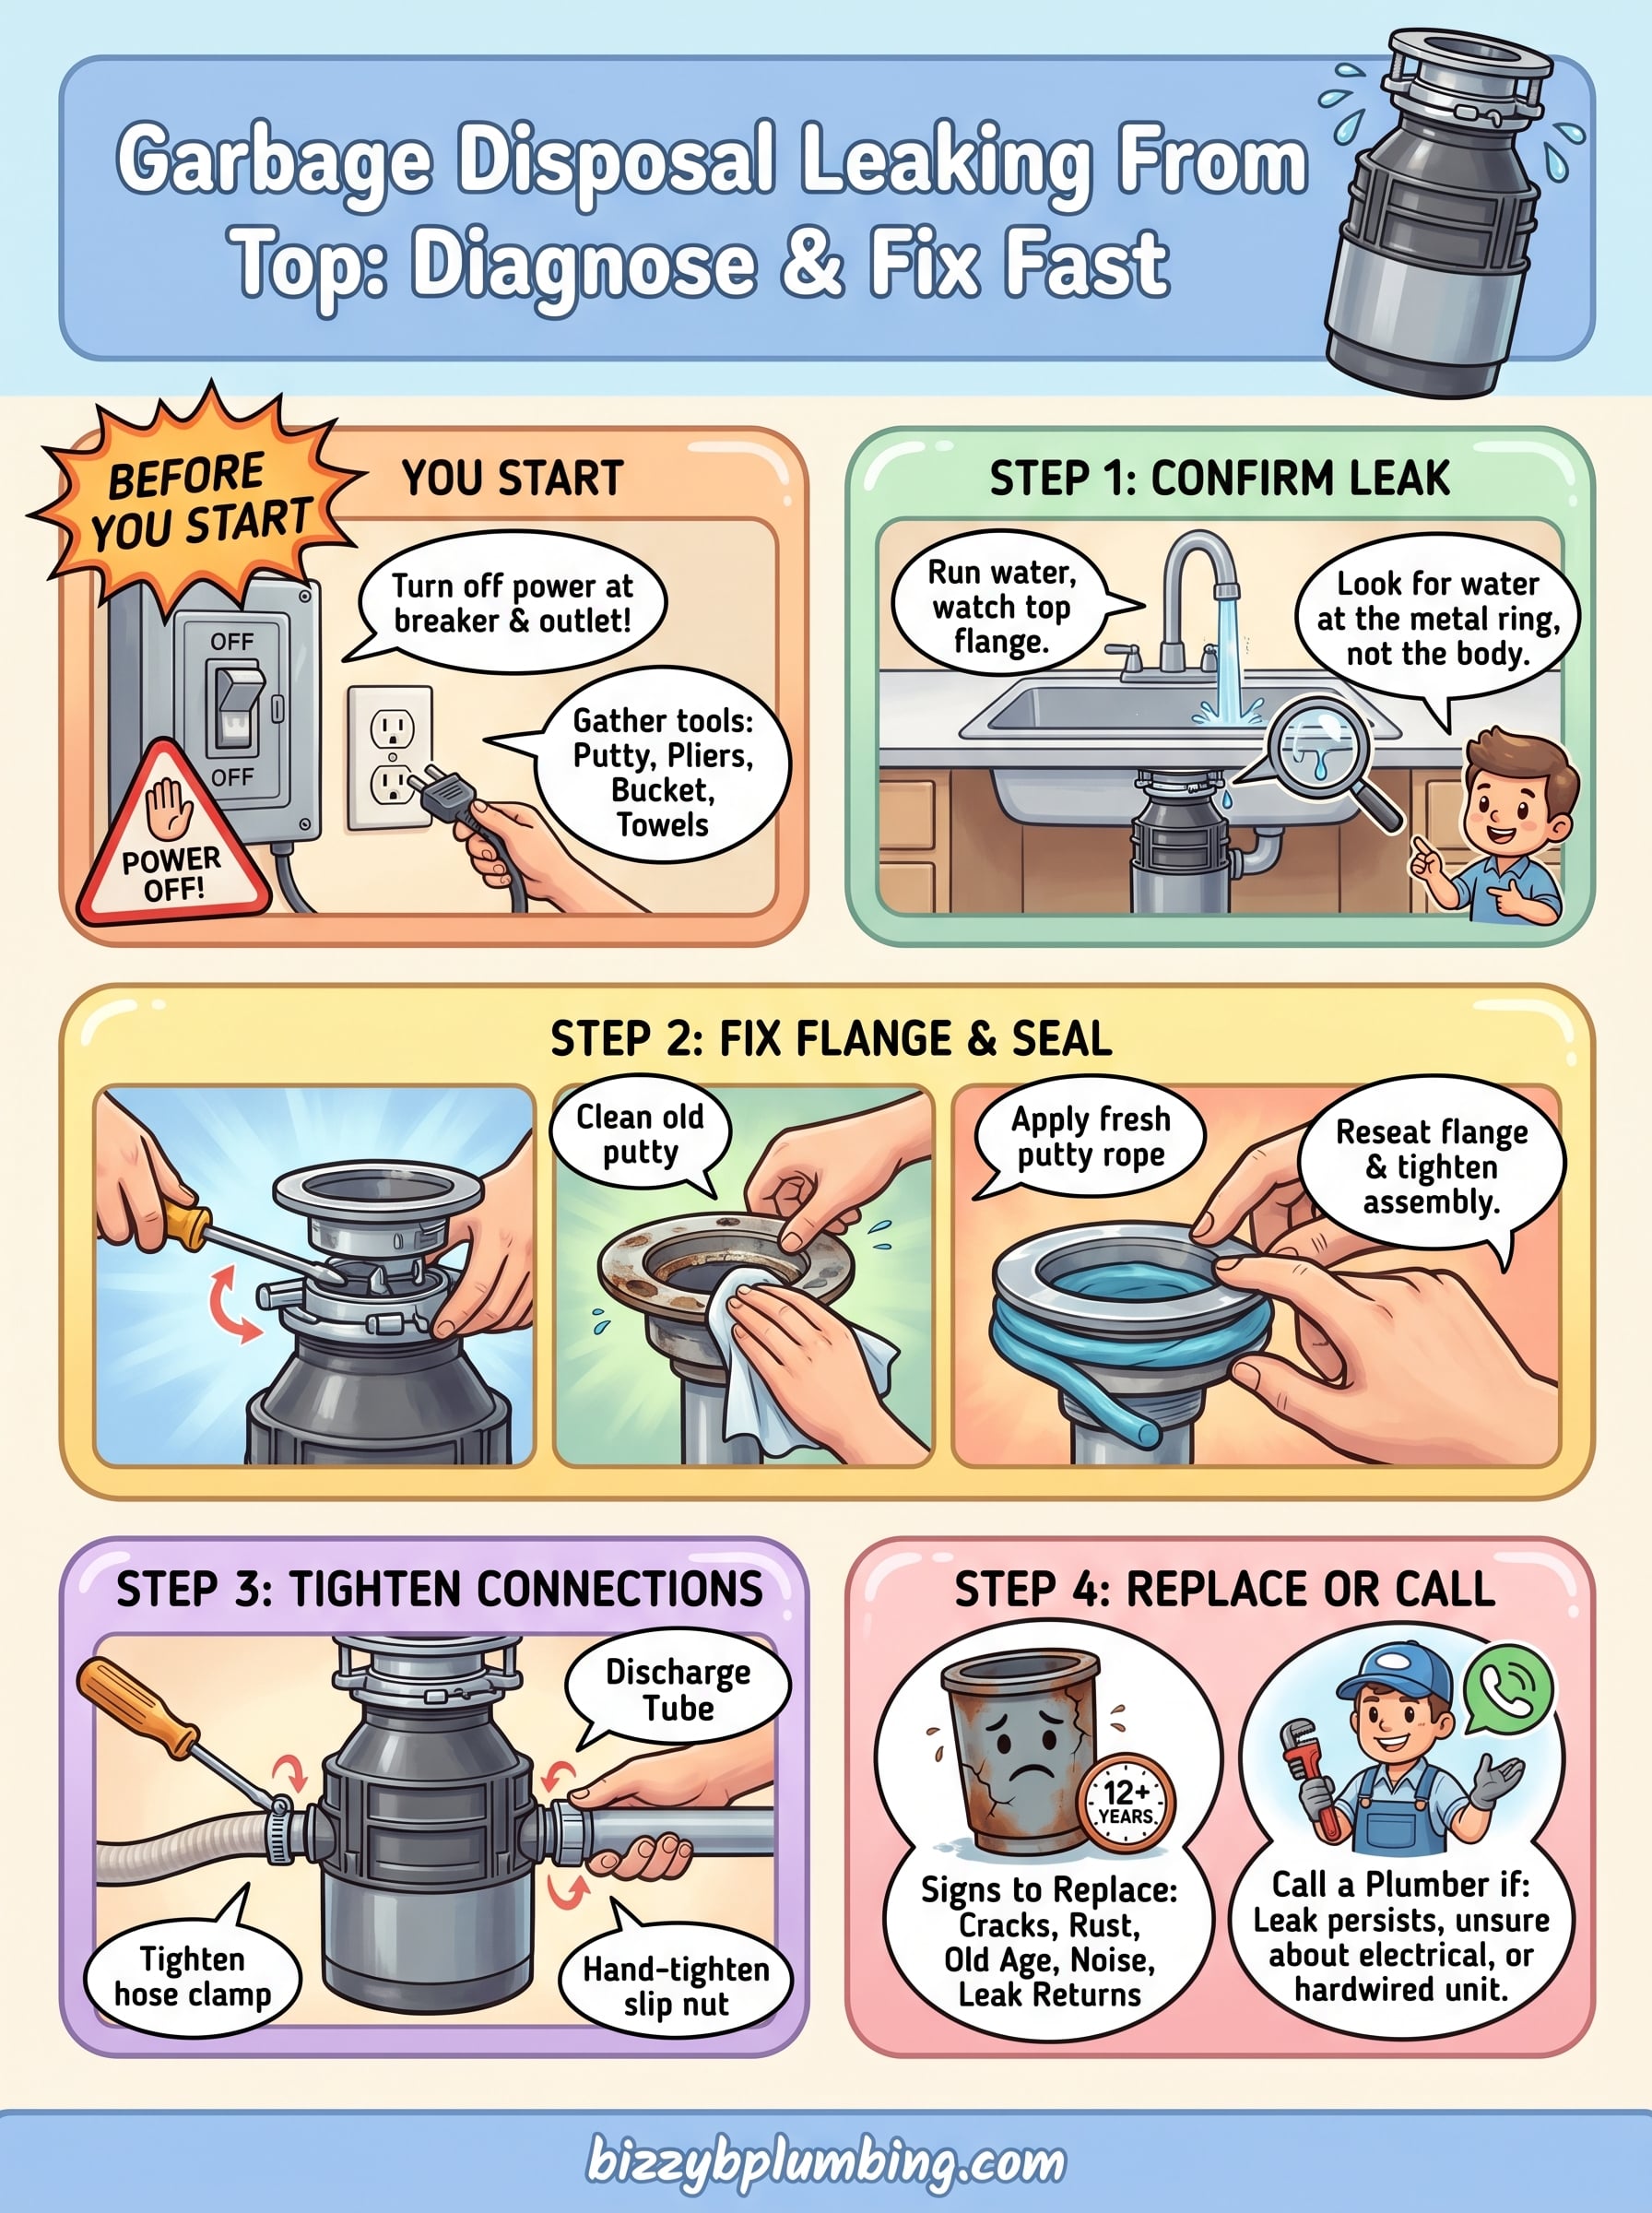
Before you touch anything under your sink, take two minutes to set yourself up properly. Rushing into the repair without cutting the power or gathering the right materials leads to mistakes that turn a simple fix into a bigger problem. Getting organized first saves you from running back and forth to the hardware store mid-job.
Skipping the power shutoff is the most common mistake homeowners make before working on a disposal. Always cut the power before you touch anything.
Turn off the power to your disposal
A garbage disposal leaking from top is a wet, electrical repair environment, which means cutting power is non-negotiable. Find your disposal’s wall switch and flip it off, then go to your electrical panel and switch off the circuit breaker for the disposal. Most panels label it as “disposal” or “kitchen appliance.” If you’re not sure which breaker controls it, plug a lamp into the outlet under the sink and flip breakers until the lamp goes dark.
Once you’ve cut the power, unplug the disposal’s cord from the outlet under the sink if your model has one. Not all disposals do, but unplugging it gives you a second layer of protection while you work with wet hands near the mounting assembly.
Gather your tools and supplies
Having everything on hand before you start keeps the job moving without interruptions. Here’s what to collect:
- Plumber’s putty (for resealing the sink flange)
- Adjustable pliers or channel-lock pliers
- Flat-head screwdriver
- A bucket or shallow pan
- Old towels or rags
- Flashlight or headlamp
Most of these items are already in your home or available at any hardware store. Plumber’s putty typically costs under five dollars and is the most likely material you’ll need to complete this repair.
Clear out the cabinet under your sink
Pull everything out from under the sink before you start. Cleaning products, extra sponges, and spare fittings that accumulate under most kitchen sinks will block your access and get wet if you bump the disposal during the repair. Set them aside on the floor or counter.
Place your bucket or pan directly under the disposal to catch any water that drains out when you loosen the mounting assembly. Lay a towel flat on the cabinet floor to protect it from drips. With the space cleared, you’ll have room to move and a clean view of exactly what you’re dealing with.
Step 1. Confirm the leak source at the top
Before you pull out the putty or reach for tools, confirm exactly where the water is coming from. A garbage disposal leaking from top can sometimes be confused with a leak at the side or bottom, especially when water runs down the disposal’s body and pools in the same spot. Identifying the source correctly saves you from resealing the wrong connection and wasting time.
Run water and watch where it appears
Turn your faucet on to a steady stream and shine your flashlight directly on the top of the disposal where it meets the sink. Look for water appearing at the sink flange, which is the metal ring sitting in the sink drain hole and sealed to the sink basin with plumber’s putty underneath. If you see water seeping out right at that ring or dripping from around the underside of the sink, the leak is at the top.
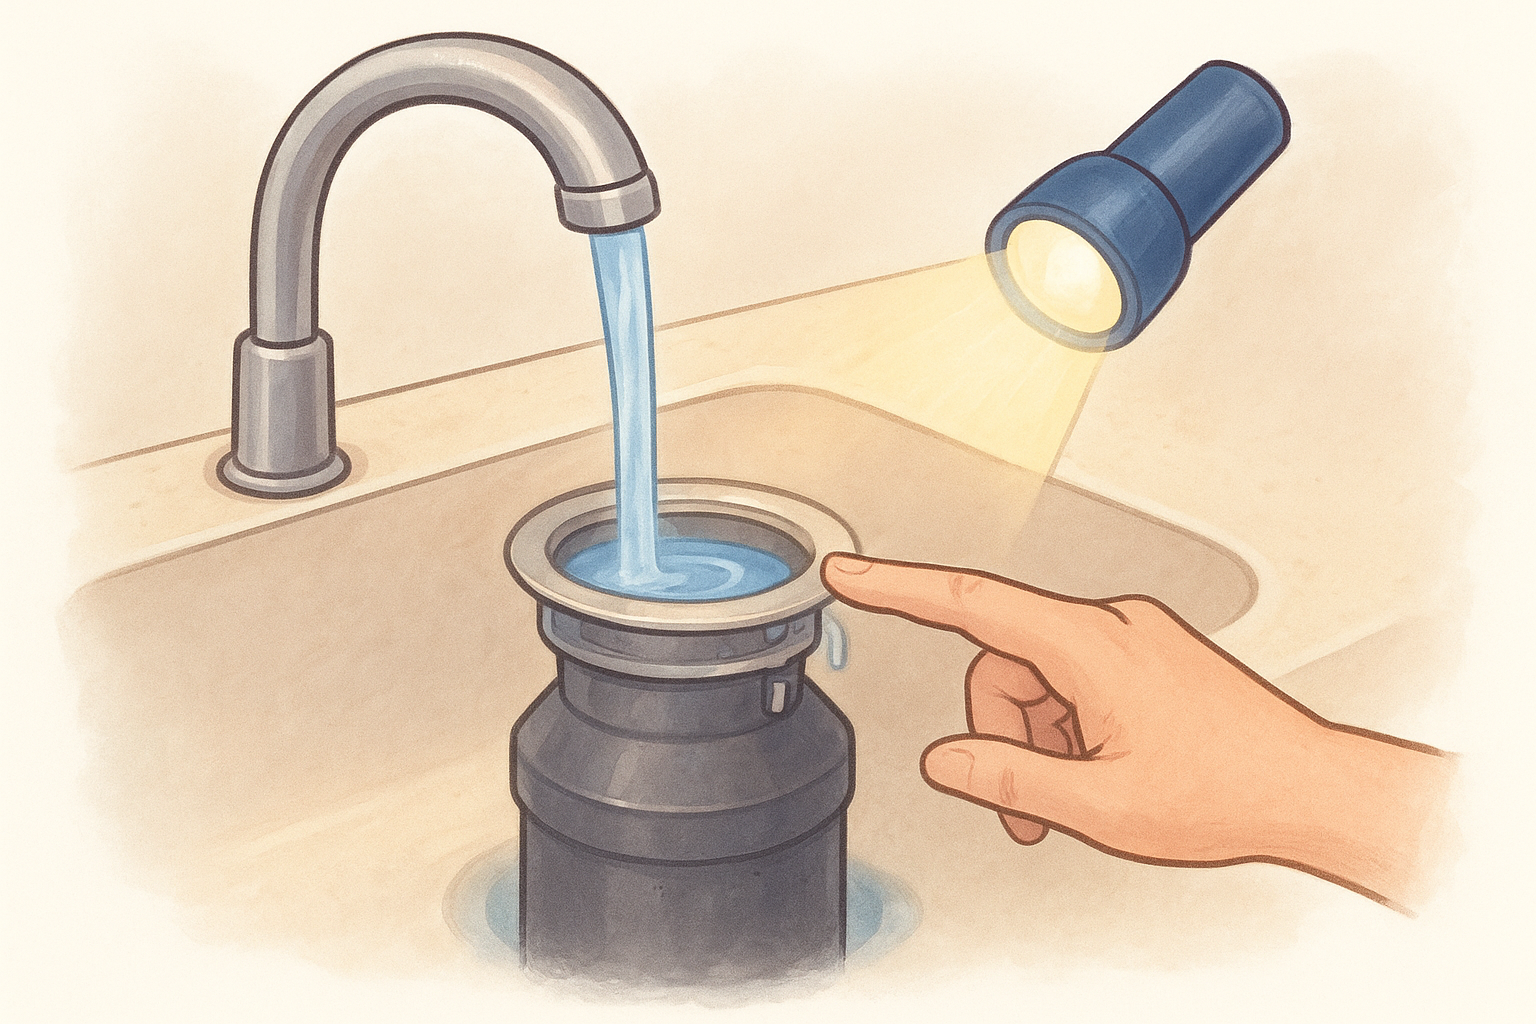
Water that appears at the sink flange almost always points to failed putty or a loose mounting assembly, not a cracked disposal body.
Watch for a full minute before drawing any conclusion. Slow seeps can take time to show up, and stopping too early can send you after the wrong problem.
Feel around the mounting assembly
Dry your hands, then run your fingers around the mounting ring that connects the disposal unit to the underside of the flange. The mounting assembly includes a snap ring, mounting tabs, and a rubber gasket pressed between the flange and the sink basin. If you feel moisture directly on or around those components, the problem sits at the top connection, and Step 2 will take care of it.
Step 2. Fix the sink flange and mounting seal
Once you’ve confirmed the garbage disposal leaking from top originates at the flange, it’s time to reseal that connection. This fix involves dropping the disposal, cleaning out old putty, and applying a fresh seal before reassembling everything. Take your time with each step to avoid repeating the job.
Loosen the mounting assembly and drop the disposal
Support the disposal body with one hand or prop it on a folded towel inside the bucket before you start loosening anything. Locate the mounting ring where the disposal connects to the underside of the flange. Insert a flat-head screwdriver into one of the mounting tabs and rotate the ring counterclockwise until it releases. The disposal will drop, so keep your grip firm. Set the unit aside on the cabinet floor.
If the mounting ring feels stuck, tap the screwdriver handle lightly with your palm to break it loose rather than forcing it.
Reseal the flange with fresh putty
With the disposal removed, push up on the flange from below to pop it out of the sink. Clean off all old putty from both the flange rim and the underside of the sink opening using a rag. Old putty hardens and leaves uneven surfaces that prevent a proper seal.
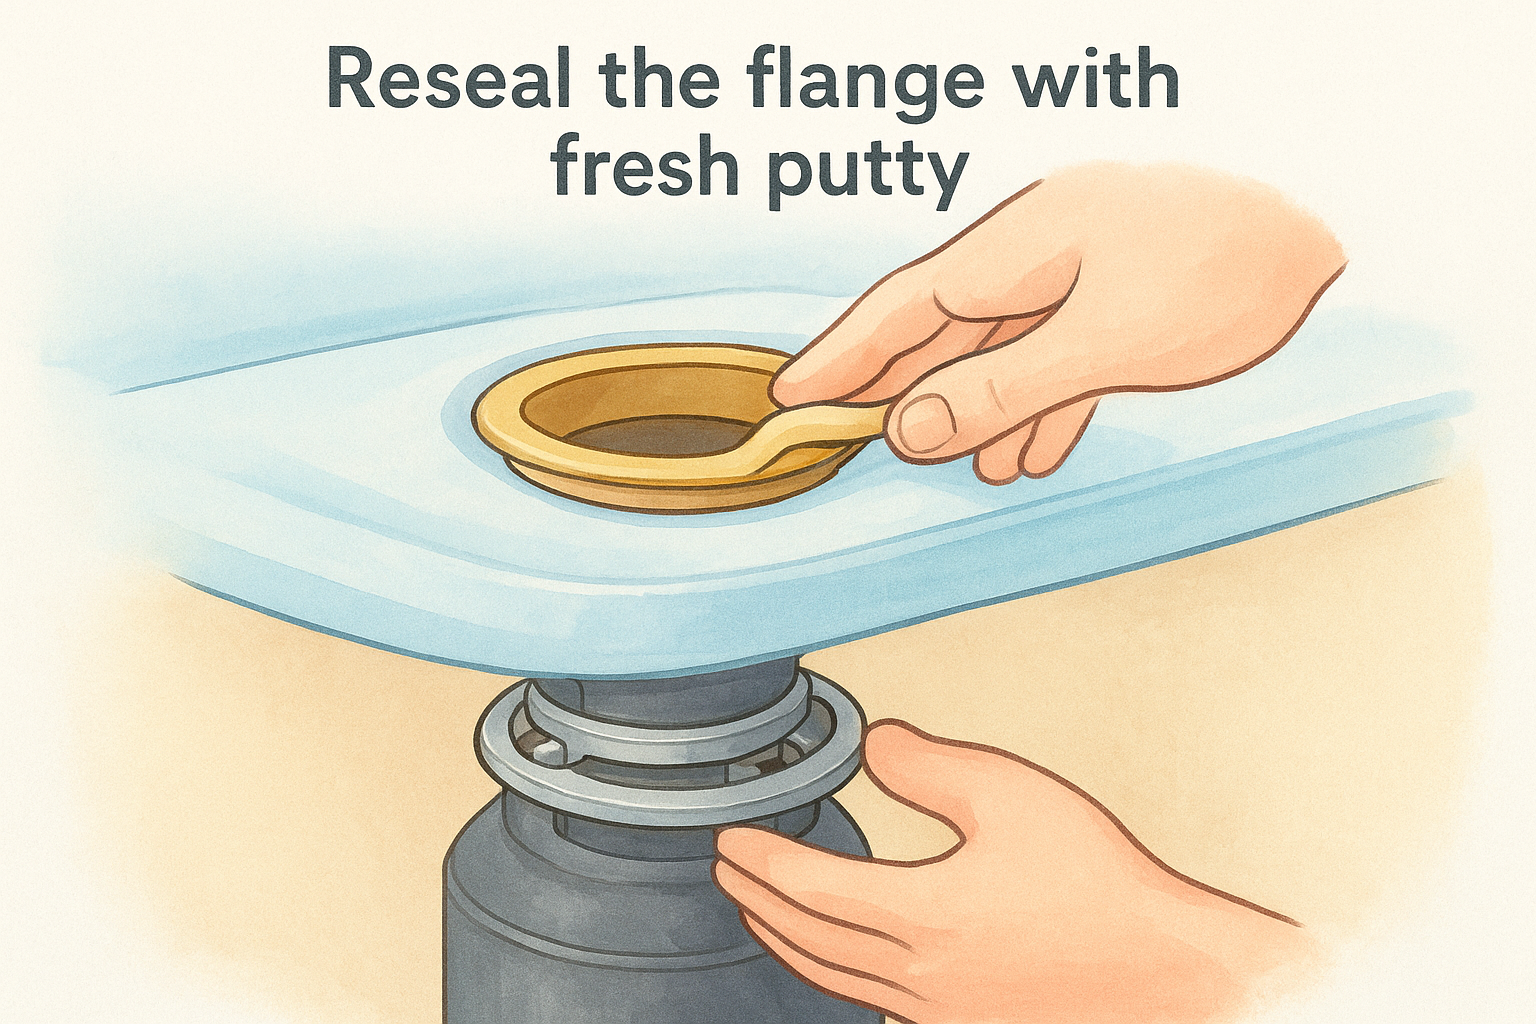
Roll a rope of fresh plumber’s putty about the thickness of a pencil and press it evenly around the underside lip of the flange. Press the flange back down into the drain hole firmly. From underneath, reinstall the mounting assembly by threading on the snap ring and tightening the mounting tabs until the flange seats flush and putty squeezes out slightly around the edges. Wipe away the excess putty with a rag.
Step 3. Tighten and reseal nearby connections
After you reseat the flange, check the other connections at the top of the disposal before you call the job done. A garbage disposal leaking from top sometimes involves more than one loose joint, and water from a nearby connection can travel down the disposal body and look like a flange leak. Checking every nearby fitting now prevents you from reassembling everything only to find a second drip minutes later.
Inspect the dishwasher drain hose connection
Look for a short rubber hose on the upper side of the disposal body. This is the dishwasher drain hose, and it connects to a small inlet port near the top of the unit. Over time, the clamp holding that hose in place loosens and allows water to seep out during drain cycles.
A loose dishwasher drain hose is easy to miss because it only leaks when the dishwasher runs, not when you run the kitchen faucet.
Locate the hose clamp securing the hose to the port and tighten it clockwise with a flathead screwdriver or nut driver until it feels firm. If the hose feels brittle, cracked, or won’t hold pressure, replace it with a matching section of 7/8-inch corrugated drain hose available at any hardware store for a few dollars.
Check the discharge tube connection
The discharge tube runs out of the side of the disposal near the bottom of the unit, but its connection point sits close enough to the top area that a loose fitting can direct water upward during operation. Hand-tighten the plastic slip nut where the tube meets the disposal. If the nut stripped or cracks when you tighten it, replace the slip nut and washer as a pair to get a reliable seal.
Step 4. Decide when to replace or call a plumber
Not every garbage disposal leaking from top situation ends with a simple reseal. Once you’ve worked through Steps 1 through 3, run water again and watch for a full two minutes before deciding the job is done. If the leak persists after you’ve replaced the putty and tightened every connection, you’re dealing with something the putty and a screwdriver can’t fix.
Signs the disposal needs replacement
Some disposal problems point clearly toward replacement rather than repair. Watch for these specific signs after completing your fixes:
- Cracks in the disposal body visible on the outer shell
- Rust or corrosion around the flange or mounting collar that prevents a clean seal
- The unit is more than 10 to 12 years old and has needed multiple repairs
- Grinding or humming noises that suggest internal motor wear alongside the leak
- Water reappears at the same spot within a day or two of resealing
If your disposal is cracked or heavily corroded, no amount of putty will hold long-term. Replacement is the only lasting fix.
When to call a plumber
Call a plumber when the leak continues after you’ve resealed the flange, replaced worn connections, and confirmed the disposal body looks intact. A plumber can assess whether the mounting assembly is warped or whether the sink drain opening itself has shifted, which requires more than a basic reseal to correct. You should also call if you’re uncomfortable working near electrical connections or if the disposal is hardwired rather than plugged in, since hardwired units require electrical work alongside the plumbing repair.
Next Steps
A garbage disposal leaking from top is a fixable problem in most cases, and working through these four steps gives you the best shot at resolving it without spending money on a service call. Confirm the leak location first, reseal the flange with fresh putty, tighten every nearby connection, and make an honest call about whether the unit has enough life left to justify the repair.
If the leak returns after you complete the fix, or you find cracking and corrosion that goes beyond what fresh putty can handle, don’t wait on it. Water under your sink moves fast, and cabinet damage and mold add up quickly once the dripping starts. The Knoxville-area team at Bizzy B Plumbing offers same-day service, upfront pricing, and honest advice on whether a repair or a full replacement makes more sense for your home. Give us a call and we’ll take it from there.


