That constant hissing or trickling sound coming from your bathroom isn’t just annoying, it’s wasting water around the clock. A running toilet can burn through 200 gallons of water per day, and figuring out how to stop a toilet from running is one of the most common (and fixable) plumbing problems homeowners in Knoxville and East Tennessee deal with.
The good news? Most of the time, the fix takes minutes and costs next to nothing. The culprit is usually a worn flapper, a tangled chain, or a fill valve that needs a quick adjustment. These are parts you can find at any hardware store, and you don’t need special tools or plumbing experience to handle them.
At Bizzy B Plumbing, we help homeowners across Knox County, Alcoa, and Maryville with plumbing problems every day, but we also believe in giving you straight answers when a repair is something you can tackle yourself. This guide walks you through the most common causes of a running toilet and exactly how to fix each one, step by step. And if the problem turns out to be bigger than expected, we’re a phone call away with same-day service.
Before you start: safety and quick checks
Working on a toilet is one of the safer home repairs you can do, but a few simple steps upfront will keep you from making a small problem worse. The water inside the tank is clean and not under pressure, so there’s no real hazard here as long as you take a moment to prepare. Getting these basics right also means you’ll diagnose the problem faster and avoid unnecessary trips to the hardware store.
Turn off the water supply
The first thing you want to do is find the shutoff valve behind or beneath your toilet. It’s a small oval or oblong handle connected to the wall by a braided supply line. Turn it clockwise until it stops moving. If the valve is stiff and won’t budge, don’t force it. Old shutoff valves can be brittle, and breaking one turns a simple repair into a much bigger job. In that case, shut off the main water supply to your house instead and add the valve replacement to your list.
Once the water is off, flush the toilet to empty the tank. This gives you a dry, clear workspace inside and lets you see the internal parts without water getting in the way.
If your shutoff valve hasn’t been turned in years, apply a small amount of penetrating oil and wait a few minutes before trying again.
What you need before opening the tank
You don’t need a lot of gear to fix a running toilet. Most repairs require nothing more than your hands and about ten minutes. That said, having these items nearby before you start will save you time:
| Item | What it’s for |
|---|---|
| Adjustable pliers | Tightening or removing the fill valve locknut |
| Old towel or bucket | Catching residual water from the tank |
| Universal flapper kit | Replacing a worn or warped flapper ($10 to $15) |
| White vinegar | Dissolving mineral buildup on the fill valve |
| Dry rag or paper towels | Wiping down parts for a cleaner inspection |
You can pick up a universal flapper at any hardware store without knowing your toilet’s brand. If you want an exact match, check the inside of the tank lid for a model number, which is often stamped directly into the porcelain.
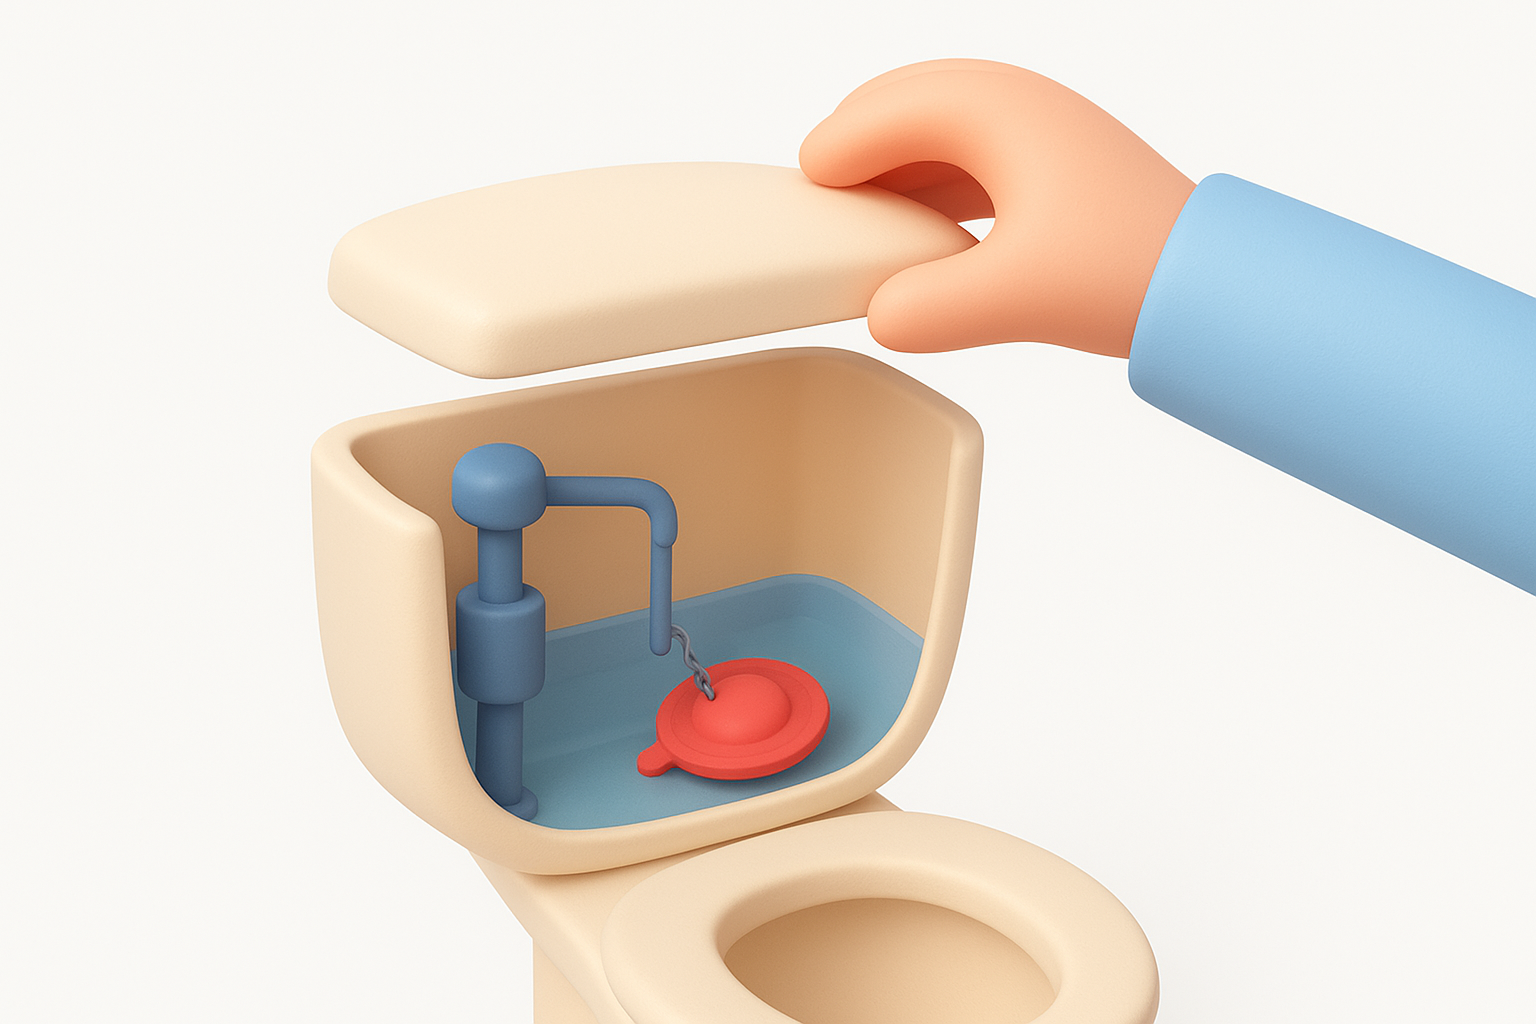
Do a quick visual check before touching anything
Before you pull any parts apart, lift the tank lid carefully and set it somewhere safe. Porcelain lids chip easily, so place it flat on a towel away from the work area. Once the lid is off, look inside before doing anything else. You’re checking three specific things: whether the flapper sits flat against the flush valve seat at the bottom of the tank, whether the chain connecting the flapper to the flush handle has the right amount of slack, and whether the water level is so high that it’s spilling into the overflow tube.
This quick look often tells you exactly what’s wrong before you touch a single part. Many cases of a running toilet come down to a visual issue you can spot in seconds. If water is clearly flowing into the overflow tube, for example, you already know the fill valve or float needs adjustment rather than a flapper swap. Starting with this check saves you from replacing parts that aren’t actually broken.
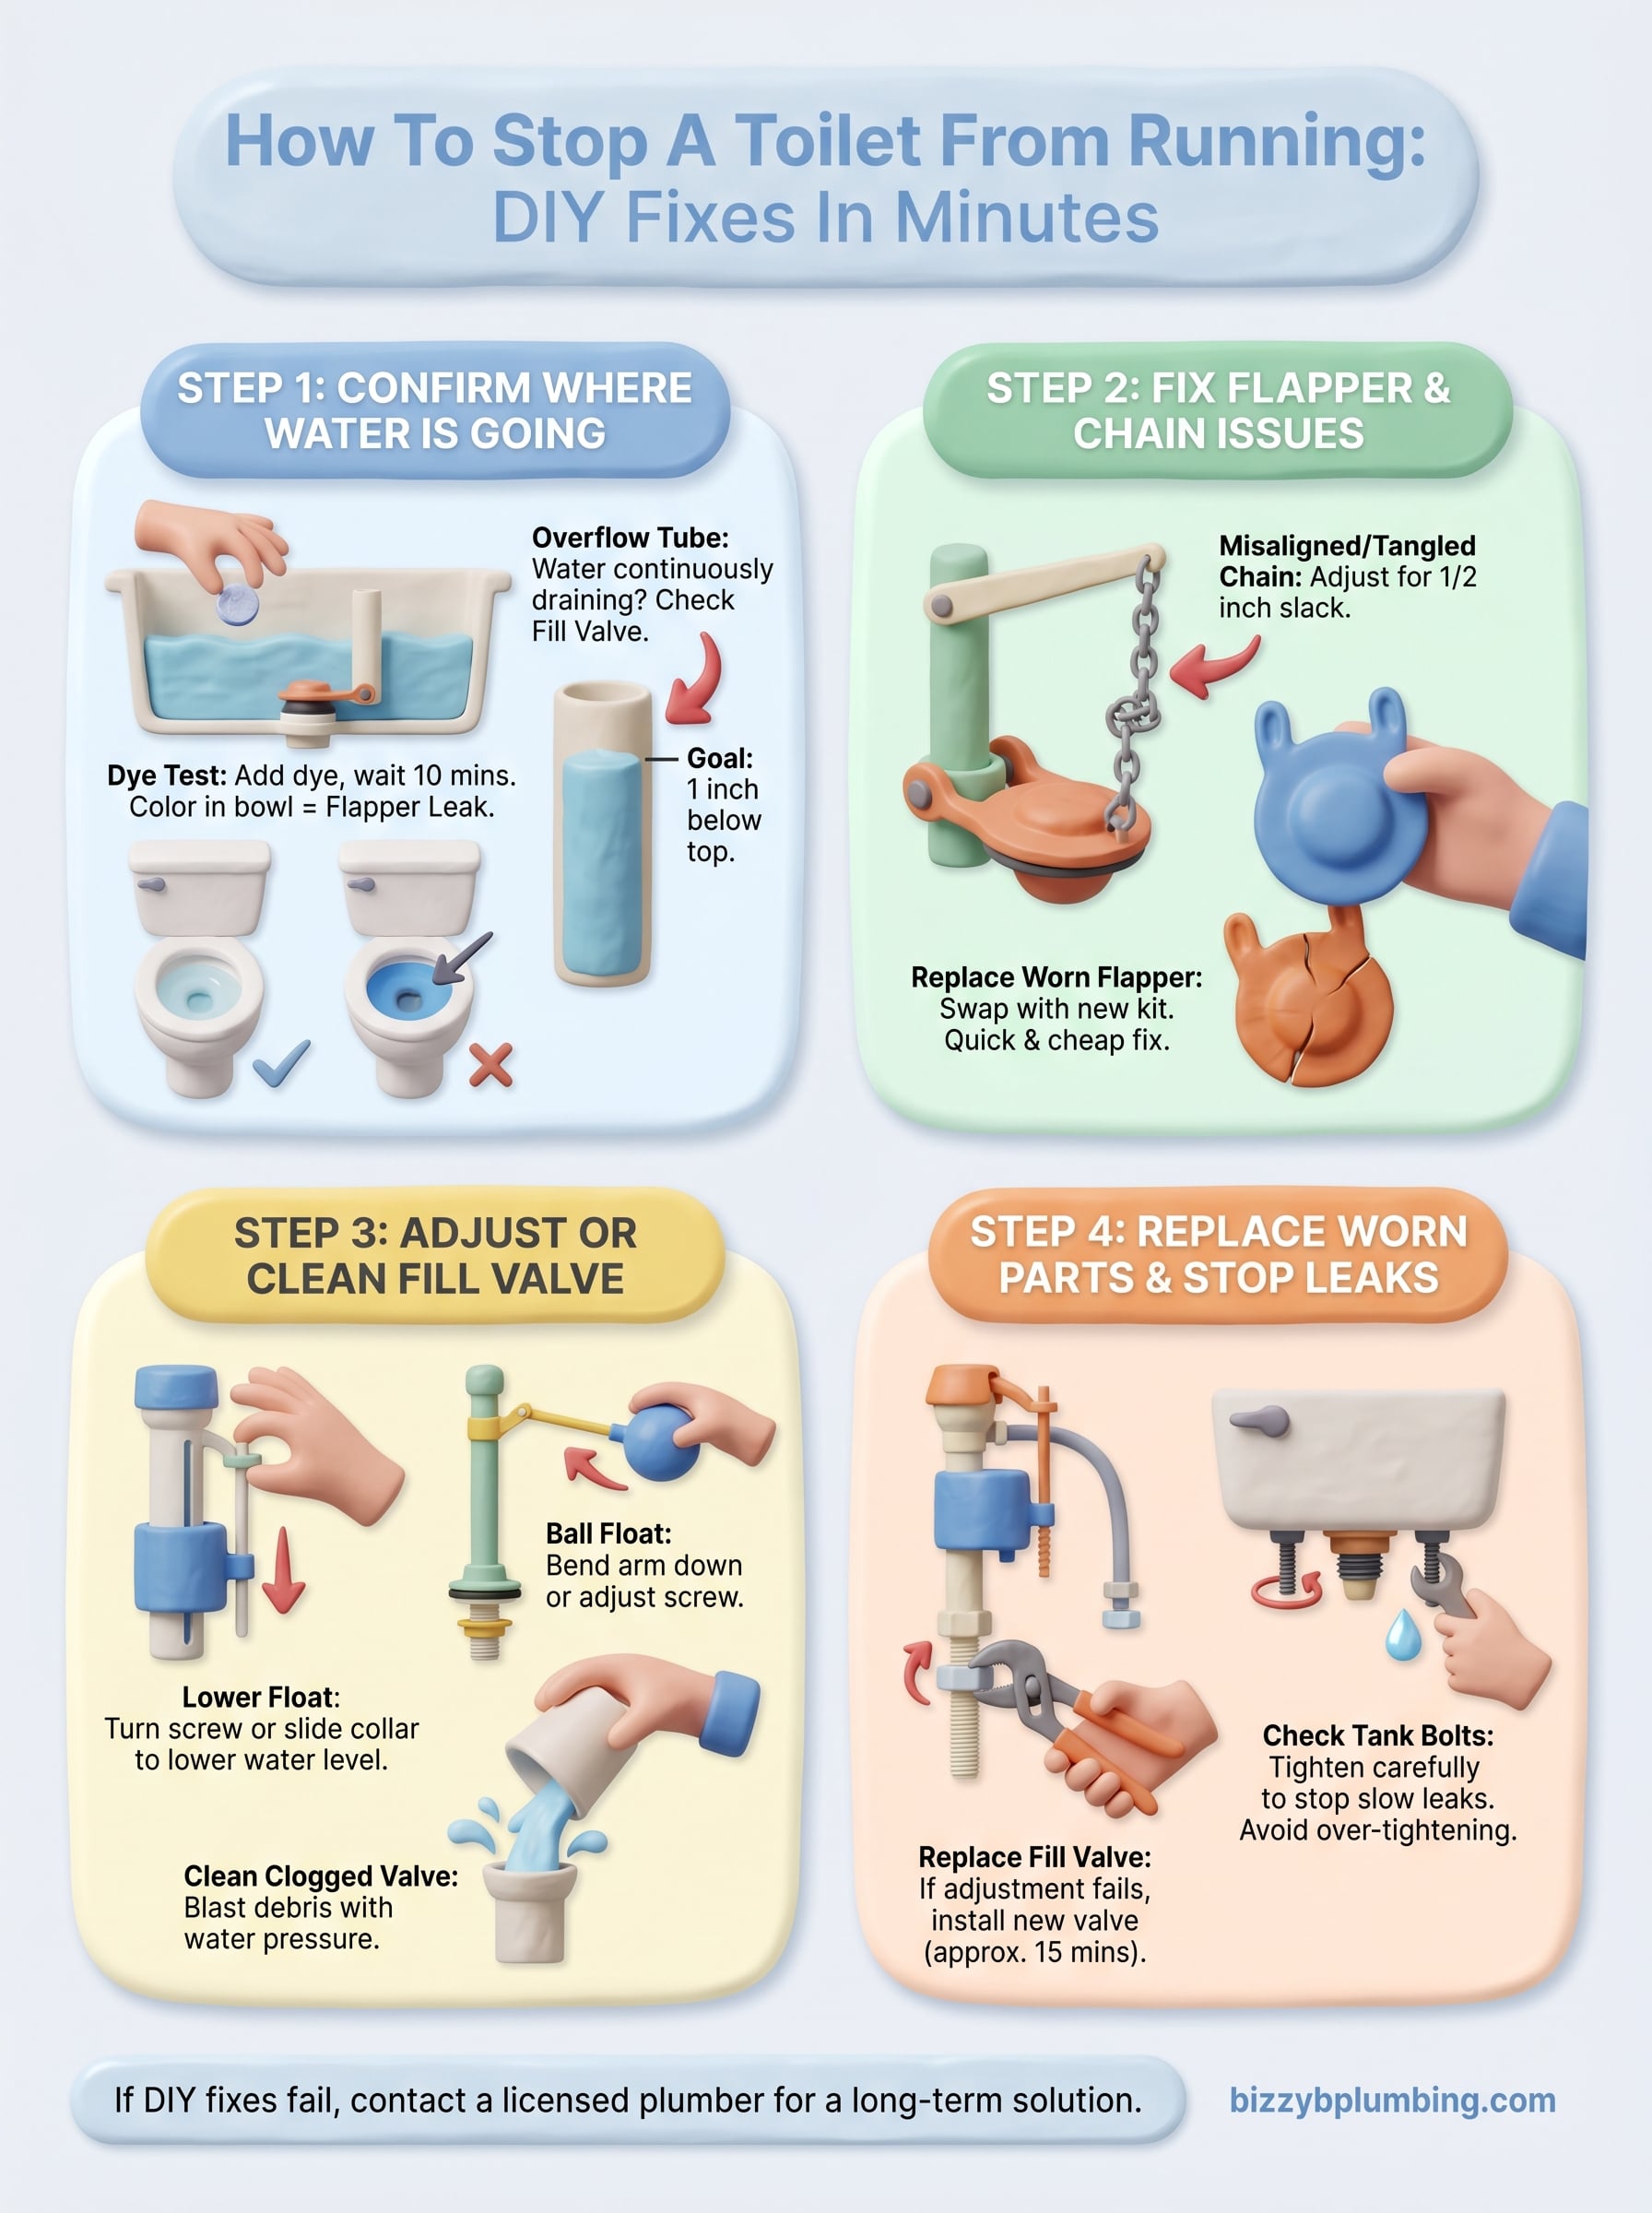
Step 1. Confirm where the water is going
Before you replace anything, you need to know exactly where the water is going. A running toilet has two possible escape routes: it’s either leaking past the flapper into the bowl, or it’s spilling over the top of the overflow tube and draining straight down. Knowing which one you’re dealing with tells you which repair to focus on and keeps you from swapping parts that don’t need swapping.
The dye test: check for a flapper leak
The simplest way to find a flapper leak is to drop food coloring or a dye tablet into the tank. Don’t flush after you add it, and wait about 10 to 15 minutes. Then look into the toilet bowl without flushing. If you see color appear in the bowl water, water is seeping through the flapper seal even when the toilet isn’t in use. This is one of the most common causes behind a running toilet, and it’s also one of the most straightforward to fix.
A dye tablet from a hardware store works better than food coloring because it’s more concentrated and easier to spot in bowl water.
Here’s what your results mean:
- Color in the bowl within 10 minutes: the flapper is leaking and needs adjustment or replacement
- Color appears in under 2 minutes: the flapper is severely worn or warped
- No color in the bowl: the flapper seal is intact and the problem is coming from elsewhere
Check the overflow tube
The overflow tube is the tall plastic pipe standing upright in the center of the tank. Its job is to act as a backup drain if the fill valve ever lets the water rise too high. Watch the water level after the tank refills following a flush. If the water keeps climbing until it spills into the top of the tube, the fill valve or float is set too high and water is draining away continuously.
To check this clearly, look at the water line in relation to the tube. Most tanks have a marked fill line stamped on the inside wall or printed on the tube itself. The water should sit about one inch below the top of the overflow tube. If it doesn’t, knowing how to stop a toilet from running in this case comes down to adjusting the fill valve, which Step 3 covers in full.
Step 2. Fix flapper and chain issues
If the dye test confirmed a flapper leak, this is where you fix it. Start with the chain, because a chain problem is often the actual cause even when the flapper looks fine. The chain connects the flush handle arm to the top of the flapper. When it’s too short, too long, or twisted, it can prevent the flapper from seating correctly against the flush valve.
Fix a misaligned or tangled chain
Reach into the tank and pull the chain free if it’s caught under the flapper or looped around the flush arm. The chain should have about half an inch of slack when the flapper is closed. Too much slack lets the chain slip under the flapper and hold it slightly open. Too little slack means the flapper can never close all the way after a flush.
If the chain keeps getting tangled, clip it to a different hole on the flush arm to give it a straighter path down to the flapper.
You can adjust the chain length by moving the clip to a different link. Most chains have multiple attachment points along the length, so work through a few positions until the flapper drops cleanly and sits flat after every flush. If the chain is corroded, kinked, or missing links, swap it out entirely. A replacement chain costs under two dollars at any hardware store.
Replace a worn flapper
If adjusting the chain doesn’t stop the leak, the flapper itself needs to come out. Flappers wear down over time, especially in areas with hard or chlorinated water. A warped or brittle flapper won’t seal properly no matter how well the chain is adjusted.
Follow these steps to swap the flapper:
- Turn off the water supply and flush to empty the tank.
- Unhook the chain from the top of the flapper.
- Slide the flapper ears off the pegs on either side of the flush valve.
- Take the old flapper to the hardware store to match the size, or pick up a universal flapper kit.
- Snap the new flapper onto the pegs and reattach the chain with half an inch of slack.
- Turn the water back on, let the tank refill, and confirm the flapper seals completely.
Knowing how to stop a toilet from running often comes down to this one part swap. Most flappers cost between five and ten dollars and take less than five minutes to install.
Step 3. Adjust or clean the fill valve
If the dye test came back clean but water is still spilling into the overflow tube, the fill valve is the problem. The fill valve controls how much water enters the tank after every flush, and when the float is set too high or the valve is clogged with mineral buildup, water runs continuously because the tank never registers that it’s full. This step covers both fixes.
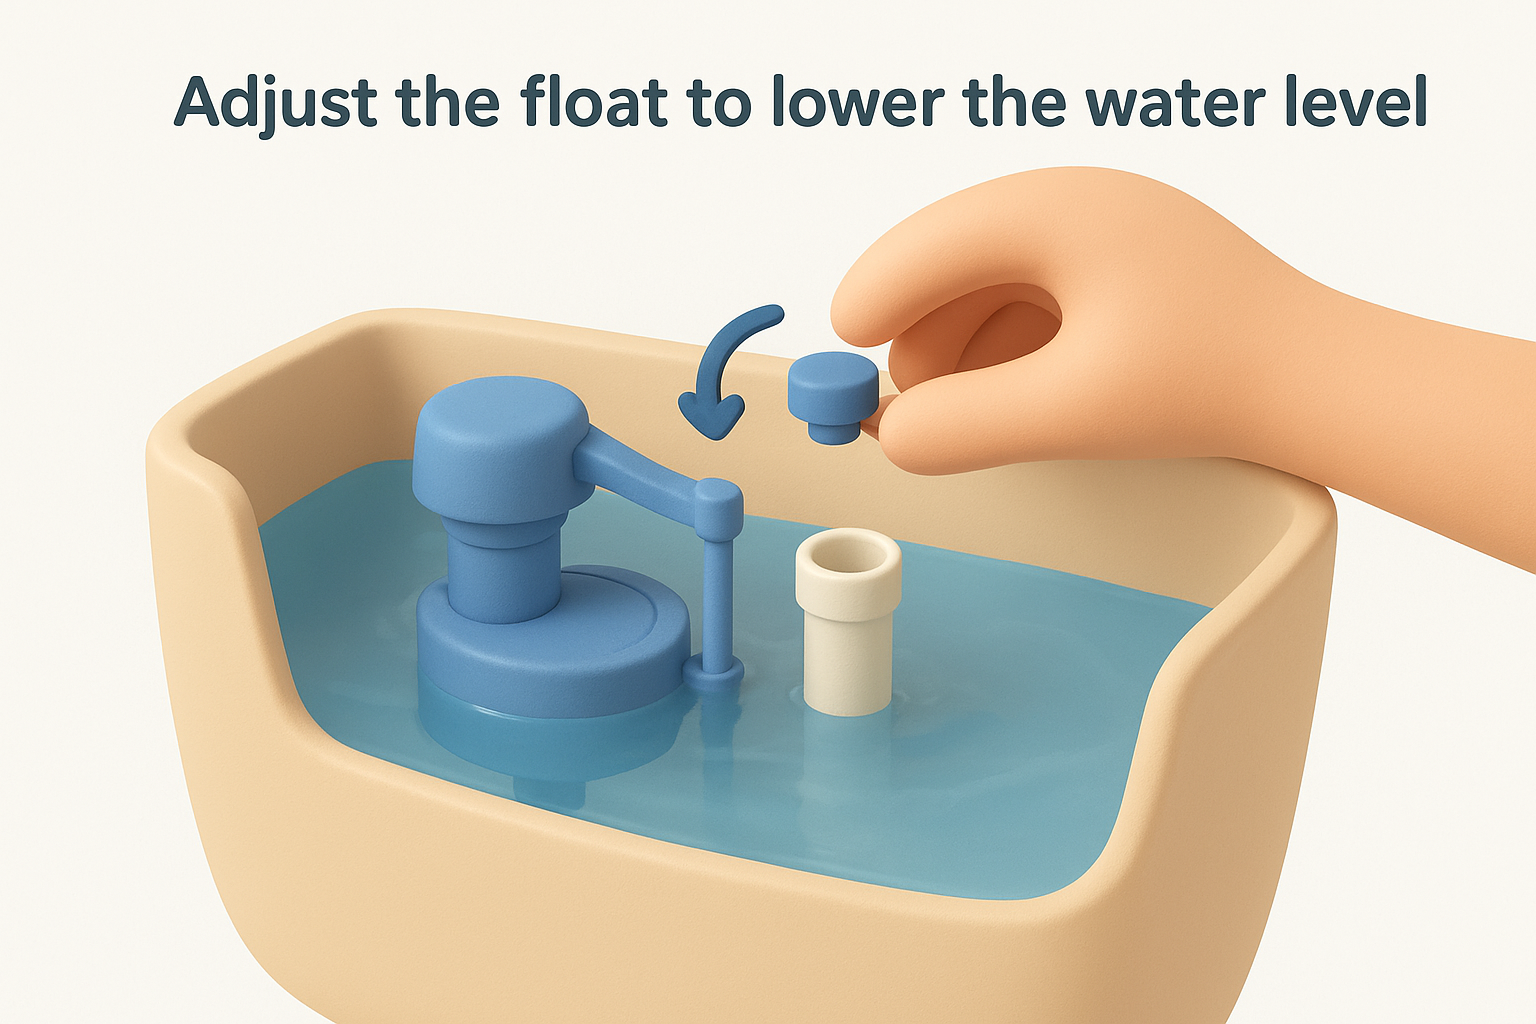
Adjust the float to lower the water level
The float tells the fill valve when to shut off. Most modern toilets use a cylinder-style fill valve with a float that slides up and down the valve body. Older toilets use a ball float attached to a horizontal arm. Either way, your goal is to lower the float so the water stops about one inch below the top of the overflow tube.
If you’re not sure which type of fill valve you have, look for a large plastic tower running vertically on the left side of the tank. That’s the modern cylinder style.
For a cylinder fill valve:
- Locate the adjustment screw or clip on top of the fill valve.
- Turn the screw counterclockwise, or pinch and slide the float collar downward, to lower the shutoff point.
- Flush the toilet and watch where the water level settles. Keep adjusting until the water sits one inch below the overflow tube opening.
For a ball float fill valve:
- Find the adjustment screw at the base of the float arm, or bend the arm itself gently downward.
- Flush and confirm the float ball stops the valve before water reaches the top of the overflow tube.
Clean a clogged fill valve
Mineral deposits from hard water can clog the fill valve seat and prevent it from closing fully. To clean it, turn off the water supply and flush to empty the tank. Then hold a cup upside down over the open top of the fill valve, turn the water back on briefly, and let the pressure blast debris loose from the inside out. This works on most cylinder-style valves without any disassembly. Run water through the valve two or three times, then restore normal operation and watch the tank refill. If the valve still won’t shut off cleanly after cleaning, knowing how to stop a toilet from running at that point means replacing the fill valve entirely, which Step 4 covers next.
Step 4. Replace worn parts and stop leaks
When cleaning and adjusting don’t fix the problem, the parts themselves are worn out. A fill valve that won’t hold its adjustment or a flush valve with a damaged seat needs to be replaced, not repaired. This step covers how to swap a fill valve and how to check for slow leaks around tank hardware that can keep water running without an obvious cause.
Replace the fill valve
A new fill valve costs between ten and twenty dollars and installs in about fifteen minutes. Universal fill valves fit most standard toilets and come with clear instructions, but the process is straightforward regardless of the brand you choose.
Turn the water off completely and flush twice before starting this repair to get as much water out of the tank as possible.
Follow these steps to swap the fill valve:
- Turn off the water supply valve and flush to drain the tank.
- Disconnect the supply line from the bottom of the fill valve by turning the coupling nut counterclockwise.
- Reach inside the tank and hold the fill valve body steady while you unscrew the locknut beneath the tank with adjustable pliers.
- Lift the old fill valve straight up and out of the tank.
- Set the height of the new valve so the critical level mark sits at least one inch above the overflow tube opening.
- Insert the new valve, hand-tighten the locknut from below, and reconnect the supply line.
- Turn the water back on, let the tank refill, then adjust the float position until the water stops one inch below the top of the overflow tube.
Check tank bolts and the flush valve seat
Water that escapes slowly through loose tank bolts can mimic a running toilet and is easy to overlook. Reach under the tank and feel each bolt nut. If any nut turns without resistance or you notice moisture around it, tighten it a quarter turn at a time until it feels snug. Avoid overtightening, since porcelain cracks under too much force.
Knowing how to stop a toilet from running sometimes means checking the flush valve seat, which is the ring the flapper presses against to seal the tank. Run your finger around the seat. If you feel nicks, cracks, or rough mineral buildup that won’t scrub away, the entire flush valve assembly needs replacement, which is a larger repair that requires draining the tank completely and disconnecting the supply line before you can access the hardware.
If the toilet still runs
You’ve worked through every step and the hissing hasn’t stopped. At that point, the problem usually points to a cracked flush valve, a hairline fracture in the tank, or a combination of worn-out parts that no amount of adjusting will fix. Knowing how to stop a toilet from running gets harder when the issue sits deeper in the tank’s structure rather than in a single replaceable component.
Some repairs are simply faster and more cost-effective with a licensed plumber handling them. Bizzy B Plumbing serves homeowners across Knoxville, Knox County, Alcoa, and Maryville with same-day service and upfront pricing so you know exactly what you’re paying before any work starts. There’s no pressure, just a straight answer about what your toilet needs. If the DIY fixes didn’t solve it, contact Bizzy B Plumbing and we’ll get it sorted the same day.