You step into the shower, and within a minute, you’re standing in ankle-deep water. Sound familiar? A clogged bathtub drain is one of the most common plumbing problems homeowners deal with, and in most cases, you can fix it yourself before it turns into something bigger. Knowing how to unclog a bathtub drain saves you time, money, and the frustration of watching water slowly spiral around your feet. The good news: you probably already have what you need to get it done.
Hair, soap scum, and mineral buildup are usually the culprits. These materials collect over weeks and months until water barely drains at all. The fix can be as simple as pulling out a clump of hair or using a baking soda and vinegar combination you’d find in any kitchen. For tougher blockages, basic tools like a plunger or a drain snake do the job without calling in reinforcements. Most clogs don’t require professional equipment, just the right approach.
At Bizzy B Plumbing, we handle drain clogs across Knoxville, Maryville, Alcoa, and the surrounding East Tennessee area every day. We know which problems you can tackle on your own and which ones need a pro. This guide walks you through practical, step-by-step methods to clear your bathtub drain, from the simplest fixes to more stubborn blockages, so you can get the water flowing again as quickly as possible.
What usually clogs a tub drain and what to avoid
Understanding what causes bathtub drain clogs puts you ahead of the problem before you start any repair. Most tub drain blockages come from a small number of predictable sources, and once you recognize them, you can fix the current clog and prevent the next one. Before you learn how to unclog a bathtub drain, it helps to know what you’re actually dealing with inside the pipe.
The most common clog sources
Hair is the top culprit in almost every bathtub clog. A single shower can send dozens of loose hairs down the drain, and over days and weeks, those strands wrap around the drain stopper and catch everything else that follows. Soap scum is the second major factor. Bar soap contains fats and oils that stick to pipe walls and act like glue, trapping hair, dead skin, and grit into a dense blockage. In areas with hard water, mineral deposits compound the problem, building up on pipe walls and narrowing the flow over time.
Here’s a quick look at the most common culprits:
| Clog Source | Why It Builds Up | Where It Collects |
|---|---|---|
| Hair | Sheds during washing, wraps around stopper | Just below the drain cover |
| Soap scum | Fat and oil in bar soap stick to pipe surfaces | Pipe walls and stopper |
| Mineral deposits | Hard water leaves calcium and magnesium residue | Pipe walls and drain fittings |
| Skin cells and debris | Fine particles clump with soap and hair | Throughout the drain pipe |
What to avoid putting down the drain
Some clogs happen not because of everyday use, but because of items that should never enter the drain in the first place. Shaving cream, thick hair products, and grooming residue all add to the buildup inside your pipes. Cotton swabs, small bottle caps, and razor blade covers have a habit of slipping into the drain during busy bathroom routines, and these solid items can anchor a clog that would otherwise flush through on its own.
Once a solid object lodges in the drain, it becomes a collection point for every strand of hair and glob of soap that follows.
Why chemical drain cleaners are a bad idea
Reaching for a bottle of chemical drain cleaner feels like a quick fix, but these products carry real risks that most people don’t consider upfront. Chemical cleaners rely on sodium hydroxide or sulfuric acid to dissolve organic material, and while they can cut through a soft clog, they also damage older metal pipes, corrode rubber gaskets, and weaken PVC fittings over time. Repeated use accelerates pipe deterioration and can turn a simple clog into a much more expensive repair.
Chemical cleaners also create a hazardous situation if the product fails to clear the clog. You’re left with a pool of caustic liquid standing in your tub, which is dangerous to skin and eyes and complicates any follow-up repair work, whether you’re handling it yourself or a plumber is stepping in. The methods in this guide skip the chemicals entirely and focus on approaches that are safer for your pipes and your household.
Tools and prep before you start
Gathering the right tools before you begin saves you from making multiple trips back and forth mid-job. Most of what you need is already in your home, and the few items that aren’t cost very little at any hardware store. Having everything within arm’s reach also keeps the process cleaner and faster, which matters when you’re dealing with standing water or a slippery tub.
What to gather before you begin
You don’t need a professional toolkit to learn how to unclog a bathtub drain. A few basic items cover the majority of clog situations, from surface-level hair buildup all the way to deeper blockages that need mechanical help. Pulling everything together before you start means you won’t be touching grimy handles or faucets with soapy gloves on.
Here’s what to have on hand:
| Tool or Supply | Purpose |
|---|---|
| Rubber gloves | Protect your hands from grime and bacteria |
| Old towels or rags | Absorb water and contain debris around the drain |
| Needle-nose pliers or hair removal tool | Grab hair clumps below the stopper |
| Cup plunger (flat-bottomed) | Create suction in the tub; works better than a flange plunger here |
| Baking soda and white vinegar | Chemical-free flush for soap and mineral buildup |
| Kettle or pot of hot water | Tap water often isn’t hot enough to break up soap scum |
| Hand-crank drain snake | Clears deeper blockages when plunging doesn’t work |
| Flathead or Phillips screwdriver | Needed to remove certain stopper styles |
How to prep the work area
Before you touch the drain, remove all bottles, soap dishes, and accessories from the tub so you have clear access to both the drain and the overflow plate near the top of the tub wall. Set your towels on the floor just outside the tub to catch any water that sloshes out during plunging.
Keeping the area clear from the start means you spend less time managing mess and more time fixing the problem.
Check the water level in the tub before you do anything else. If you have several inches of standing water, bail most of it out using a cup or small bucket. Excess water reduces the suction you can generate with a plunger and makes every other step harder to control.
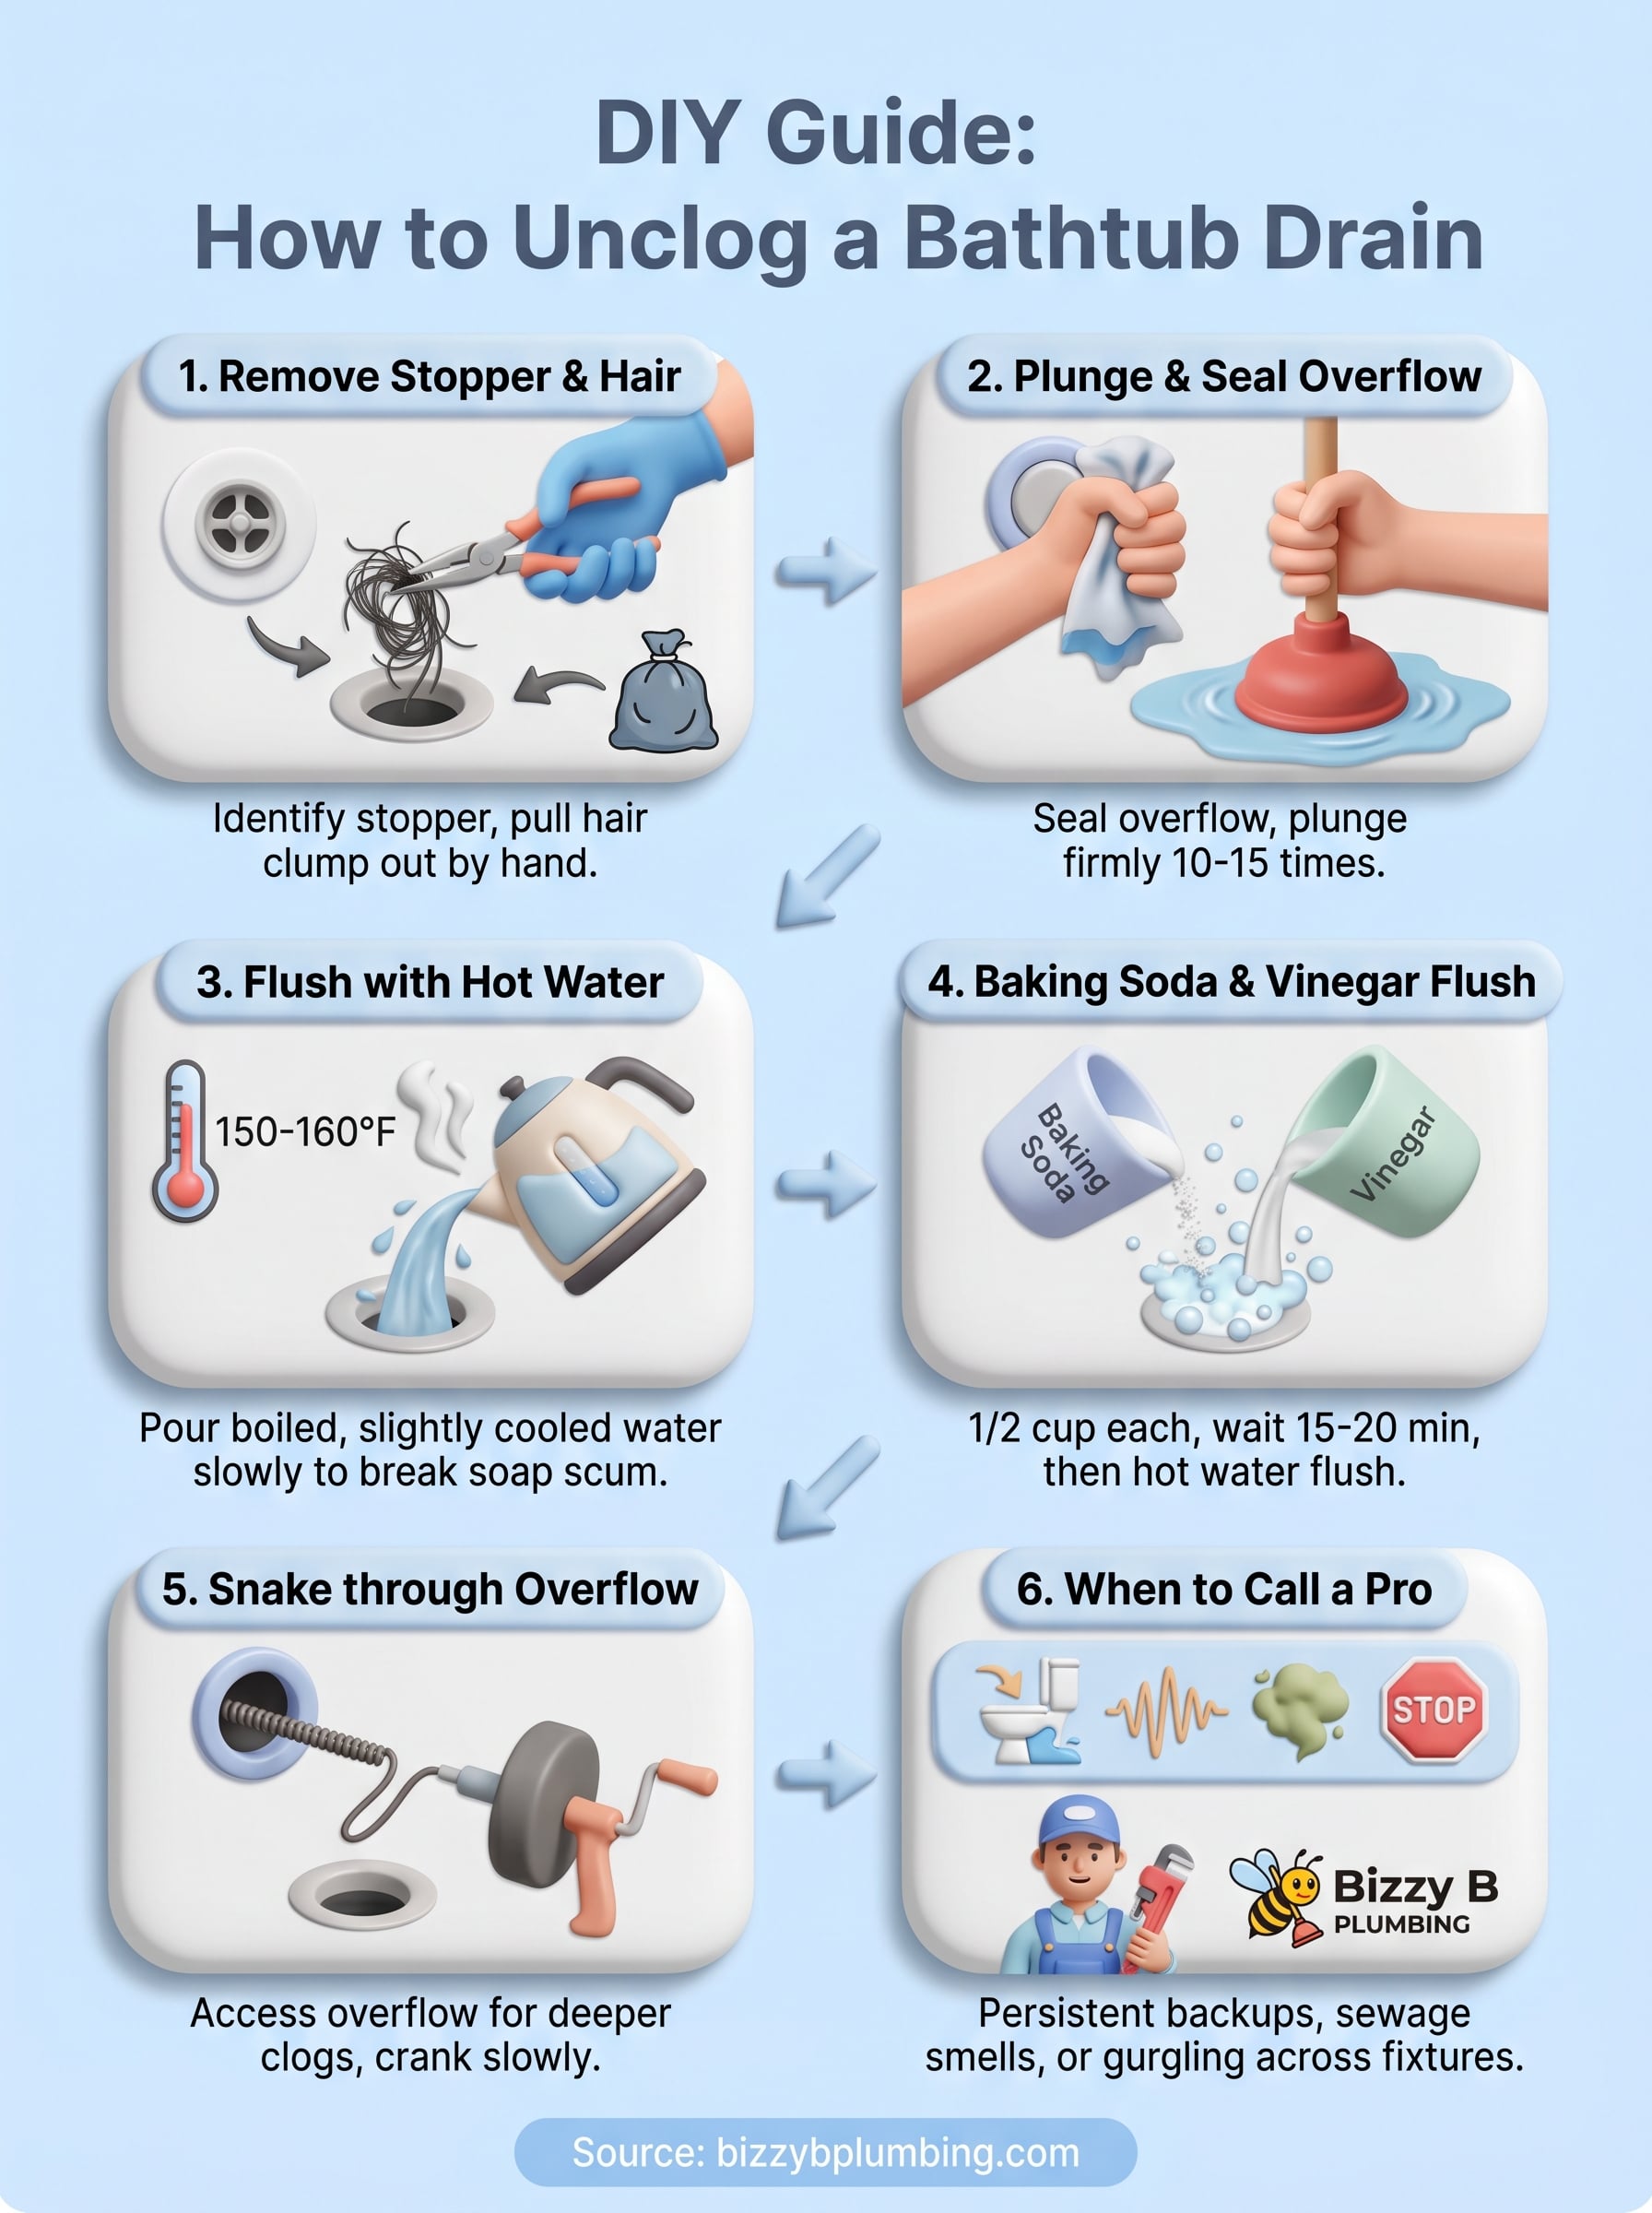
Step 1. Remove the stopper and pull out hair
The first step in learning how to unclog a bathtub drain is getting the stopper out of the way. Hair clogs almost always collect just below the stopper, which means removing it gives you direct access to the blockage. In most cases, this single step resolves the entire clog before you ever reach for a plunger or a snake.
Identify your stopper type first
Bathtub stoppers come in several different styles, and each type requires a slightly different removal method. Pulling on the wrong style without knowing how it attaches can strip threads or crack the fittings underneath, so take ten seconds to identify what you’re working with before you start.
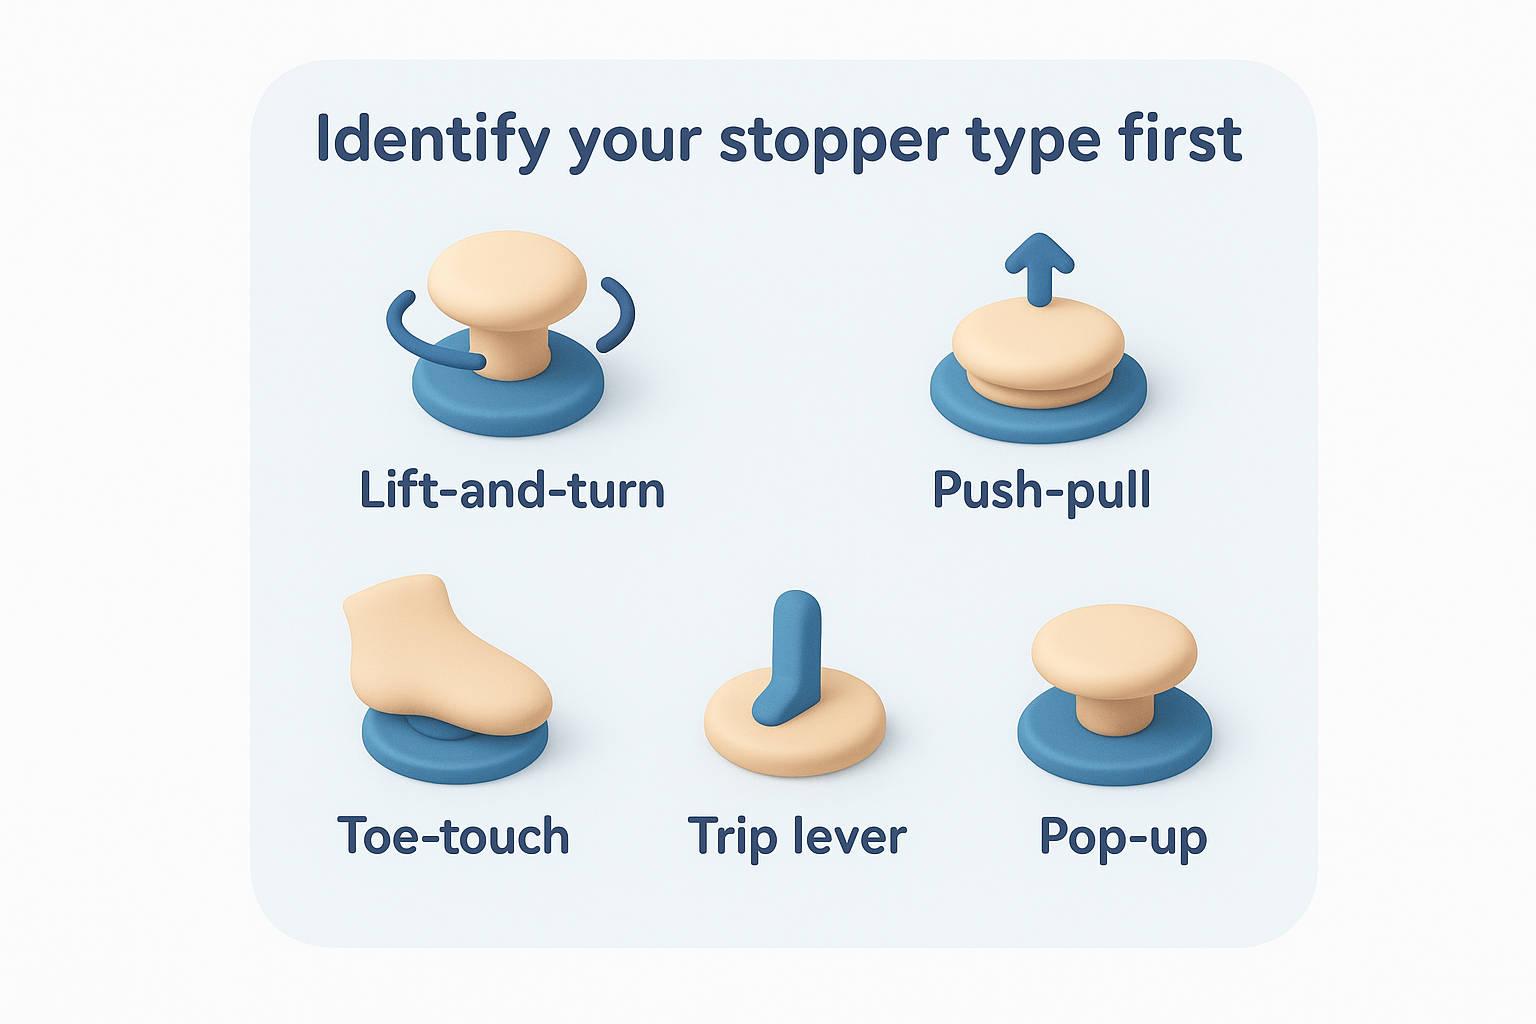
Here are the most common stopper types and how to remove them:
| Stopper Type | How to Identify | How to Remove |
|---|---|---|
| Lift-and-turn | Knob on top; twist to open or close | Unscrew the knob counterclockwise, then lift out |
| Push-pull | Pops up and down when you push it | Pull up firmly while twisting counterclockwise |
| Toe-touch | Press with your toe to open or close | Press open, then unscrew the center cap |
| Trip lever | No visible stopper; lever on overflow plate | Remove the overflow plate screws and pull out the full assembly |
| Pop-up | Rocker arm visible at the back of the drain | Lift and pull while wiggling side to side |
Pull the hair out by hand
Once the stopper is out, put your gloves on and shine a flashlight directly into the drain. You will almost always see a matted clump of hair wrapped around the drain crossbars or the stopper post.
Pulling hair out by hand rather than pushing it down keeps the clog from compacting deeper into the pipe.
Use needle-nose pliers or a plastic drain hair tool to grip the clump and pull it straight up with a slow, steady motion. Rotate the tool slightly as you pull to unwind strands that are wrapped tight. Drop everything directly into a trash bag rather than setting it on the tub surface.
Step 2. Plunge the drain and seal the overflow
After clearing the stopper and any surface hair, plunging is your next move for breaking up deeper buildup that pulling alone won’t reach. The key to getting real suction when you’re learning how to unclog a bathtub drain is covering the overflow plate, that small opening near the top of the tub wall. Most people skip this step entirely, which is why their plunger barely moves anything.
Why sealing the overflow matters
Your bathtub has an overflow drain built into the wall of the tub, typically about eight inches below the rim. When you push down with a plunger, air and water find the path of least resistance. Without a seal over the overflow, the pressure you generate escapes upward through that opening instead of pushing forward through the clog. The result is a plunger that bobs in place without doing much useful work.
Sealing the overflow plate is the single step that turns a weak, ineffective plunge into one that actually drives pressure into the blockage.
How to plunge correctly
Press a wet cloth or old rag firmly over the overflow plate to create a tight seal. Hold it in place with one hand, or have someone else hold it while you plunge. Add a few inches of water to the tub if there isn’t enough to cover the plunger cup, since water transmits pressure far better than air alone.
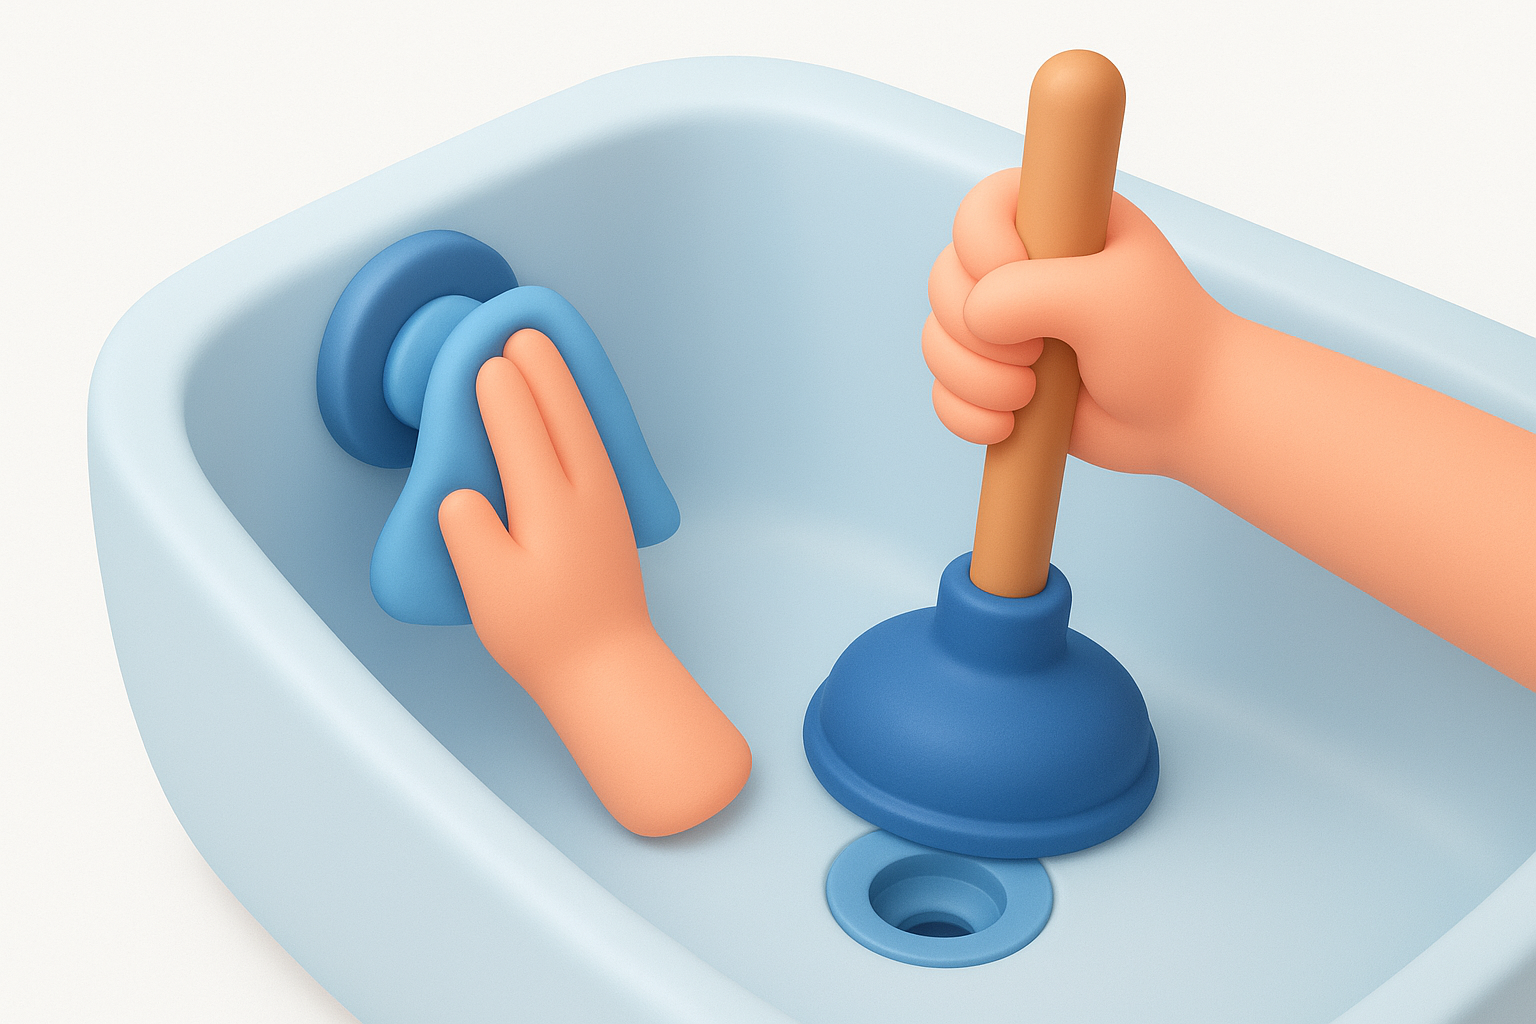
Use a flat-bottomed cup plunger rather than a flange plunger. Position the cup directly over the drain and press down firmly to seat it flat against the tub floor. Then follow this sequence:
- Push down slowly to compress the cup and force water toward the clog.
- Pull up sharply to create reverse suction.
- Repeat this push-pull motion 10 to 15 times in a steady rhythm.
- Lift the plunger on the final pull and check if water drains freely.
If the water drains, run the faucet for 30 seconds to confirm the blockage is fully clear. If it still pools, repeat the full sequence two more times before moving to the next step.
Step 3. Flush with hot water the safe way
A good flush with hot water after plunging breaks apart remaining soap scum and pushes loose debris further down the line. This step works best as a follow-up to pulling out hair and plunging, not as a standalone fix for a fully blocked drain. When you understand how to unclog a bathtub drain properly, you treat hot water as a finishing tool, not a first move.
Why water temperature matters
Many people turn on the hot tap and assume that’s sufficient, but standard tap hot water sits around 120°F, which is warm but not hot enough to dissolve compacted soap fat on its own. Boiling water, on the other hand, can crack porcelain tub surfaces and damage PVC pipe joints if poured in too quickly. The sweet spot is water that has just come off a boil and cooled for about two minutes, bringing it down to roughly 150 to 160°F.
Water that is too cool won’t move soap buildup, and water that is too hot can damage your pipes and tub finish.
Here’s a quick reference for temperature and approach:
| Water Temperature | Effect on Pipes | Best Use |
|---|---|---|
| 120°F (hot tap) | Safe for all pipes | Light maintenance flush |
| 150-160°F (boiled, rested 2 min) | Safe for most pipes | Breaking up soap scum after plunging |
| 212°F (full boil) | Risk of cracking porcelain and PVC joints | Avoid in bathtubs |
How to flush correctly
Fill a kettle or medium pot with water and bring it to a full boil, then set a timer for two minutes before you pour. Carry it carefully to the tub and pour the water directly into the drain opening in a slow, steady stream rather than dumping it all at once. A slow pour keeps the heat concentrated on the buildup instead of spreading across the tub floor.
Repeat the flush two to three times, waiting about 30 seconds between each pour to let the water work through the pipe. Run the faucet afterward to confirm the water drains freely before moving to the next step.
Step 4. Use baking soda and vinegar for buildup
If hot water alone didn’t fully clear the drain, a baking soda and vinegar flush is your next move. This combination tackles soap scum and mineral buildup on pipe walls without introducing any harsh chemicals into your plumbing. It works well as a follow-up to plunging and fits naturally into a complete approach to how to unclog a bathtub drain without reaching for a bottle of chemical cleaner.
How the reaction works
Baking soda is a mild base, and white vinegar is a weak acid. When you pour them into the drain together, they react and produce carbon dioxide gas, which creates a fizzing action inside the pipe. That fizz loosens soap deposits and organic buildup clinging to pipe walls, making it easier for a water flush to carry everything downstream. The reaction isn’t strong enough to clear a hard blockage on its own, but it works well for the residual film left behind after you’ve already pulled out hair and plunged.
This method works best as a follow-up step rather than a first response to a fully blocked drain.
How to apply it correctly
Start with a dry or mostly dry drain so the baking soda doesn’t immediately dissolve before it reaches the buildup. Pour the ingredients in the correct order and give the reaction time to work before you flush.
Follow these steps in order:
- Pour 1/2 cup of baking soda directly into the drain opening.
- Follow immediately with 1/2 cup of white vinegar.
- Cover the drain with the stopper or a damp cloth to contain the fizzing action inside the pipe rather than letting it escape upward.
- Wait 15 to 20 minutes while the reaction works on the buildup.
- Remove the cover and pour a full kettle of hot water (cooled slightly from boiling) directly into the drain to flush everything clear.
- Run the faucet for 30 seconds to confirm the drain is moving freely.
Step 5. Snake the drain through the overflow
When plunging and the baking soda flush haven’t fully cleared the blockage, a hand-crank drain snake is your next tool. This step targets deeper obstructions sitting further down the pipe, past the point where suction and water pressure can reach. Threading the snake through the overflow plate rather than the drain opening gives you a cleaner path and lets you work around the internal trip lever assembly without jamming the cable.
Access the overflow plate first
Remove the screws on the overflow plate using a flathead or Phillips screwdriver and pull the plate away from the wall. You’ll see a metal assembly behind it connected to the stopper mechanism. Pull that assembly out gently and set it aside so it doesn’t interfere with the snake cable as you feed it in. This opening gives you a direct route into the main drain line, which is exactly where stubborn clogs hide when standard methods for how to unclog a bathtub drain fall short.
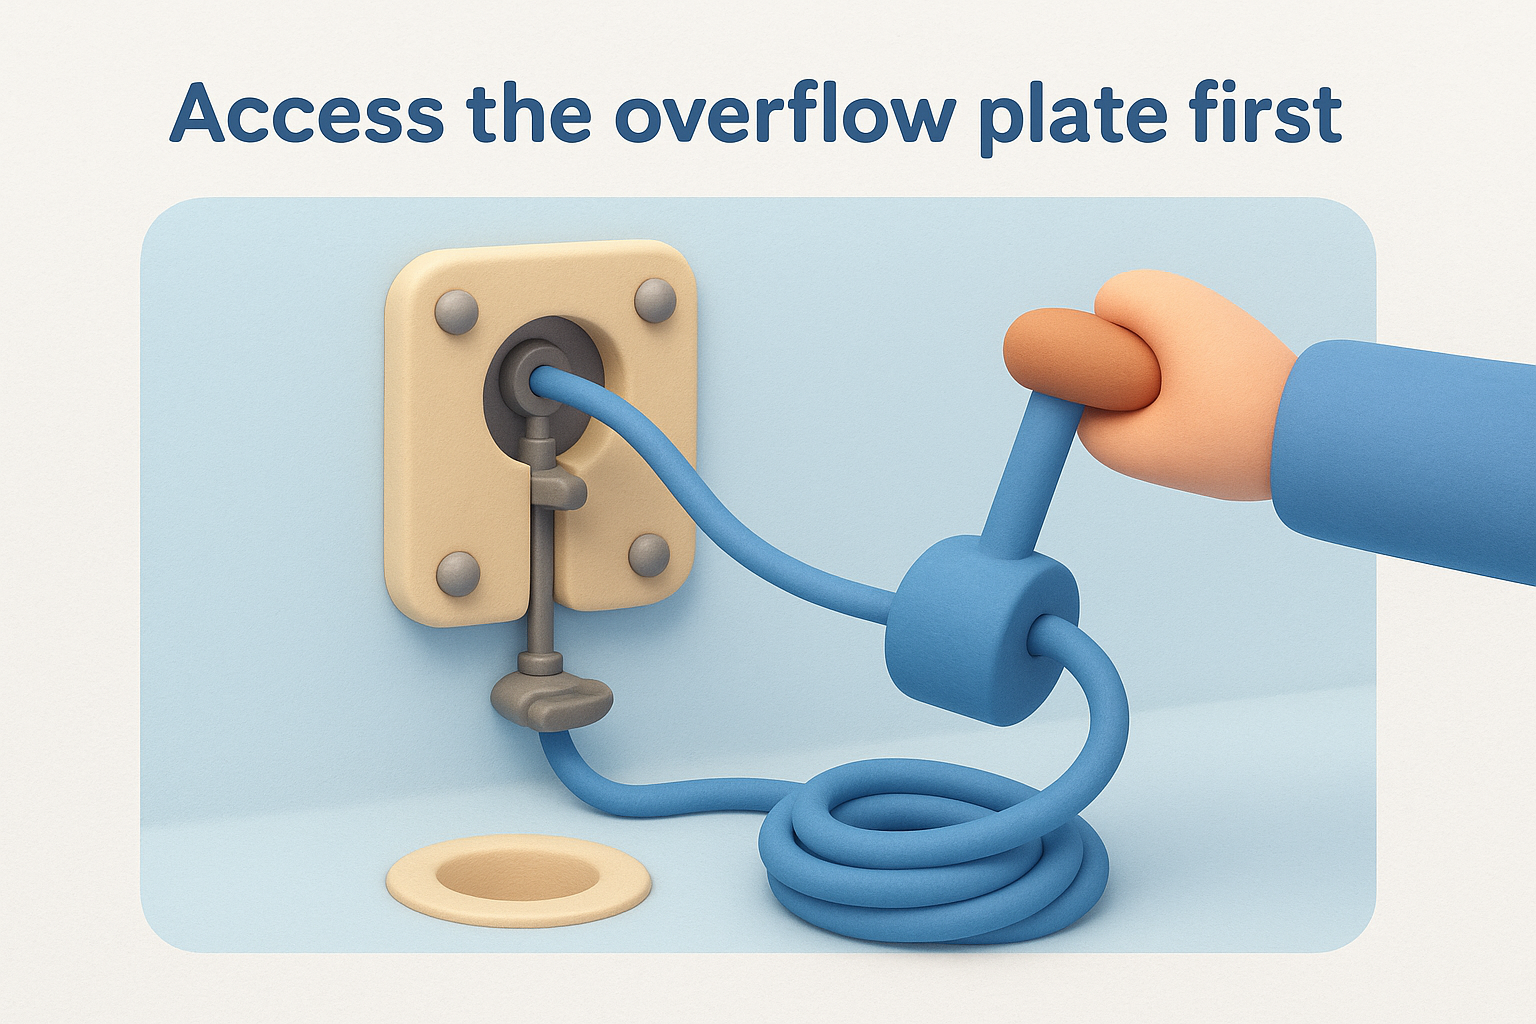
The overflow opening is a wider, straighter entry point than the drain itself, which makes it significantly easier to guide the snake without bending or kinking the cable.
Work the snake through the pipe
Feed the cable slowly and maintain firm control throughout. Moving too fast causes the cable to bunch up inside the pipe rather than advancing toward the clog.
Follow these steps in order:
- Insert the snake cable 6 to 8 inches into the overflow opening before engaging the crank.
- Turn the handle clockwise while pushing forward to help the cable navigate bends in the pipe.
- When you feel resistance, slow down and crank steadily rather than forcing the cable through.
- Once you reach the blockage, rotate the cable to hook or break apart the clog.
- Pull the cable back slowly, winding it onto the drum as you retract it.
- Run hot water for 30 to 45 seconds to flush loosened debris down the line.
Reattach the overflow plate assembly after you confirm the drain is moving freely.
Step 6. Know when to stop and call a plumber
DIY drain cleaning has real limits, and recognizing those limits is just as important as knowing how to unclog a bathtub drain in the first place. Continuing to force a snake or plunger after you’ve exhausted your options can damage your pipes and turn a minor clog into a repair that costs several times more than a single service call. Working through all five previous steps is reasonable. Going further without the right equipment and training is where the risk starts to outweigh the effort.
Signs the clog is beyond DIY
Some warning signs tell you clearly that the blockage is deeper or more serious than hair and soap scum near the drain opening. If you’ve completed every step in this guide and still have standing water or sluggish drainage, the problem is either far down the line or involves a material your tools can’t break apart or hook effectively.
Slow drainage across multiple fixtures at the same time points to a problem in the main sewer line, not the bathtub drain alone.
Watch for these specific red flags before continuing:
- Water backs up into the toilet or sink when you run the tub faucet
- A gurgling sound comes from other drains while the tub is draining
- The drain stays fully blocked after two complete passes with the snake
- A persistent sewage smell rises from the drain that doesn’t clear after flushing with hot water
- You feel solid resistance in the pipe that the cable won’t penetrate or hook after careful maneuvering
What pushing too hard can cost you
Forcing the snake cable past firm resistance risks puncturing or disconnecting a pipe joint inside the wall, which adds water damage to your original problem. Older cast iron and corroded galvanized pipes are especially vulnerable to mechanical stress from a hand-crank snake pushed beyond its effective range. Stopping before you cause a secondary issue is the less expensive and more practical decision in almost every scenario.
A licensed plumber can use a camera inspection to pinpoint the exact location and cause of the blockage and clear it without guesswork or collateral damage to your pipe system.
Get back to a fast drain
A slow or standing bathtub drain doesn’t have to become a full plumbing emergency. Working through each step in this guide gives you a clear, practical path for how to unclog a bathtub drain without chemical cleaners or professional tools in most situations. Start with the stopper and hair removal, move through plunging and flushing, and reach for the snake only when the simpler methods fall short. Adding a basic drain cover to catch hair going forward is the easiest way to prevent the same clog from returning.
Knowing when to stop is just as valuable as knowing which steps to try. Persistent blockages, sewage smells, or backups across multiple fixtures are your signal to call a professional. If you’ve worked through every step and the drain still isn’t moving, Bizzy B Plumbing serves Knoxville, Maryville, Alcoa, and the surrounding East Tennessee area with same-day service and upfront pricing so you get a working drain fast.


